> ## Documentation Index
> Fetch the complete documentation index at: https://docs.sonderplan.com/llms.txt
> Use this file to discover all available pages before exploring further.
# SAML Single Sign-On (SSO)
> Verwalten Sie die Integration von SAML Single Sign-On (SSO) für sicheren und nahtlosen Benutzerzugriff.
## Was ist SAML?
Security Assertion Markup Language (SAML, ausgesprochen SAM-el) ist ein offener Standard zum Austausch von Authentifizierungs- und Autorisierungsdaten zwischen Parteien, insbesondere zwischen einem Identitätsanbieter und einem Dienstanbieter.
In nicht-fachsprachlicher Sprache ermöglicht SAML SSO (Single Sign-On) Ihren Benutzern, sich bei Sonderplan (dem Dienstanbieter) mit Identitätsanbietern von Drittanbietern wie Google Workspace, Okta, Azure Active Directory und Onelogin anzumelden.
SAML SSO steht allen unseren Kunden zur Verfügung, und wir empfehlen, es zu implementieren, um die Sicherheitslage Ihres Unternehmens zu stärken.
SAML reduziert die Reibung und ermöglicht es Ihren Benutzern, auf Sonderplan mit ihrem bestehenden unternehmensgesteuerten Benutzerkonto zuzugreifen.
Die Implementierung von SAML bringt auch Vorteile für die IT-Administratoren Ihres Unternehmens mit sich, da der Verwaltungsaufwand reduziert und die Sicherheit durch die Zentralisierung von Benutzerkonten verbessert wird. SAML ist nicht nur für große Unternehmen gedacht, sondern wird für jedes Unternehmen empfohlen, das bereits ein zentrales Benutzerverzeichnis wie Google Workspace betreibt.
## Aktivierung von SAML SSO
Um SAML SSO zu aktivieren, gehen Sie zu **Admin -> Systemeinstellungen**, klicken Sie auf das **SAML Sign On (SSO) Einstellungen**-Accordion und ändern Sie dann die Option **Enable SAML SSO** auf **Aktiviert**.
### Details des Identitätsanbieters
Diese Einstellungen werden von Ihrem Identitätsanbieter bereitgestellt, z. B. Google Workspace, Microsoft Azure Active Directory usw. Kopieren Sie diese bitte in die entsprechenden Felder und beachten Sie die Anleitungen weiter unten, wie Sie SAML in Ihrem Identitätsanbieter konfigurieren können.
#### Name des Identitätsanbieters
Dieses Feld wird auf der SSO-Anmeldeschaltfläche auf dem Anmeldebildschirm angezeigt.
#### IDP-Entity-ID / Issuer-URL
Identitätsanbieter-Issuer-Entity-ID, oft eine URL, z. B. [http://okta.com/Eksj7Hhsk24klljsd](http://okta.com/Eksj7Hhsk24klljsd)
#### IDP-Login-URL / SSO-Endpunkt
Die URL, die Sonderplan aufruft, um eine Benutzeranmeldung vom Identitätsanbieter anzufordern.
#### IDP-Logout-URL / SLO-Endpunkt
Die URL, die Sonderplan aufruft, um eine Benutzerabmeldung beim Identitätsanbieter anzufordern.
#### IDP X.509-Zertifikat
Das Authentifizierungszertifikat, das von Ihrem Identitätsanbieter ausgestellt wurde.
## Konfigurationsanleitungen
Diese Anleitungen behandeln die gängigsten Identitätsanbieter, die unsere Kunden verwenden. Wenn Sie jedoch auf Probleme stoßen oder Hilfe bei der Konfiguration eines anderen Anbieters benötigen, wenden Sie sich bitte an unser Support-Team.
### Google Workspace
Um Sonderplan SAML SSO mit Google Workspace zu konfigurieren, erweitern Sie bitte und befolgen Sie die Anweisungen in jeder Sektion:
1. Login to the Google Workspace Admin Console and navigate to **Apps -> Web and mobile apps**.
2. Click **Add app -> Add custom SAML app**
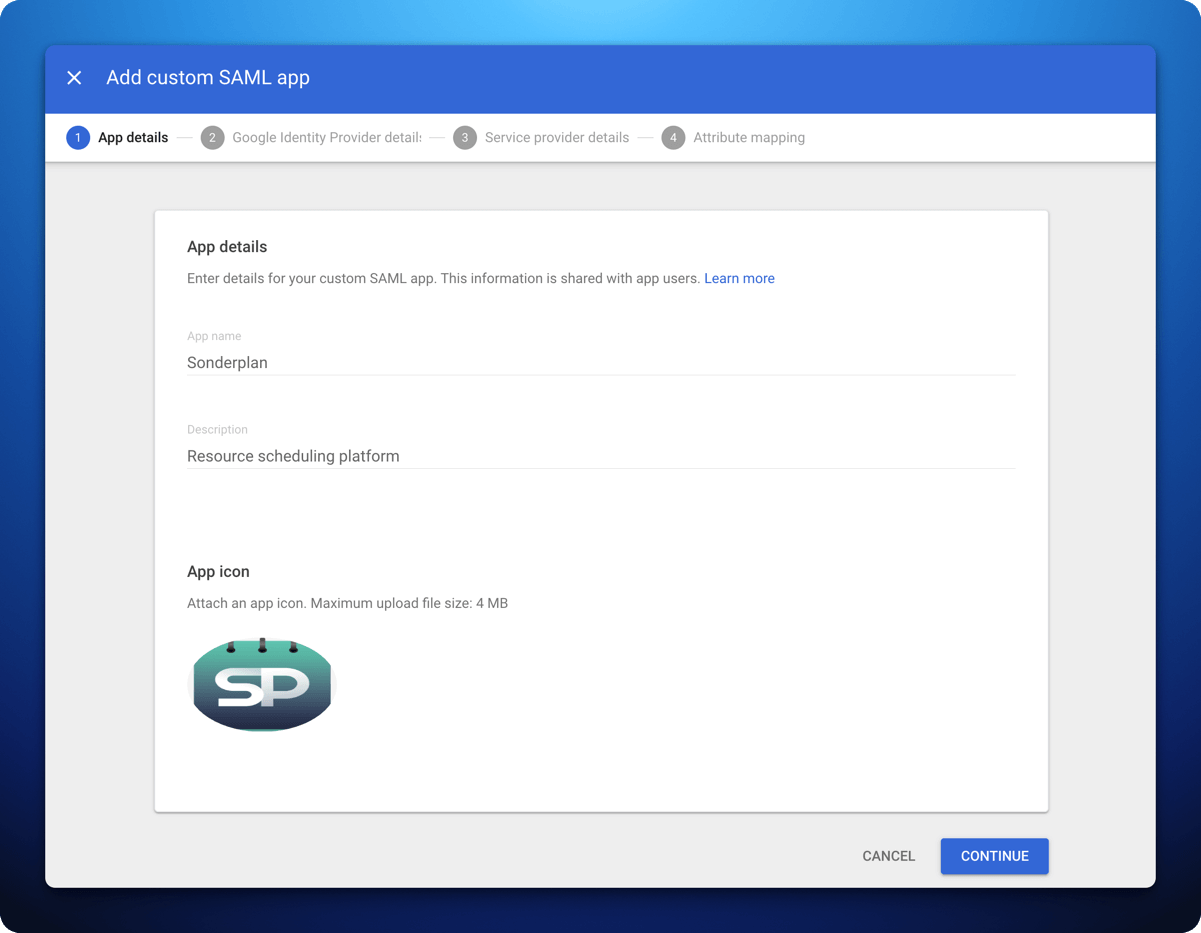 3. In **App details** enter ***Sonderplan*** as the **App name**, with a **Description** of ***Resource scheduling platform***
4. Upload the App Icon which you can save from here:
3. In **App details** enter ***Sonderplan*** as the **App name**, with a **Description** of ***Resource scheduling platform***
4. Upload the App Icon which you can save from here:
 5. Click **Continue**
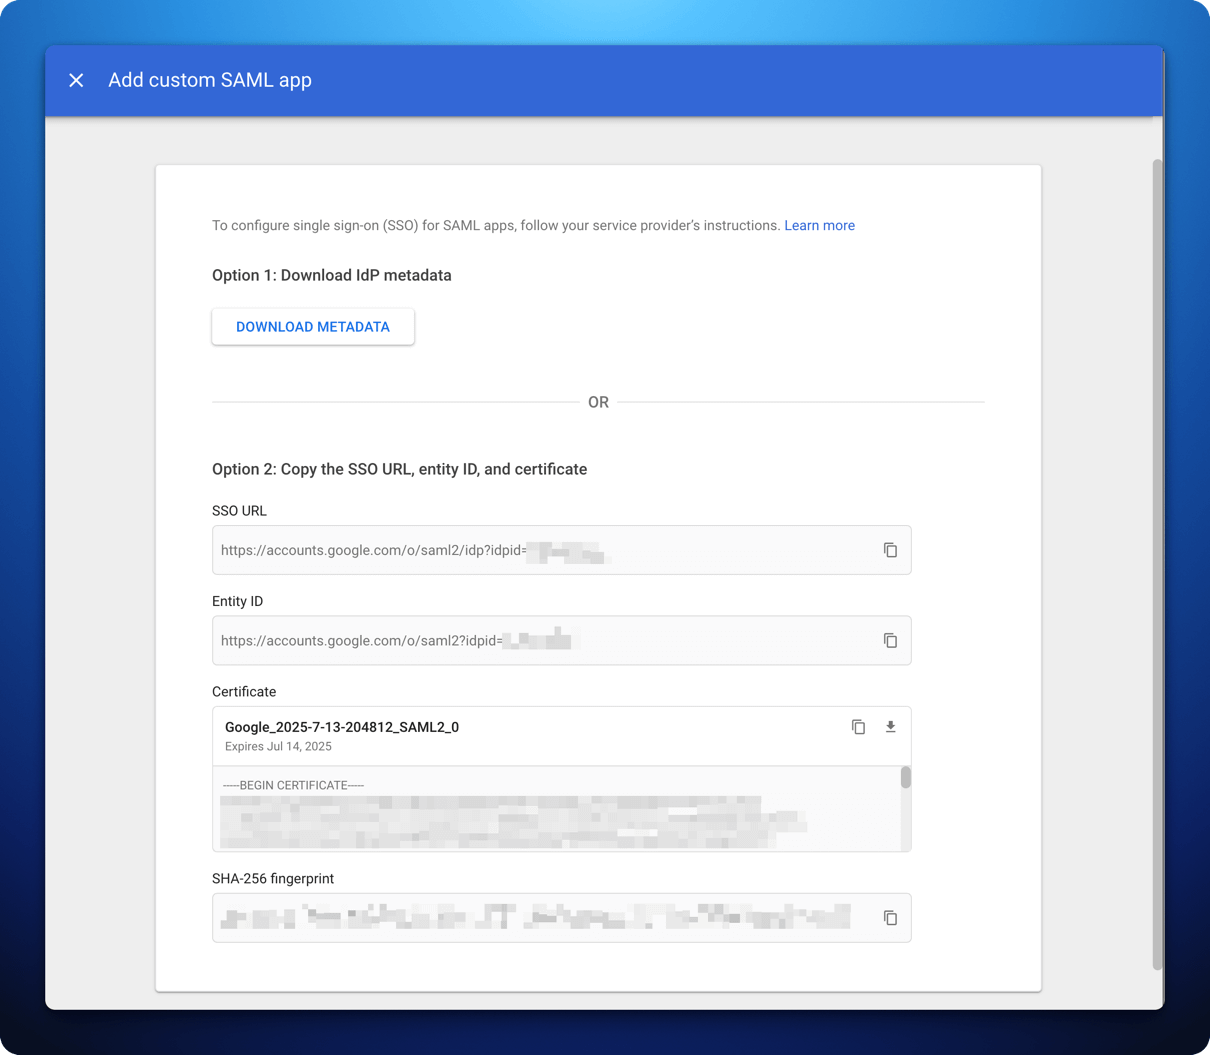 1. In Sonderplan, head over to **Admin -> System Settings** and expand the **SAML Single Sign On (SSO)** settings panel
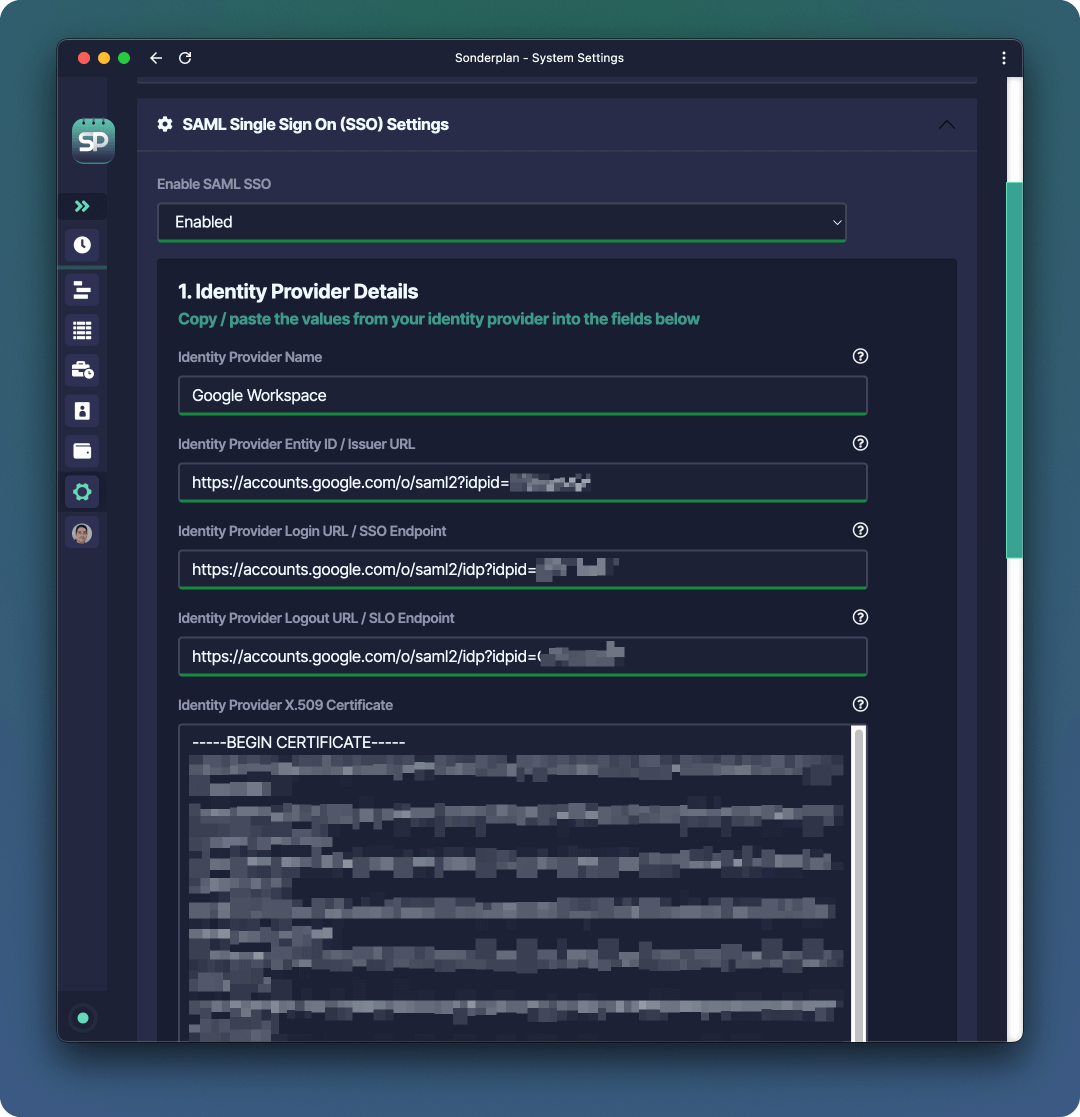
2. Enable SAML SSO and enter ***Google Workspace*** as the **Identity Provider Name**
3. Copy the **SSO URL** from Google Workspace to -> **Identity Provider Login URL / SSO Endpoint** AND **Identity Provider Logout URL / SLO Endpoint** in Sonderplan
4. Copy the **Entity ID** from Google Workspace to -> **Identity Provider Entity ID / Issuer URL** in Sonderplan
5. Copy the **Certificate** from Google Workspace to -> **Identity Provider X.509 Certificate** in Sonderplan
6. Click **Save Changes** in the top right corner of Sonderplan
7. In Google Workspace, click **Continue**
1. In Sonderplan, head over to **Admin -> System Settings** and expand the **SAML Single Sign On (SSO)** settings panel
2. Enable SAML SSO and enter ***Google Workspace*** as the **Identity Provider Name**
3. Copy the **SSO URL** from Google Workspace to -> **Identity Provider Login URL / SSO Endpoint** AND **Identity Provider Logout URL / SLO Endpoint** in Sonderplan
4. Copy the **Entity ID** from Google Workspace to -> **Identity Provider Entity ID / Issuer URL** in Sonderplan
5. Copy the **Certificate** from Google Workspace to -> **Identity Provider X.509 Certificate** in Sonderplan
6. Click **Save Changes** in the top right corner of Sonderplan
7. In Google Workspace, click **Continue**
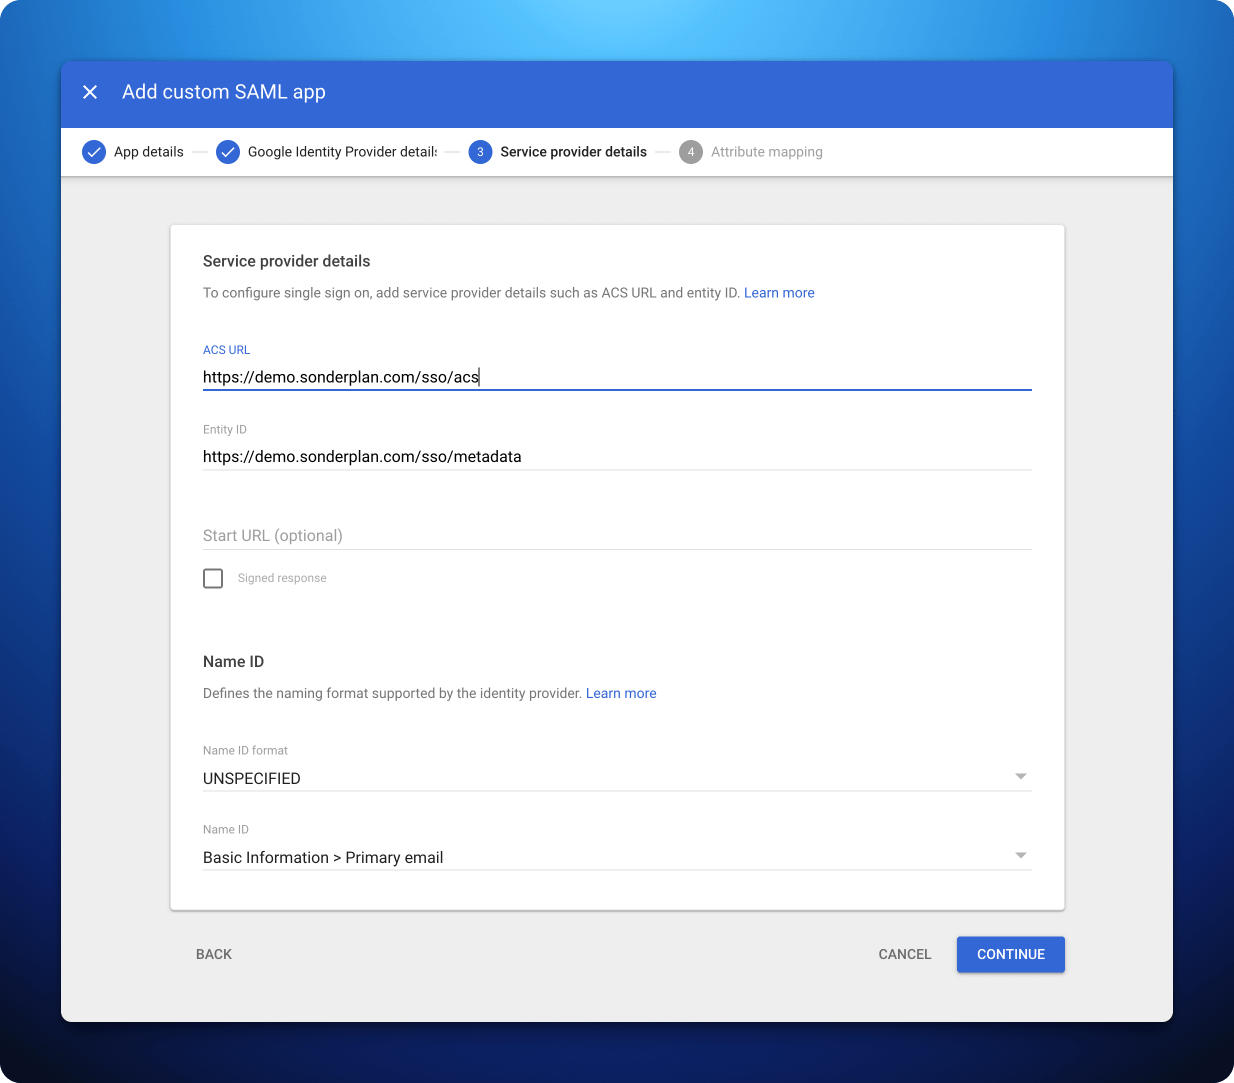 1. Copy the **Recipient / ACS (Consumer) URL** from Sonderplan to -> **ACS URL** in Google Workspace Admin Console
2. Copy the **Entity ID / Audience / Metadata URL** from Sonderplan to -> **Entity ID** in Google Workspace Admin Console
3. Make sure **Name ID** in Google Workspace Admin Console is set to **Basic information > Primary Email**
4. Click **Continue**
1. Copy the **Recipient / ACS (Consumer) URL** from Sonderplan to -> **ACS URL** in Google Workspace Admin Console
2. Copy the **Entity ID / Audience / Metadata URL** from Sonderplan to -> **Entity ID** in Google Workspace Admin Console
3. Make sure **Name ID** in Google Workspace Admin Console is set to **Basic information > Primary Email**
4. Click **Continue**
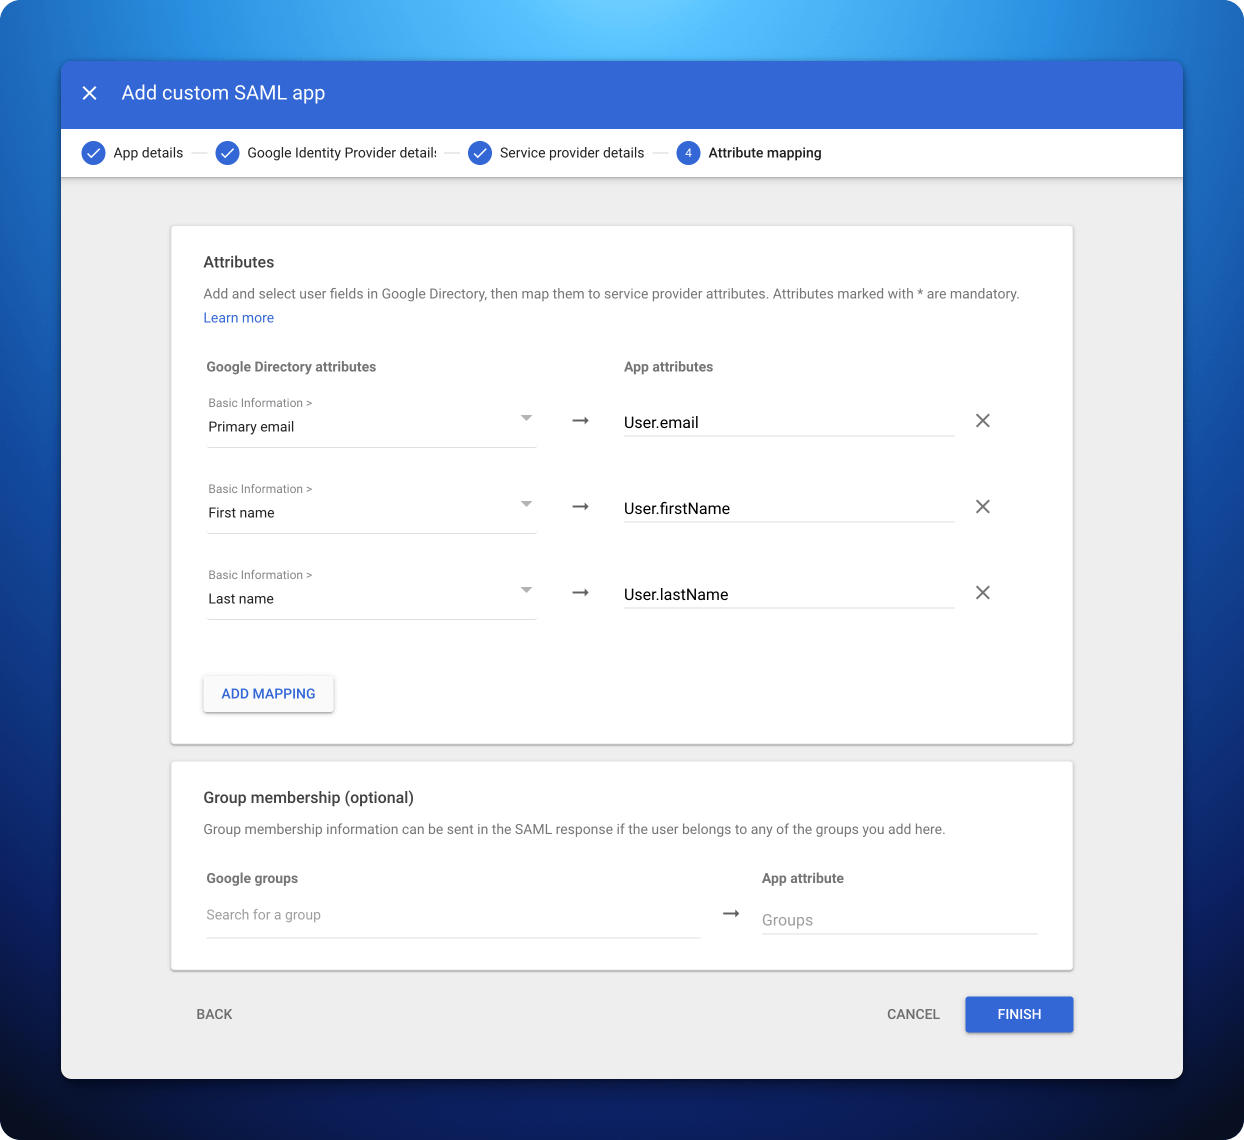 1. Configure the mapping of Google Directory attributes to the attributes of Sonderplan. Please refer to the screenshot above or table below.
\| Google Directory attributes | App attributes |
\|------------------------------------|----------------|
\| Basic Information -> Primary email | User.email |
\| Basic Information -> First name | User.firstName |
\| Basic Information -> Last name | User.lastName |
2. Click **Finish**
Once the app has been created, you'll need to enable the SAML app for your Google Workspace users.
1. Configure the mapping of Google Directory attributes to the attributes of Sonderplan. Please refer to the screenshot above or table below.
\| Google Directory attributes | App attributes |
\|------------------------------------|----------------|
\| Basic Information -> Primary email | User.email |
\| Basic Information -> First name | User.firstName |
\| Basic Information -> Last name | User.lastName |
2. Click **Finish**
Once the app has been created, you'll need to enable the SAML app for your Google Workspace users.
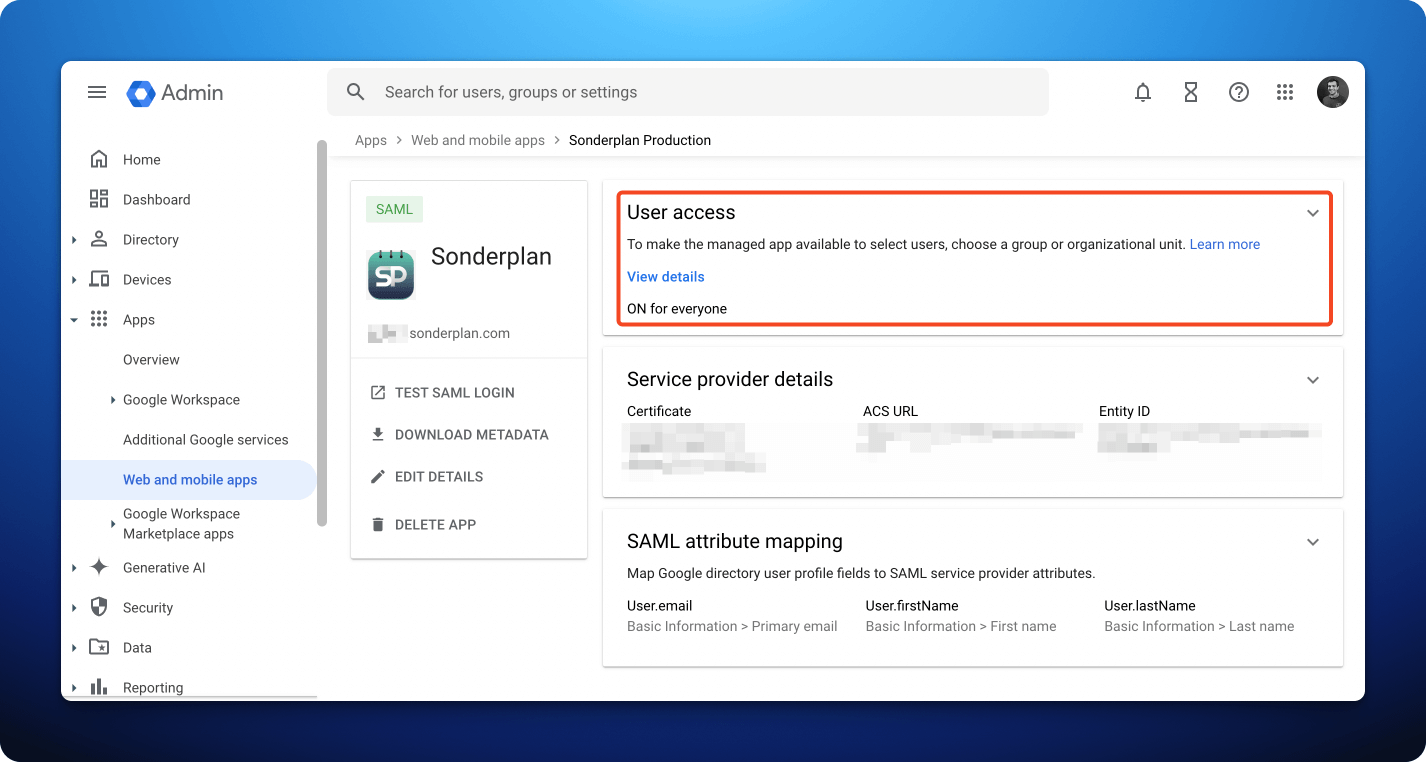 1. In the **Google Workspace Admin Console** navigate to **Apps -> Web and mobile apps -> Sonderplan -> User Access** change the access setting to **ON for everyone**
2. Finally, you'll need to configure [your users in Sonderplan for SSO](/admin/saml-sso-settings#configure-users-for-sso)
### Microsoft Entra
Um Sonderplan SAML SSO mit Microsoft Entra zu konfigurieren, erweitern Sie bitte und befolgen Sie die Anweisungen in jeder Sektion:
1. Login to the Microsoft Azure Portal and navigate to **your directory -> Enterprise Applications -> All applications -> New application**
1. In the **Google Workspace Admin Console** navigate to **Apps -> Web and mobile apps -> Sonderplan -> User Access** change the access setting to **ON for everyone**
2. Finally, you'll need to configure [your users in Sonderplan for SSO](/admin/saml-sso-settings#configure-users-for-sso)
### Microsoft Entra
Um Sonderplan SAML SSO mit Microsoft Entra zu konfigurieren, erweitern Sie bitte und befolgen Sie die Anweisungen in jeder Sektion:
1. Login to the Microsoft Azure Portal and navigate to **your directory -> Enterprise Applications -> All applications -> New application**
 2. In the Microsoft Entra Gallery, click **Create your own Application**
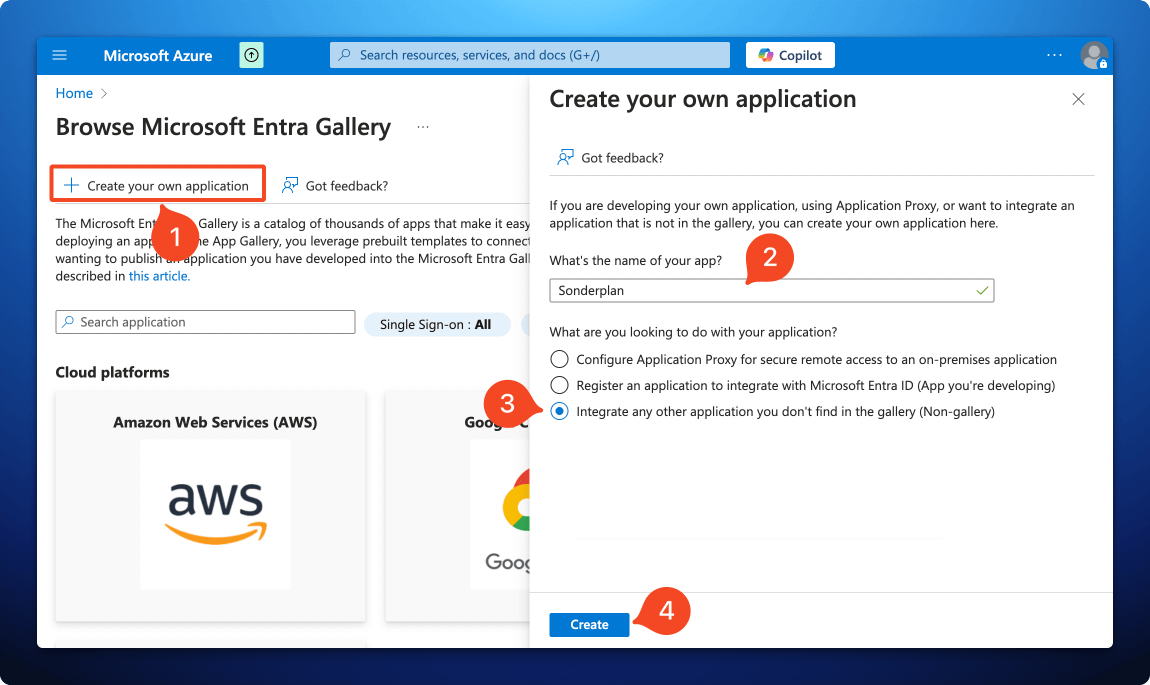 3. Enter ***Sonderplan*** as the name of the app
4. Check that the option *Integrate any other application you don't find in the gallery (Non-gallery)* is selected
5. Click **Create**
3. Enter ***Sonderplan*** as the name of the app
4. Check that the option *Integrate any other application you don't find in the gallery (Non-gallery)* is selected
5. Click **Create**
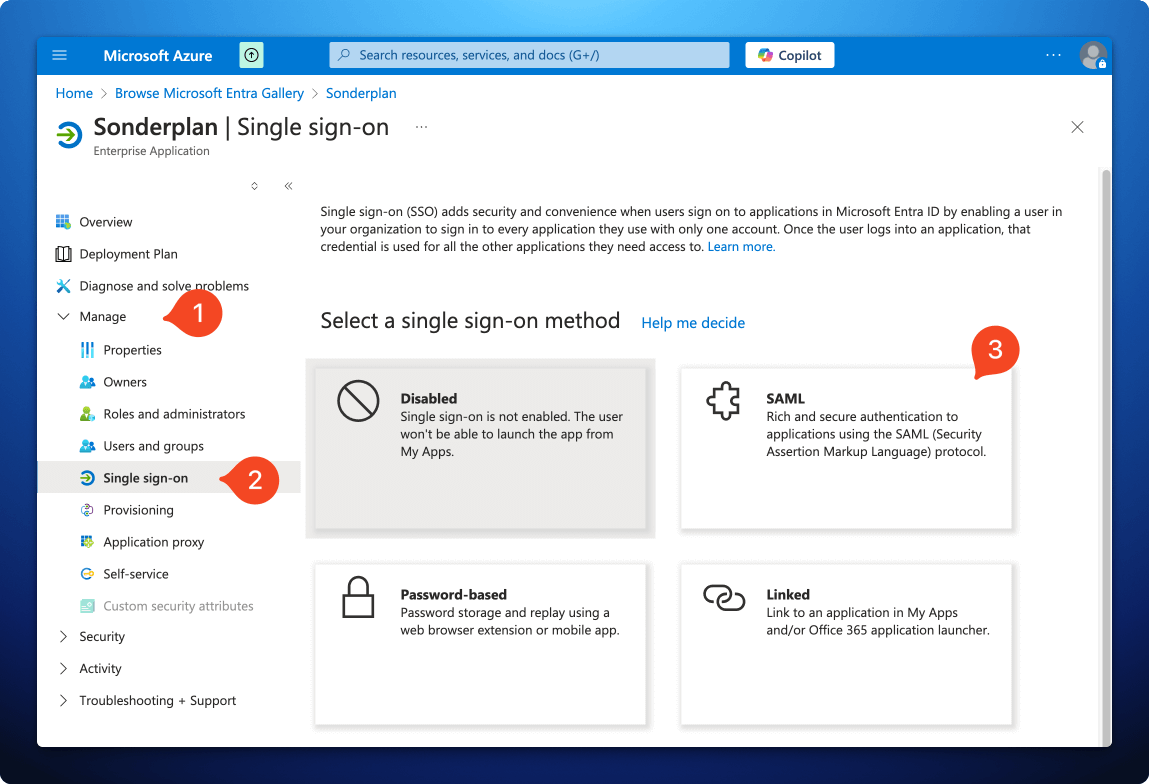 1. In the newly created app *Sonderplan* app, expand the **Manage** section, then click **Single sign-on -> SAML**
2. On the next screen, in the *Basic SAML Configuration*, click **Edit**
1. In the newly created app *Sonderplan* app, expand the **Manage** section, then click **Single sign-on -> SAML**
2. On the next screen, in the *Basic SAML Configuration*, click **Edit**
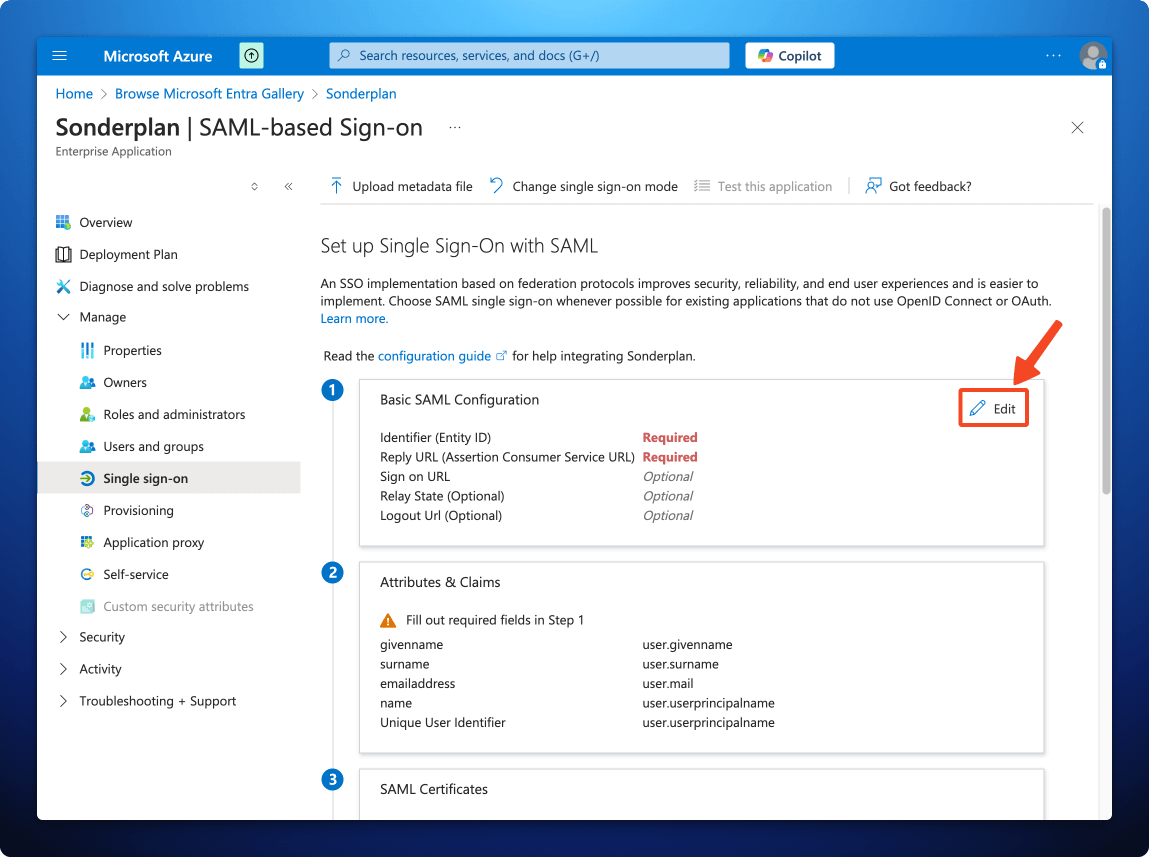 3. In another window, open Sonderplan and head over to **Admin -> System Settings** and expand the **SAML Single Sign On (SSO)** settings panel
4. Enable SAML SSO and enter ***Microsoft Entra*** as the **Identity Provider Name** then scroll down to the "*2. Service Provider Details (Sonderplan)*" section
3. In another window, open Sonderplan and head over to **Admin -> System Settings** and expand the **SAML Single Sign On (SSO)** settings panel
4. Enable SAML SSO and enter ***Microsoft Entra*** as the **Identity Provider Name** then scroll down to the "*2. Service Provider Details (Sonderplan)*" section
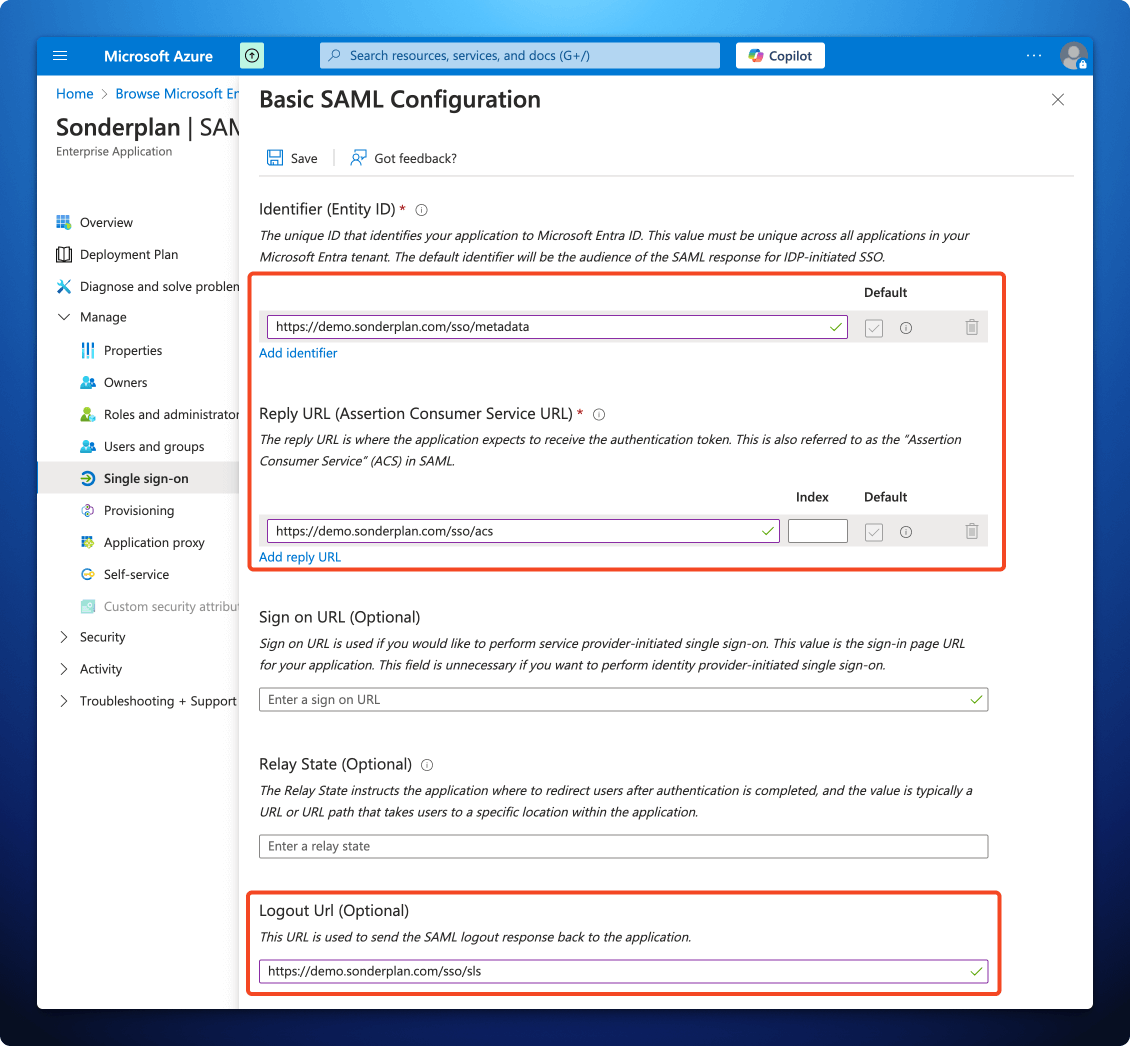
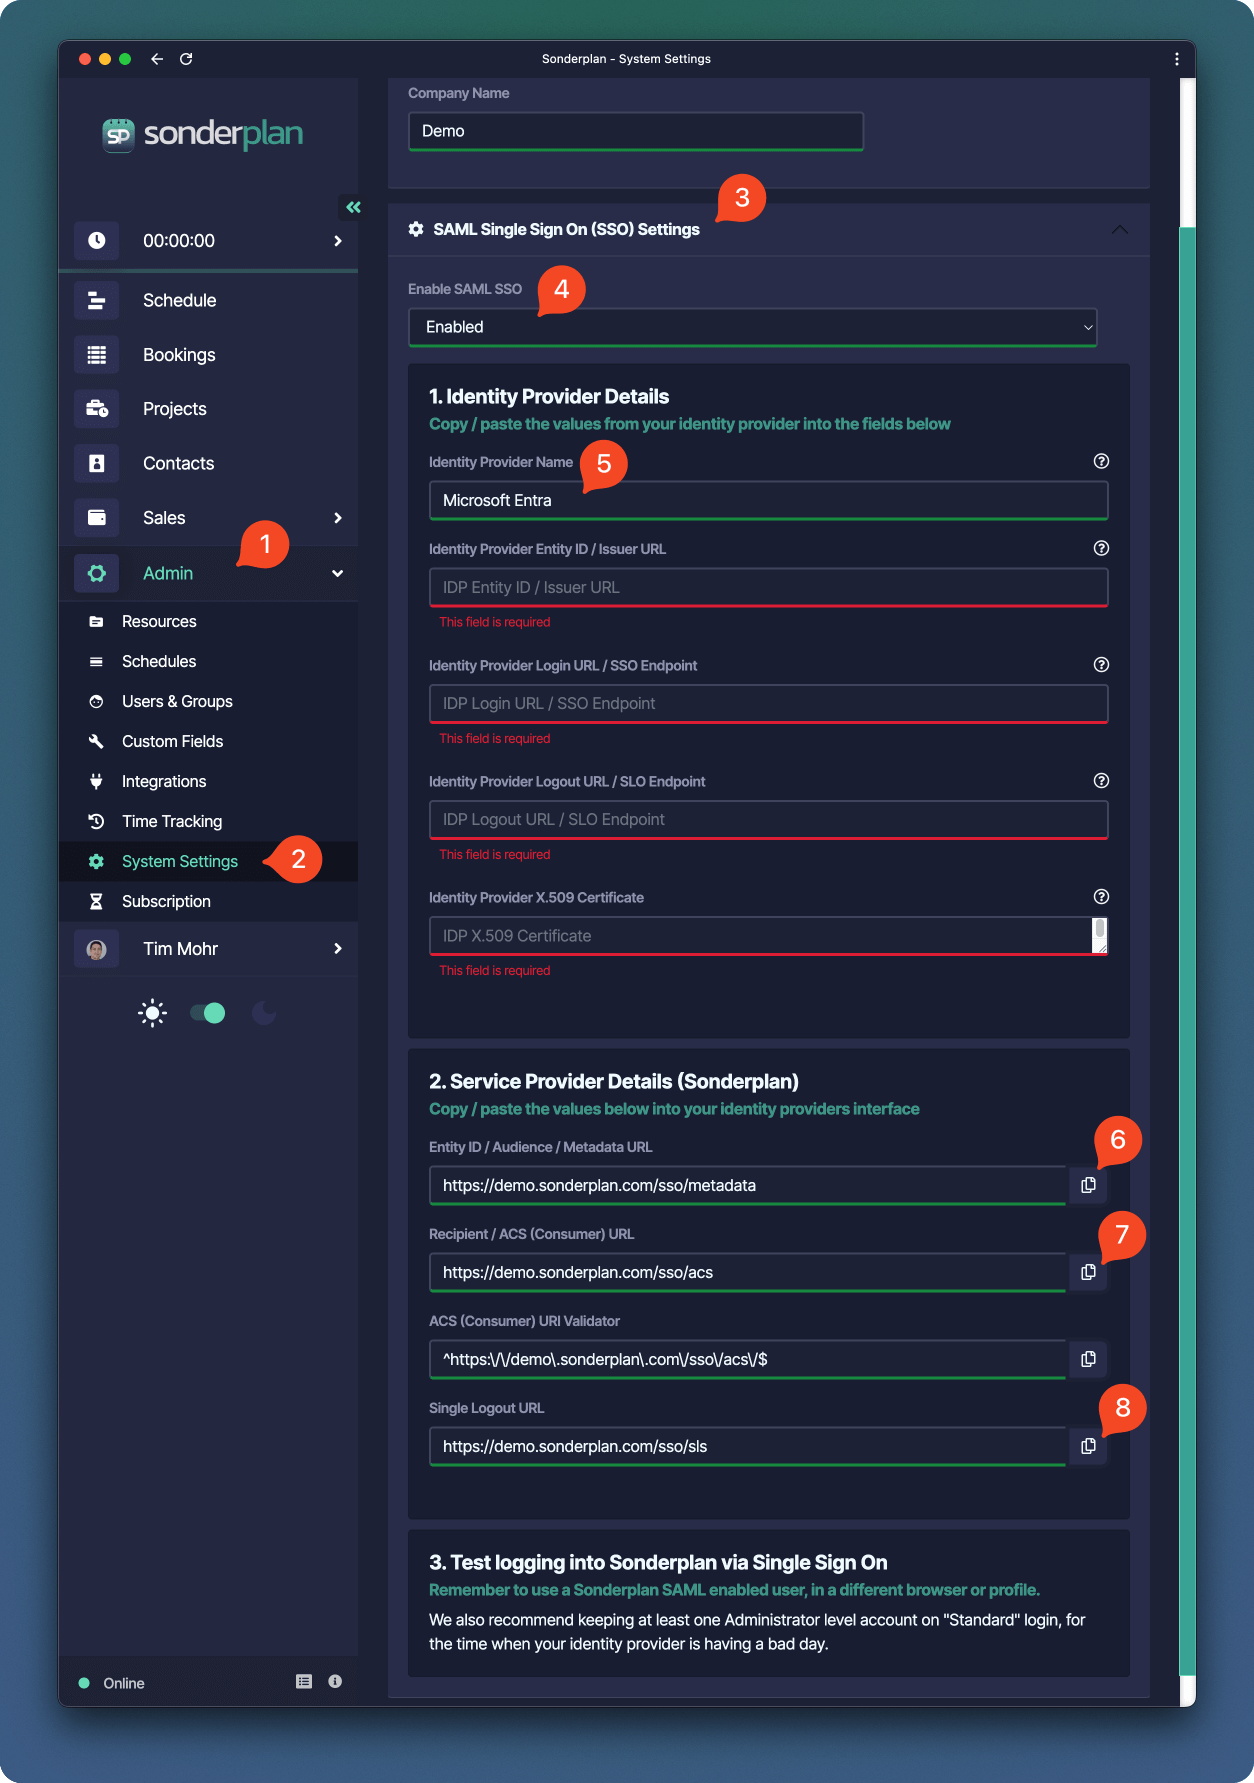 5. Copy the **Entity ID / Audience / Metadata URL** from Sonderplan to -> **Identifier Entity ID** in the Azure SAML configuration
6. Copy the **Recipient / ACS (Consumer) URL** from Sonderplan to -> **Reply URL (Assertion Consumer URL)** in the Azure SAML configuration
7. Copy the **Single Logout URL** from Sonderplan to -> \*\*Logout Url (Optional) in the Azure SAML configuration
8. Finally click **Save** at the top of the *Basic SAML Configuration* screen in the Azure Portal, then click the **x** in the top right corner
5. Copy the **Entity ID / Audience / Metadata URL** from Sonderplan to -> **Identifier Entity ID** in the Azure SAML configuration
6. Copy the **Recipient / ACS (Consumer) URL** from Sonderplan to -> **Reply URL (Assertion Consumer URL)** in the Azure SAML configuration
7. Copy the **Single Logout URL** from Sonderplan to -> \*\*Logout Url (Optional) in the Azure SAML configuration
8. Finally click **Save** at the top of the *Basic SAML Configuration* screen in the Azure Portal, then click the **x** in the top right corner
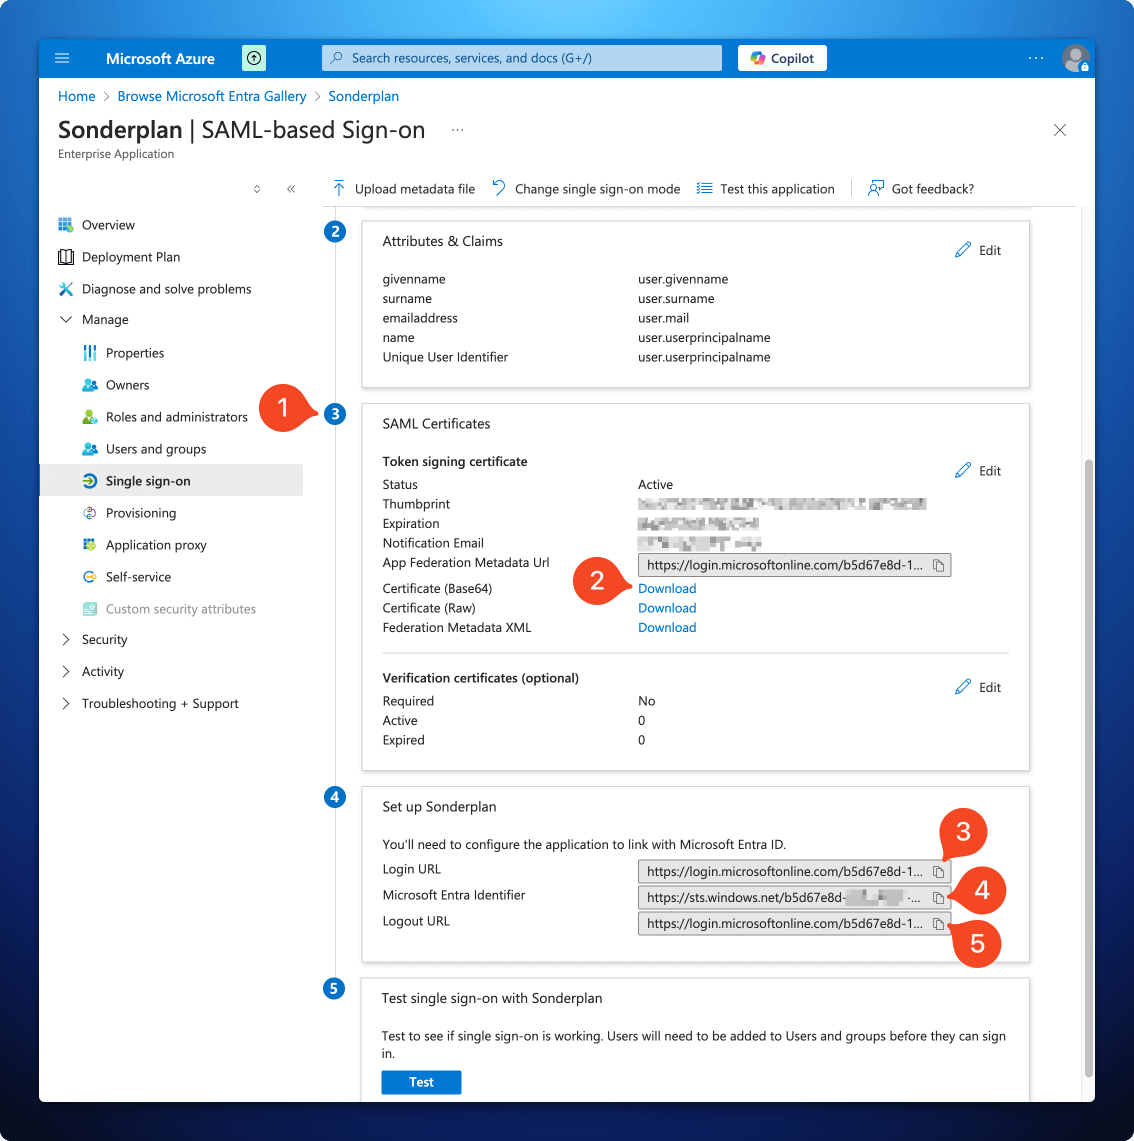 1. Still in the Azure Portal, but back on the *SAML-based Sign-on* page for the Sonderplan Enterprise app, scroll down to section **3 SAML Certificates**
2. Download the **Certificate (Base64)**, open the **Sonderplan.cer** file in a text editor on your computer and copy the entire contents of the file into the **Identity Provider X.509 Certificate** in the Sonderplan SAML SSO settings textarea
3. Copy the **Login URL** from the Azure Portal to -> **Identity Provider Login URL / SSO Endpoint** in Sonderplan
4. Copy the **Microsoft Entra Identifier** from the Azure Portal to -> **Identity Provider Entity ID / Issuer URL** in Sonderplan
5. Copy the **Logout URL** from the Azure Portal to -> **Identity Provider Logout URL / SLO Endpoint** in Sonderplan
6. Click **Save Changes** in the top right corner of Sonderplan
1. Still in the Azure Portal, but back on the *SAML-based Sign-on* page for the Sonderplan Enterprise app, scroll down to section **3 SAML Certificates**
2. Download the **Certificate (Base64)**, open the **Sonderplan.cer** file in a text editor on your computer and copy the entire contents of the file into the **Identity Provider X.509 Certificate** in the Sonderplan SAML SSO settings textarea
3. Copy the **Login URL** from the Azure Portal to -> **Identity Provider Login URL / SSO Endpoint** in Sonderplan
4. Copy the **Microsoft Entra Identifier** from the Azure Portal to -> **Identity Provider Entity ID / Issuer URL** in Sonderplan
5. Copy the **Logout URL** from the Azure Portal to -> **Identity Provider Logout URL / SLO Endpoint** in Sonderplan
6. Click **Save Changes** in the top right corner of Sonderplan

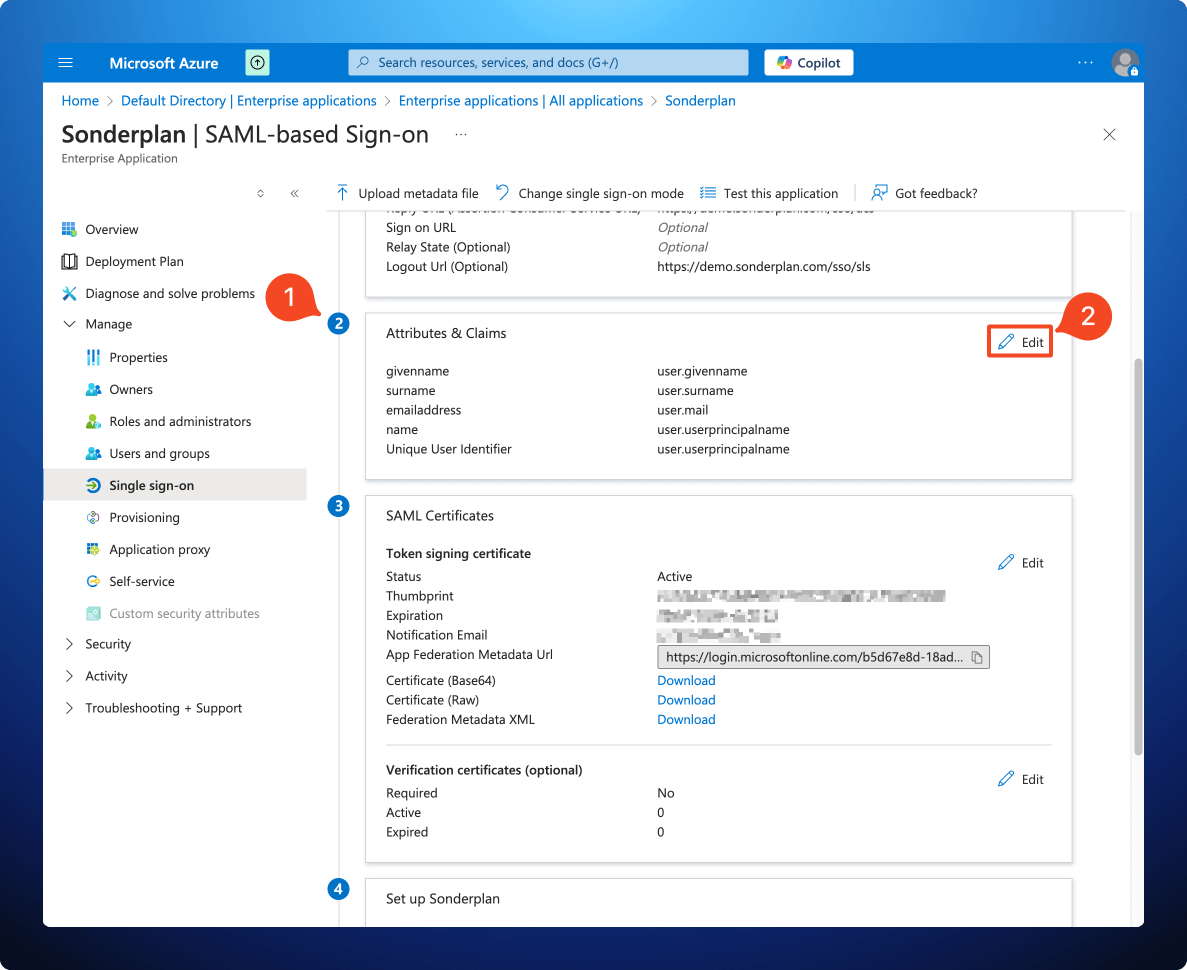 1. Still in the Azure Portal, but back on the *SAML-based Sign-on* page for the Sonderplan Enterprise app, scroll down to section **2 Attributes & Claims** and click **Edit**
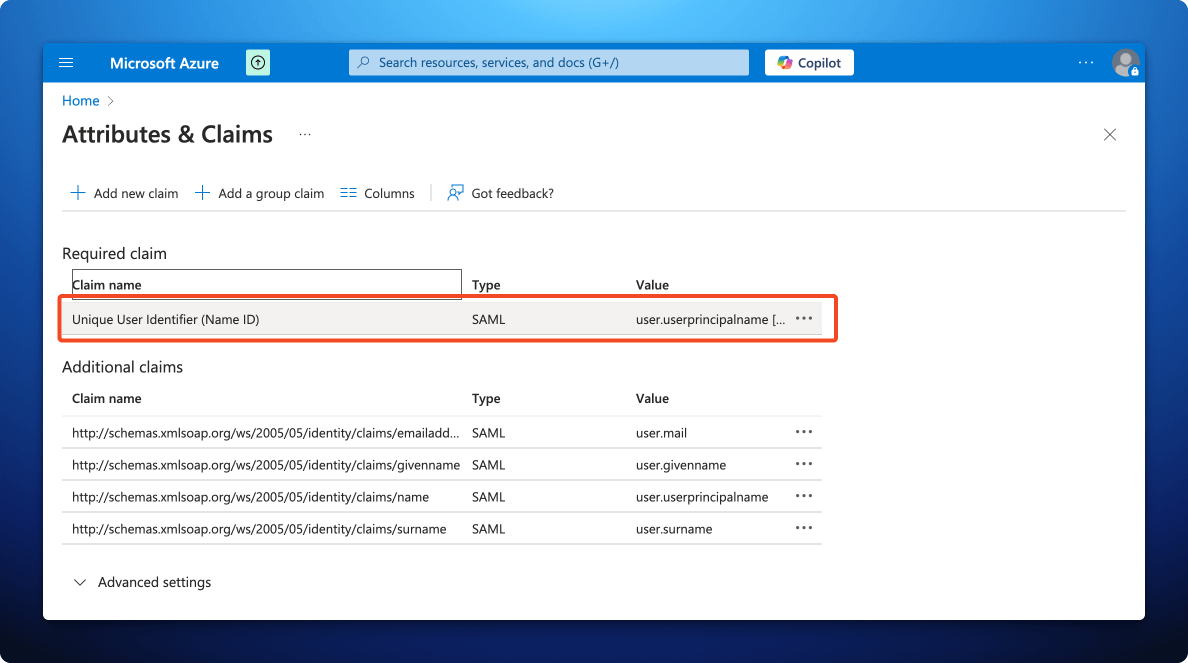 2. In the *Attributes & Claims* screen, click the **Unique User Identifier (Name ID)** claim
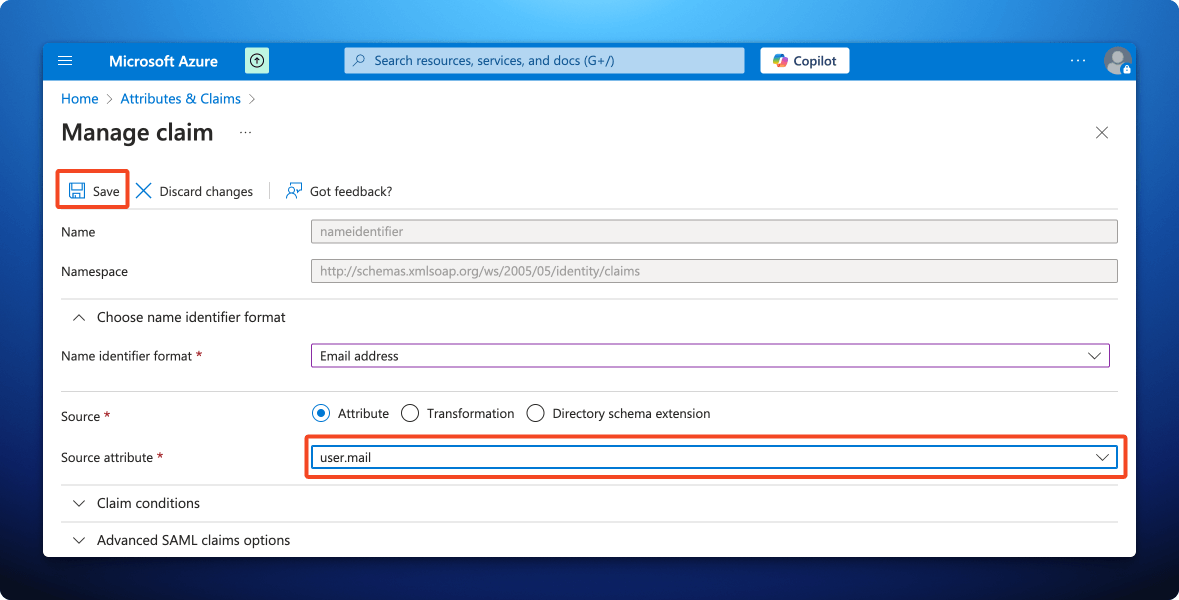 3. Change the **Source Attribute** to ***user.mail*** and click **Save**
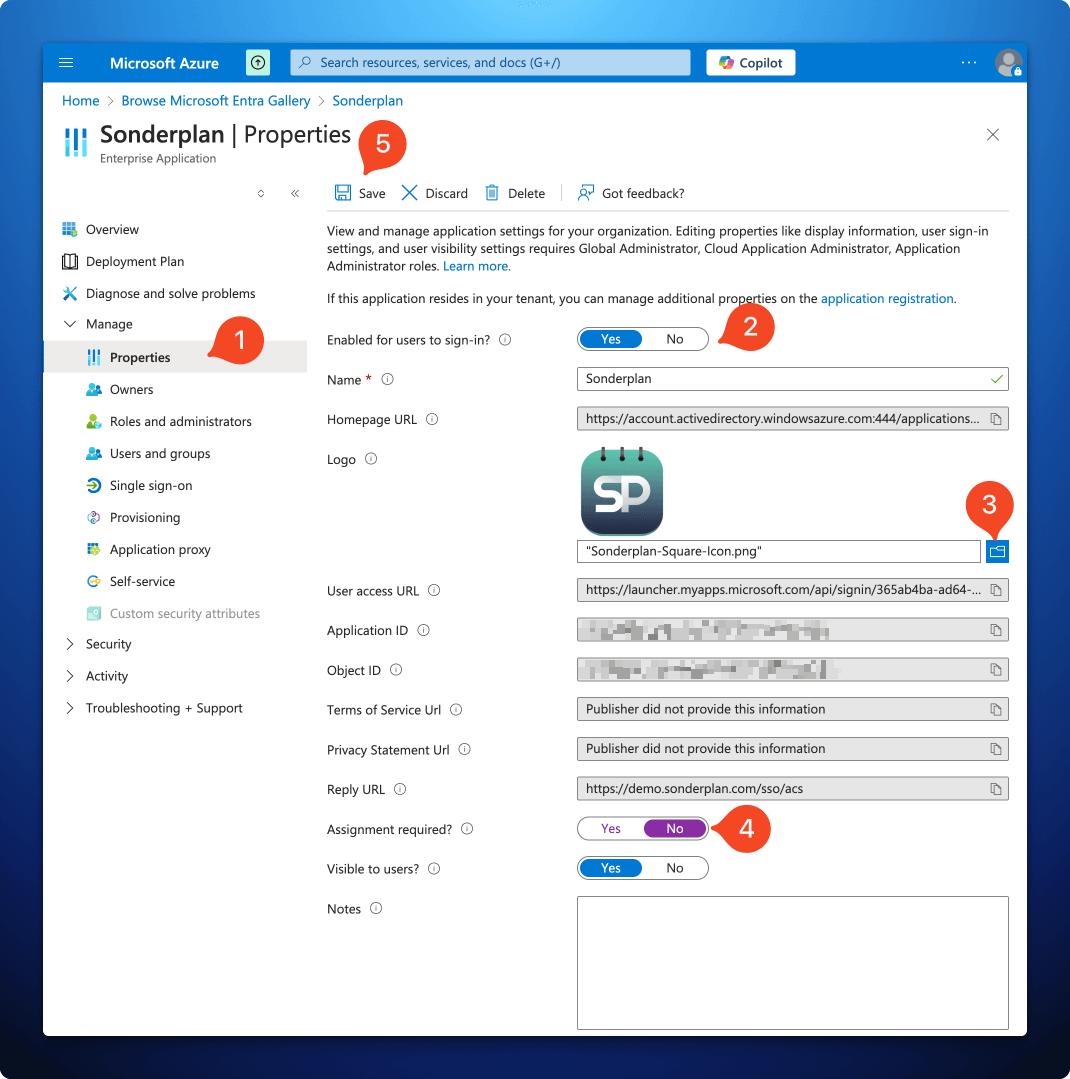 1. Still in the Sonderplan Enterprise application, expand the **Manage** section, then click on **Properties**
2. Ensure the **Enabled for users to sign-in?** slider is set to **Yes**
3. Upload the App Icon to the **Logo** field, which you can save from here:
4. Change **Assignment required?** slider to **No**
5. Click **Save** in the top left corner
6. Finally, you'll need to configure [your users in Sonderplan for SSO](/admin/saml-sso-settings#configure-users-for-sso)
### Okta
Um Sonderplan SAML SSO mit Okta zu konfigurieren, erweitern Sie bitte und befolgen Sie die Anweisungen in jeder Sektion:
1. Still in the Sonderplan Enterprise application, expand the **Manage** section, then click on **Properties**
2. Ensure the **Enabled for users to sign-in?** slider is set to **Yes**
3. Upload the App Icon to the **Logo** field, which you can save from here:
4. Change **Assignment required?** slider to **No**
5. Click **Save** in the top left corner
6. Finally, you'll need to configure [your users in Sonderplan for SSO](/admin/saml-sso-settings#configure-users-for-sso)
### Okta
Um Sonderplan SAML SSO mit Okta zu konfigurieren, erweitern Sie bitte und befolgen Sie die Anweisungen in jeder Sektion:
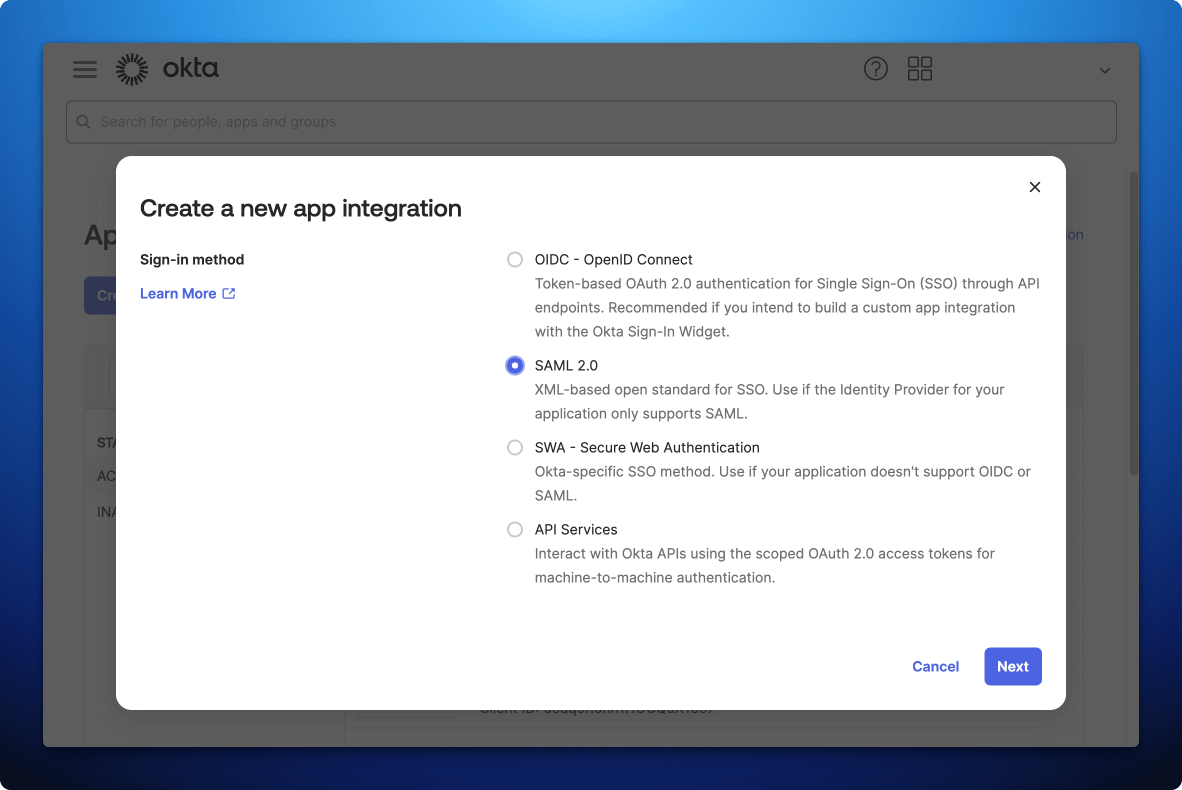 1. In the Okta Admin Console, go to **Applications -> Applications**
2. Click **Create App Integration**
3. Select **SAML 2.0** as the Sign-in method, then click **Next**
1. In the Okta Admin Console, go to **Applications -> Applications**
2. Click **Create App Integration**
3. Select **SAML 2.0** as the Sign-in method, then click **Next**
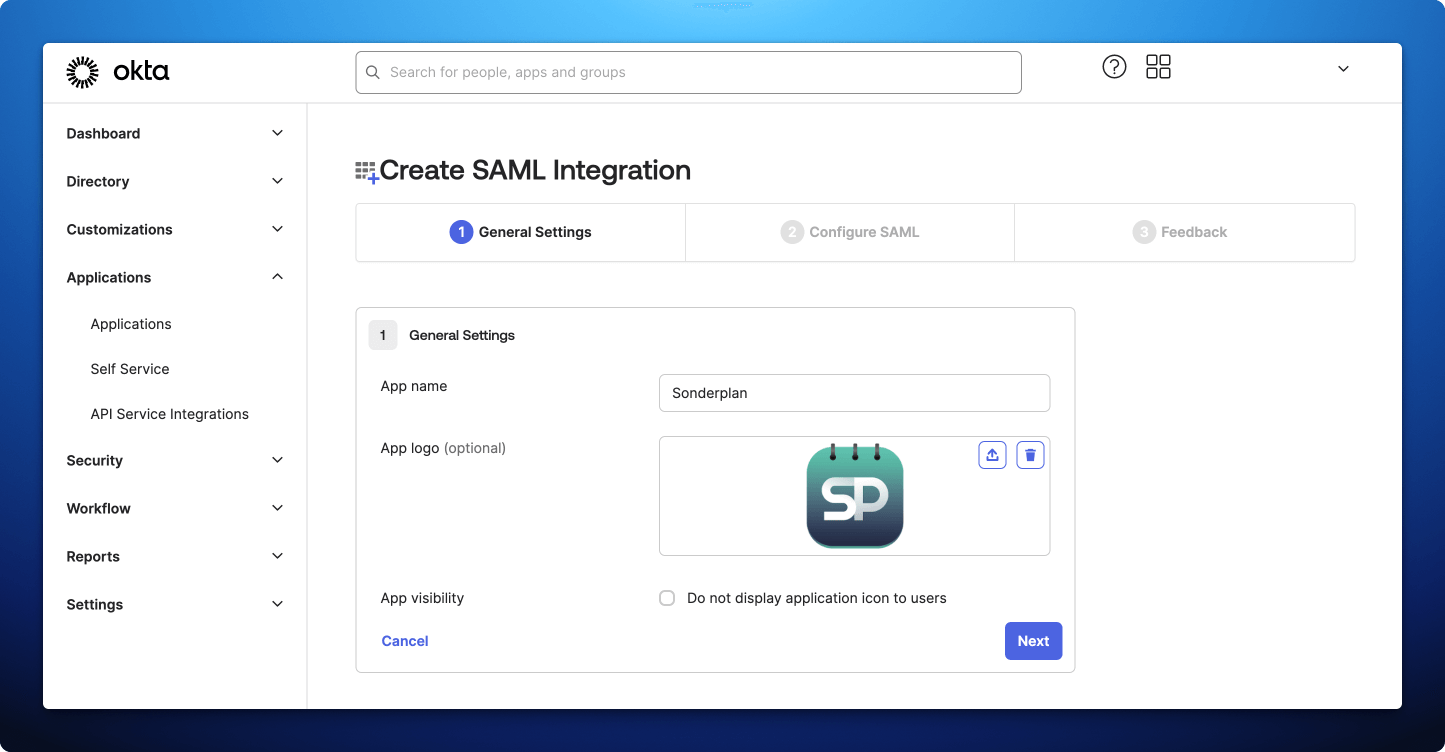 4. Enter **Sonderplan** as the **App Name**
5. Upload the App Icon to the **Logo** field, which you can save from here:
6. Then click **Next**
1. In Sonderplan, head over to **Admin -> System Settings** and expand the *SAML Single Sign On (SSO)* settings panel
2. Enable **SAML SSO** and enter **Okta** as the Identity Provider Name
3. Leave the remaining fields blank for now, and scroll to the section titled *2. Service Provider Details (Sonderplan)*
4. Enter **Sonderplan** as the **App Name**
5. Upload the App Icon to the **Logo** field, which you can save from here:
6. Then click **Next**
1. In Sonderplan, head over to **Admin -> System Settings** and expand the *SAML Single Sign On (SSO)* settings panel
2. Enable **SAML SSO** and enter **Okta** as the Identity Provider Name
3. Leave the remaining fields blank for now, and scroll to the section titled *2. Service Provider Details (Sonderplan)*
 4. Copy the **Recipient / ACS (Consumer) URL** from Sonderplan to -> **Single sign-on URL** in Okta Admin
5. Copy the **Entity ID / Audience / Metadata URL** from Sonderplan to -> **Audience URI (SP Entity ID)** in Okta Admin
4. Copy the **Recipient / ACS (Consumer) URL** from Sonderplan to -> **Single sign-on URL** in Okta Admin
5. Copy the **Entity ID / Audience / Metadata URL** from Sonderplan to -> **Audience URI (SP Entity ID)** in Okta Admin
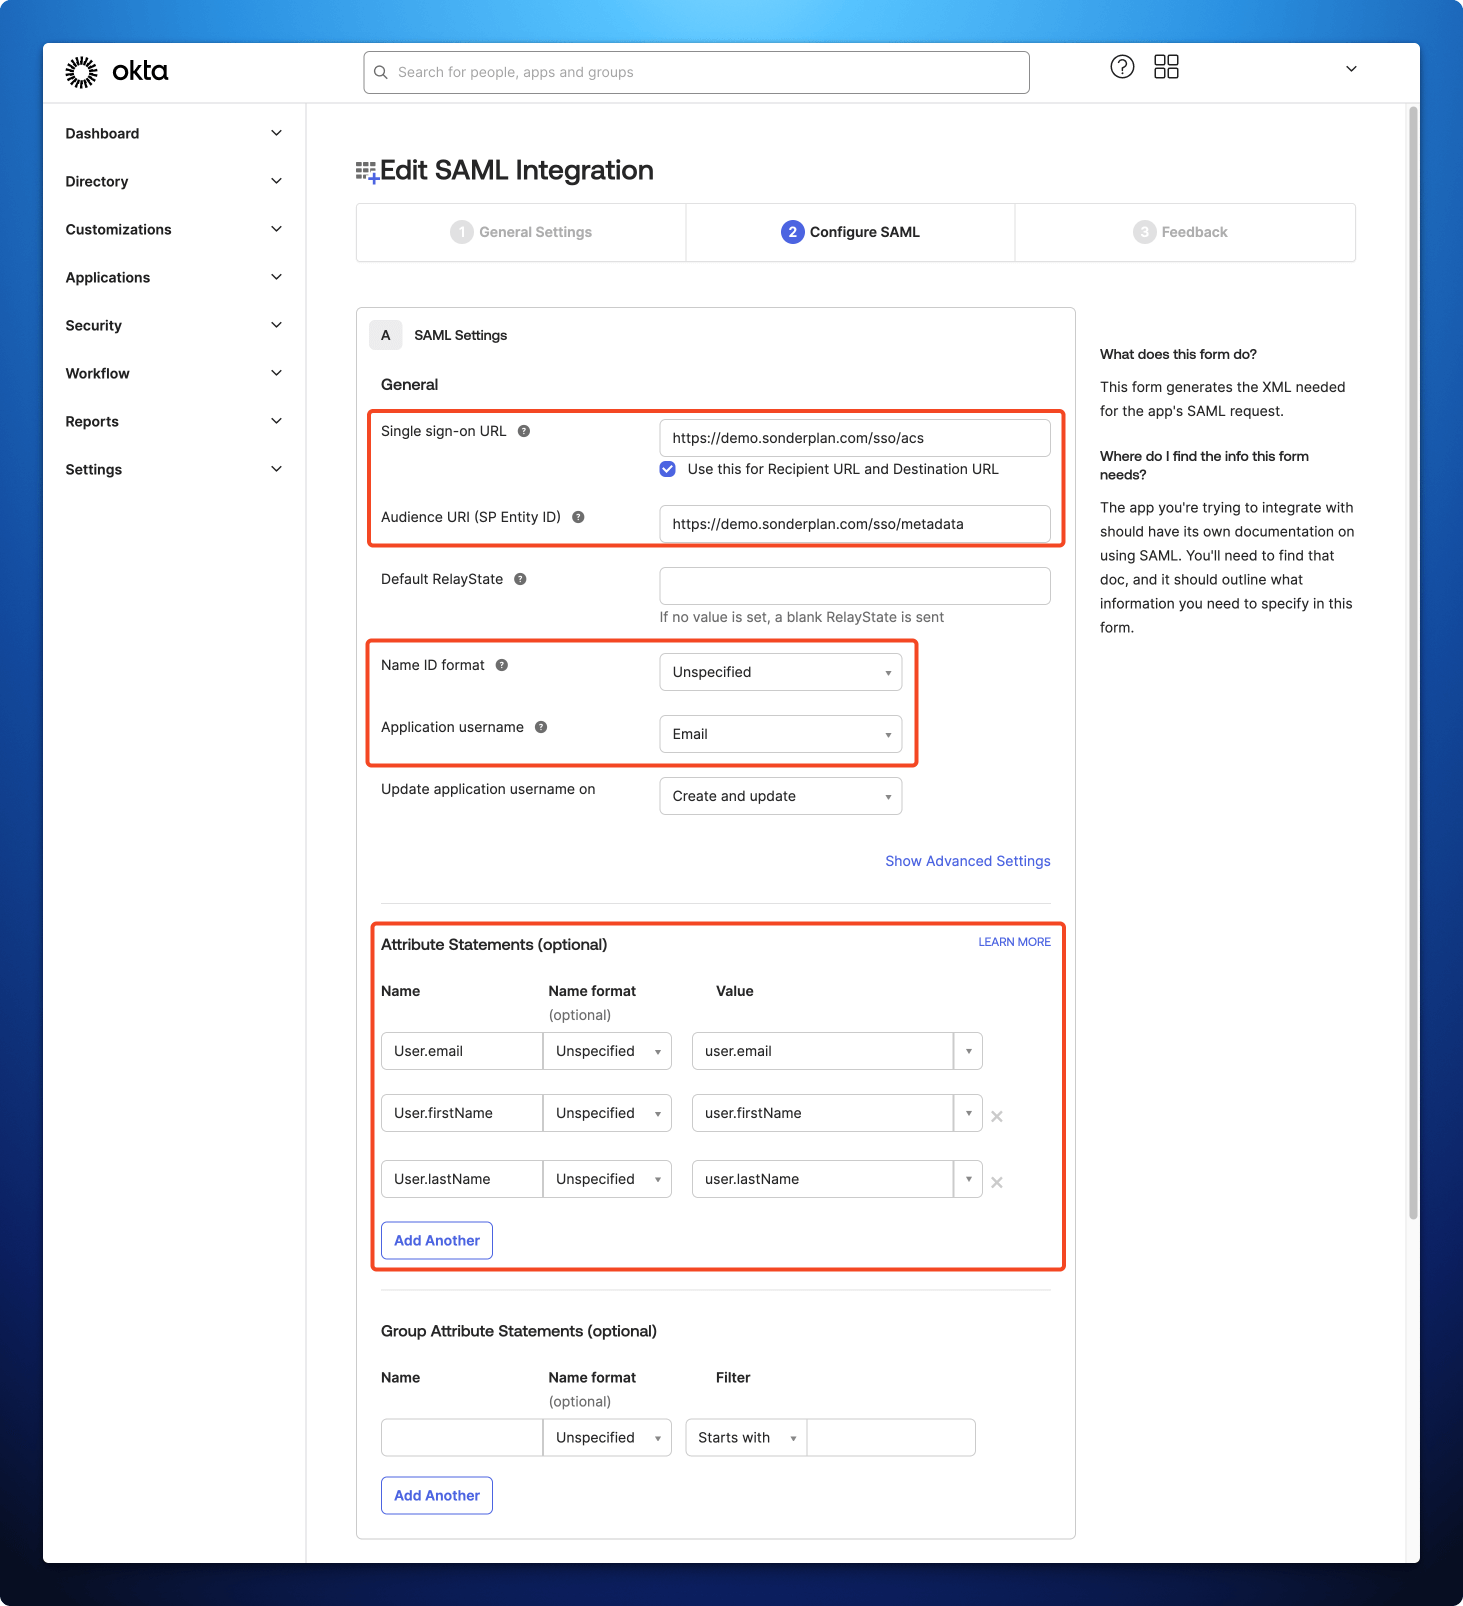 6. Make sure **Name ID format** in Okta Admin is set to **Unspecified**
7. Set **Application username** in Okta admin to **Email**
8. In the **Attribute Statements (Optional)** section, define the following mapping:
| Name | Name format | Value |
| -------------- | ----------- | -------------- |
| User.email | Unspecified | user.email |
| User.firstName | Unspecified | user.firstName |
| User.lastName | Unspecified | user.lastName |
9. Click **Next**
10. Select **I'm an Okta customer adding an internal app**
11. Check **This is an internal app that we have created**
12. Click **Finish**
6. Make sure **Name ID format** in Okta Admin is set to **Unspecified**
7. Set **Application username** in Okta admin to **Email**
8. In the **Attribute Statements (Optional)** section, define the following mapping:
| Name | Name format | Value |
| -------------- | ----------- | -------------- |
| User.email | Unspecified | user.email |
| User.firstName | Unspecified | user.firstName |
| User.lastName | Unspecified | user.lastName |
9. Click **Next**
10. Select **I'm an Okta customer adding an internal app**
11. Check **This is an internal app that we have created**
12. Click **Finish**
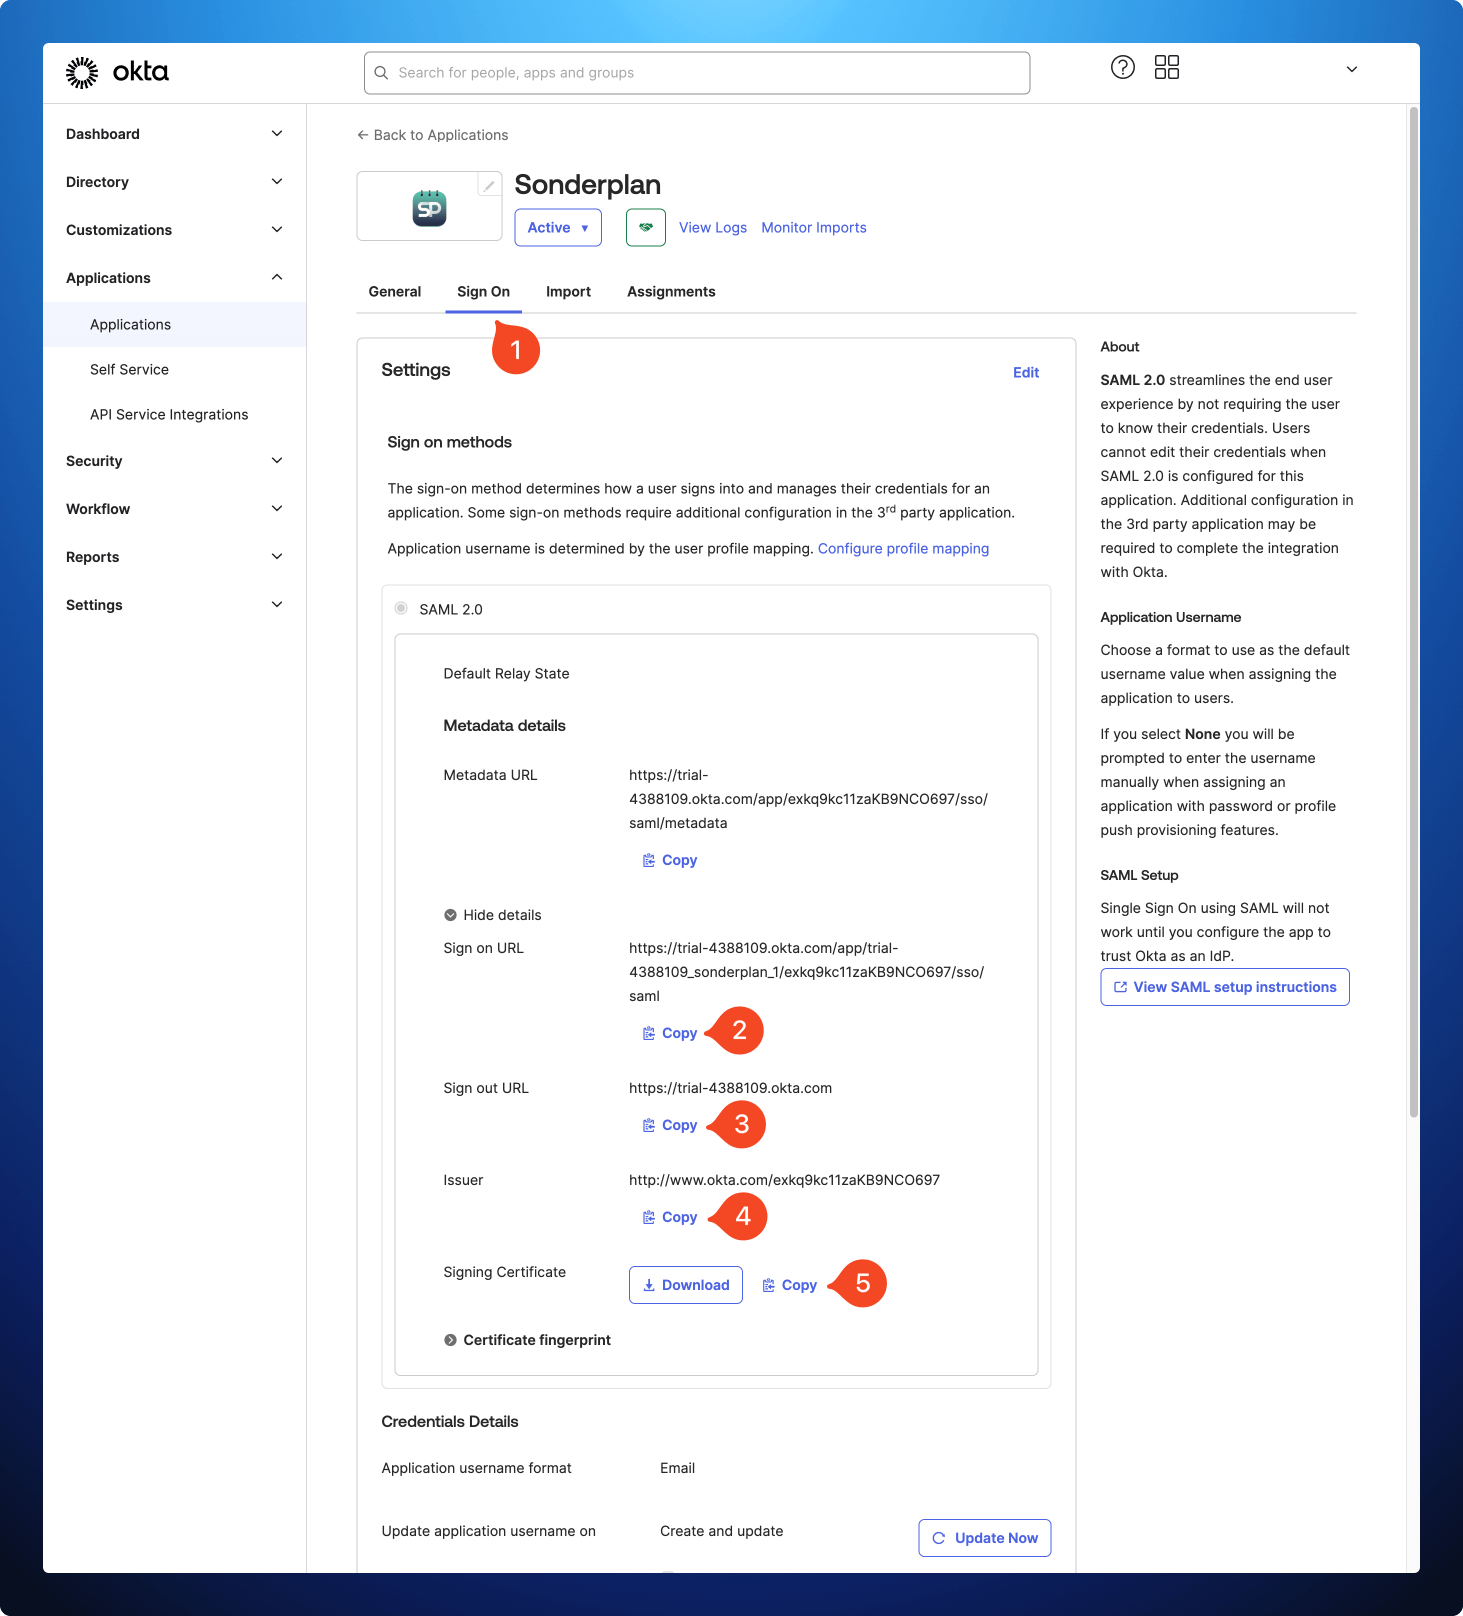 1. In the Okta Admin panel, click **Sign On** within the *Sonderplan*\* application and scroll down to the **SAML 2.0** section
2. Copy the **Sign on URL** from Okta to -> **Identity Provider Login URL / SSO Endpoint** in Sonderplan
3. Copy the **Sign out URL** from Okta to -> **Identity Provider Logout URL / SLO Endpoint** in Sonderplan
4. Copy the **Issuer** from Okta to -> **Identity Provider Entity ID / Issuer URL** in Sonderplan
5. Copy the **Signing Certificate** from Okta to -> **Identity Provider X.509 Certificate** in Sonderplan
6. Click **Save Changes** in the top right corner of Sonderplan
7. Finally, you'll need to configure [your users in Sonderplan for SSO](/admin/saml-sso-settings#configure-users-for-sso)
## Benutzer für SSO konfigurieren
Nachdem Sie SAML korrekt konfiguriert haben, müssen Sie die SAML SSO-Anmeldung für jeden Ihrer Benutzer in **Admin -> Benutzer & Gruppen -> Benutzer-Editor -> SAML SSO-Login** aktivieren.
Um versehentliche Kontosperrungen aufgrund möglicher Fehlkonfigurationen oder Ausfälle des Identitätsanbieters zu vermeiden, empfehlen wir, mindestens ein Superadministrator-Konto mit der Standardanmeldeoption zu konfigurieren.
1. In the Okta Admin panel, click **Sign On** within the *Sonderplan*\* application and scroll down to the **SAML 2.0** section
2. Copy the **Sign on URL** from Okta to -> **Identity Provider Login URL / SSO Endpoint** in Sonderplan
3. Copy the **Sign out URL** from Okta to -> **Identity Provider Logout URL / SLO Endpoint** in Sonderplan
4. Copy the **Issuer** from Okta to -> **Identity Provider Entity ID / Issuer URL** in Sonderplan
5. Copy the **Signing Certificate** from Okta to -> **Identity Provider X.509 Certificate** in Sonderplan
6. Click **Save Changes** in the top right corner of Sonderplan
7. Finally, you'll need to configure [your users in Sonderplan for SSO](/admin/saml-sso-settings#configure-users-for-sso)
## Benutzer für SSO konfigurieren
Nachdem Sie SAML korrekt konfiguriert haben, müssen Sie die SAML SSO-Anmeldung für jeden Ihrer Benutzer in **Admin -> Benutzer & Gruppen -> Benutzer-Editor -> SAML SSO-Login** aktivieren.
Um versehentliche Kontosperrungen aufgrund möglicher Fehlkonfigurationen oder Ausfälle des Identitätsanbieters zu vermeiden, empfehlen wir, mindestens ein Superadministrator-Konto mit der Standardanmeldeoption zu konfigurieren.