> ## Documentation Index
> Fetch the complete documentation index at: https://docs.sonderplan.com/llms.txt
> Use this file to discover all available pages before exploring further.
# SAML Single Sign On (SSO)
> Manage SAML Single Sign-On (SSO) integration for secure and seamless user access.
## What is SAML?
Security Assertion Markup Language (SAML, pronounced SAM-el) is an open standard for exchanging authentication and authorization data between parties, in particular, between an identity provider and a service provider.
In non-jargon speak, SAML SSO (Single Sign On) lets your users login to Sonderplan (the service provider) with third party identity providers, such as Google Workspace, Okta, Azure Active Directory and Onelogin.
SAML SSO is available to all of our customers and we recommend implementing it to boost your companies security posture
SAML reduces friction, allowing your users to access Sonderplan with their existing company controlled user account.
Implementing SAML also benefits your businesses IT administrators, with less admin overhead and improved security by centralising user accounts. SAML isn't just for large enterprise, it's recommended for any business already running a central user directory such as Google Workspace.
## Enabling SAML SSO
To enable SAML SSO go to **Admin -> System Settings**, expand the **SAML Sign On (SSO) Settings** accordion and then change the **Enable SAML SSO** option to **Enabled**.
### Identity Provider Details
These settings will be supplied via your Identity Provider, eg. Google Workspace, Microsoft Azure Active Directory etc. Please copy and paste them into the relevant fields and refer to the guides further down on how to configure SAML within your Identity Provider.
#### Identity Provider Name
This field will be displayed on the SSO sign in button on the login screen.
#### IDP Entity ID / Issuer URL
Identity Provider Issuer Entity ID, often a URL, eg. [http://okta.com/Eksj7Hhsk24klljsd](http://okta.com/Eksj7Hhsk24klljsd)
#### IDP Login URL / SSO Endpoint
The URL that Sonderplan will call to request a user login from the Identity Provider
#### IDP Logout URL / SLO Endpoint
The URL that Sonderplan will call to request a user logout to the Identity Provider
#### IDP X.509 Certificate
The authentication certificate issued by your Identity Provider
## Configuration Guides
These guides cover the most common identity providers that our customers use, however if you're running into issues or need help with configuring a different provider, please reach out to our support team.
### Google Workspace
To configure Sonderplan SAML SSO with Google Workspace, please expand and follow the instructions in each section:
1. Login to the Google Workspace Admin Console and navigate to **Apps -> Web and mobile apps**.
2. Click **Add app -> Add custom SAML app**
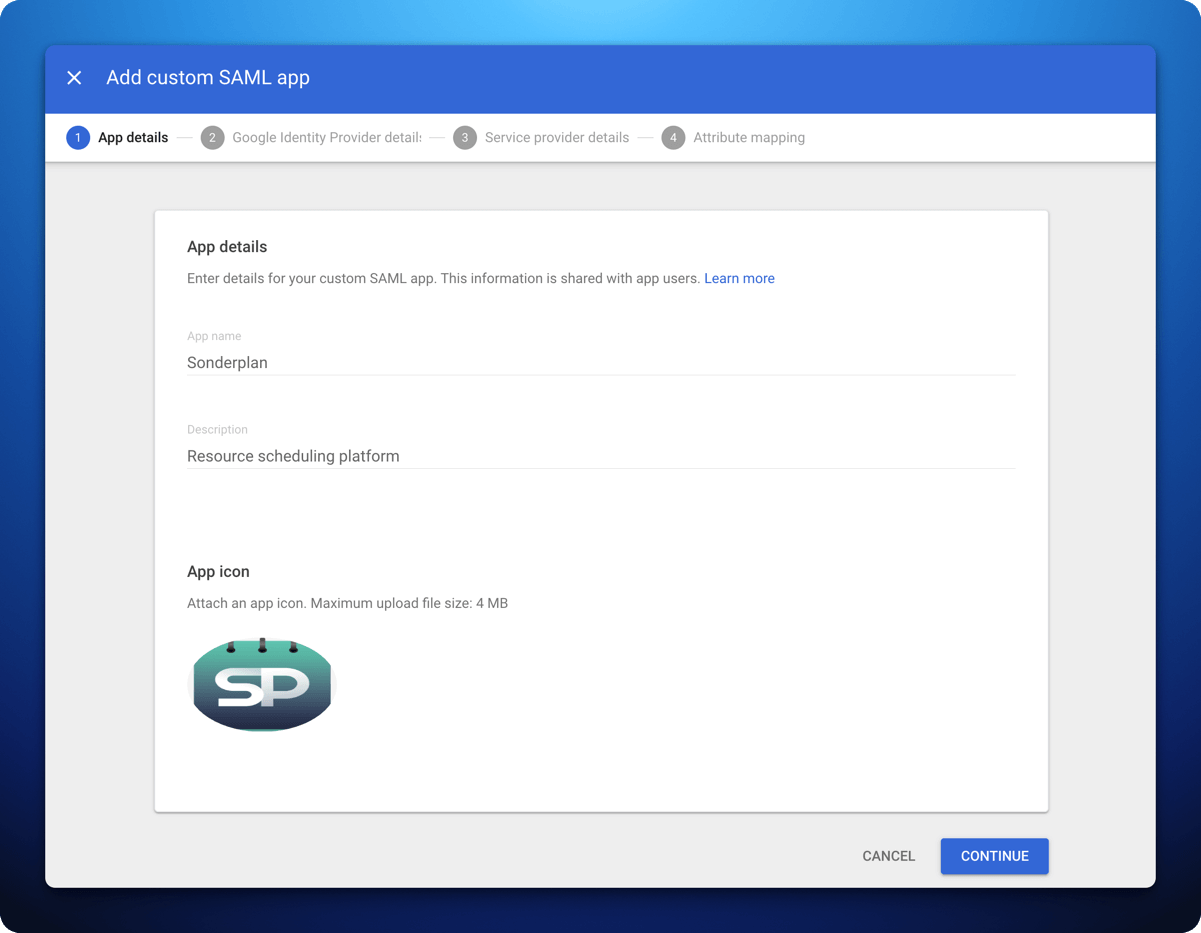 3. In **App details** enter ***Sonderplan*** as the **App name**, with a **Description** of ***Resource scheduling platform***
4. Upload the App Icon which you can save from here:
3. In **App details** enter ***Sonderplan*** as the **App name**, with a **Description** of ***Resource scheduling platform***
4. Upload the App Icon which you can save from here:
 5. Click **Continue**
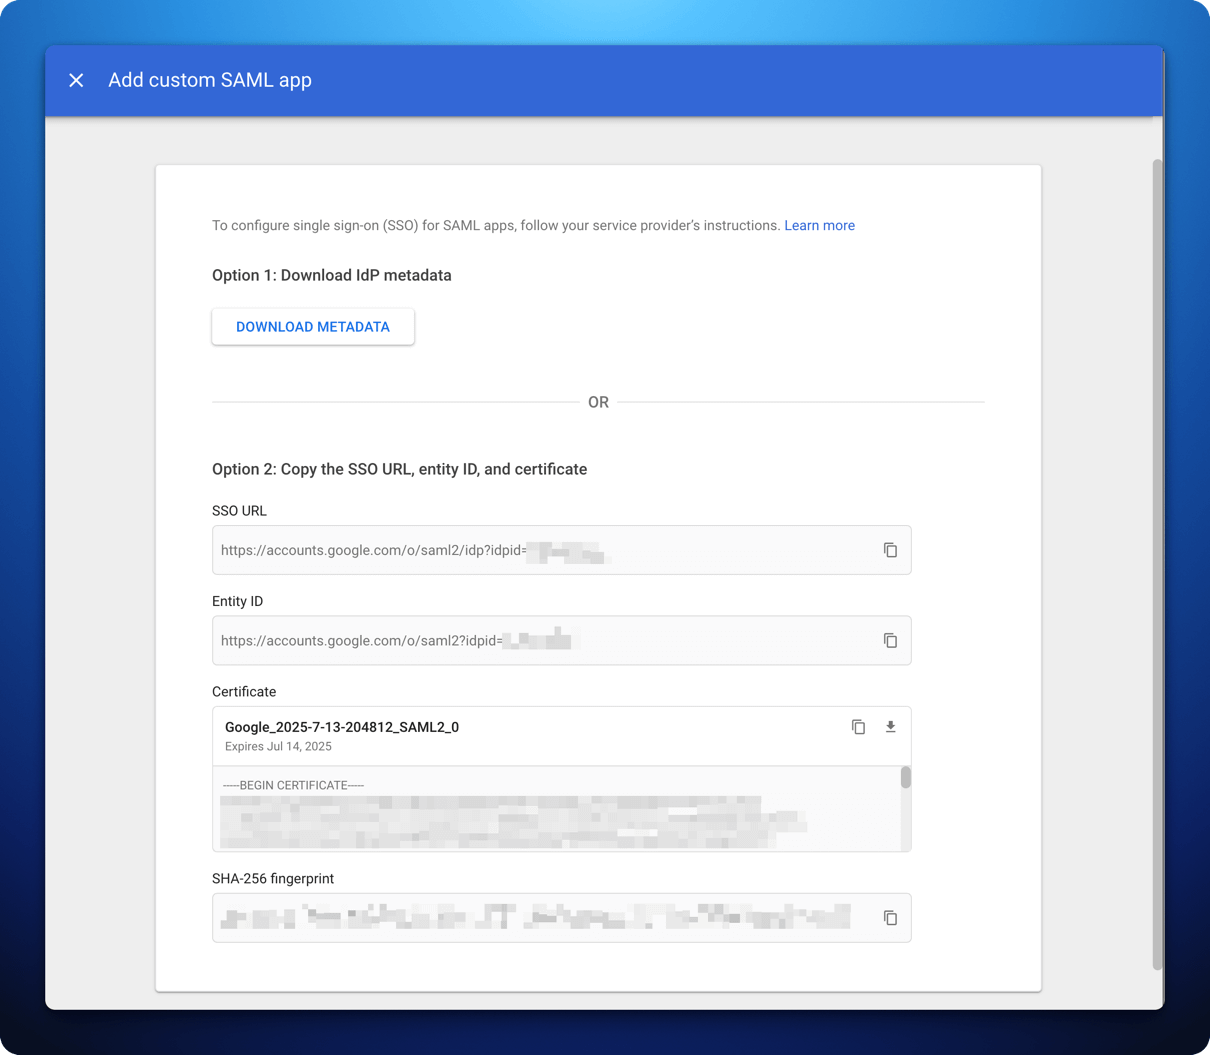 1. In Sonderplan, head over to **Admin -> System Settings** and expand the **SAML Single Sign On (SSO)** settings panel
2. Enable SAML SSO and enter ***Google Workspace*** as the **Identity Provider Name**
3. Copy the **SSO URL** from Google Workspace to -> **Identity Provider Login URL / SSO Endpoint** AND **Identity Provider Logout URL / SLO Endpoint** in Sonderplan
4. Copy the **Entity ID** from Google Workspace to -> **Identity Provider Entity ID / Issuer URL** in Sonderplan
5. Copy the **Certificate** from Google Workspace to -> **Identity Provider X.509 Certificate** in Sonderplan
6. Click **Save Changes** in the top right corner of Sonderplan
7. In Google Workspace, click **Continue**
1. In Sonderplan, head over to **Admin -> System Settings** and expand the **SAML Single Sign On (SSO)** settings panel
2. Enable SAML SSO and enter ***Google Workspace*** as the **Identity Provider Name**
3. Copy the **SSO URL** from Google Workspace to -> **Identity Provider Login URL / SSO Endpoint** AND **Identity Provider Logout URL / SLO Endpoint** in Sonderplan
4. Copy the **Entity ID** from Google Workspace to -> **Identity Provider Entity ID / Issuer URL** in Sonderplan
5. Copy the **Certificate** from Google Workspace to -> **Identity Provider X.509 Certificate** in Sonderplan
6. Click **Save Changes** in the top right corner of Sonderplan
7. In Google Workspace, click **Continue**
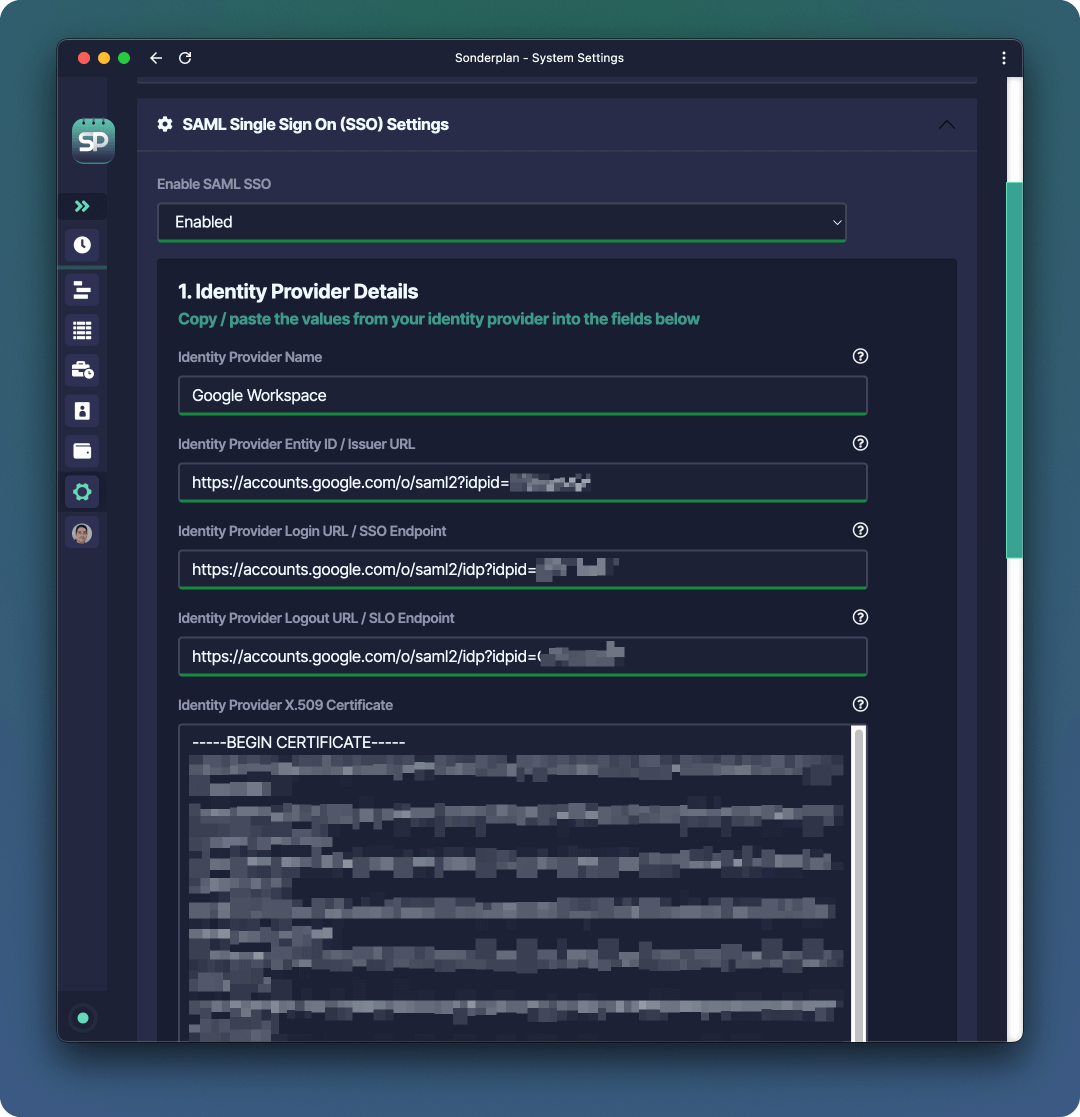
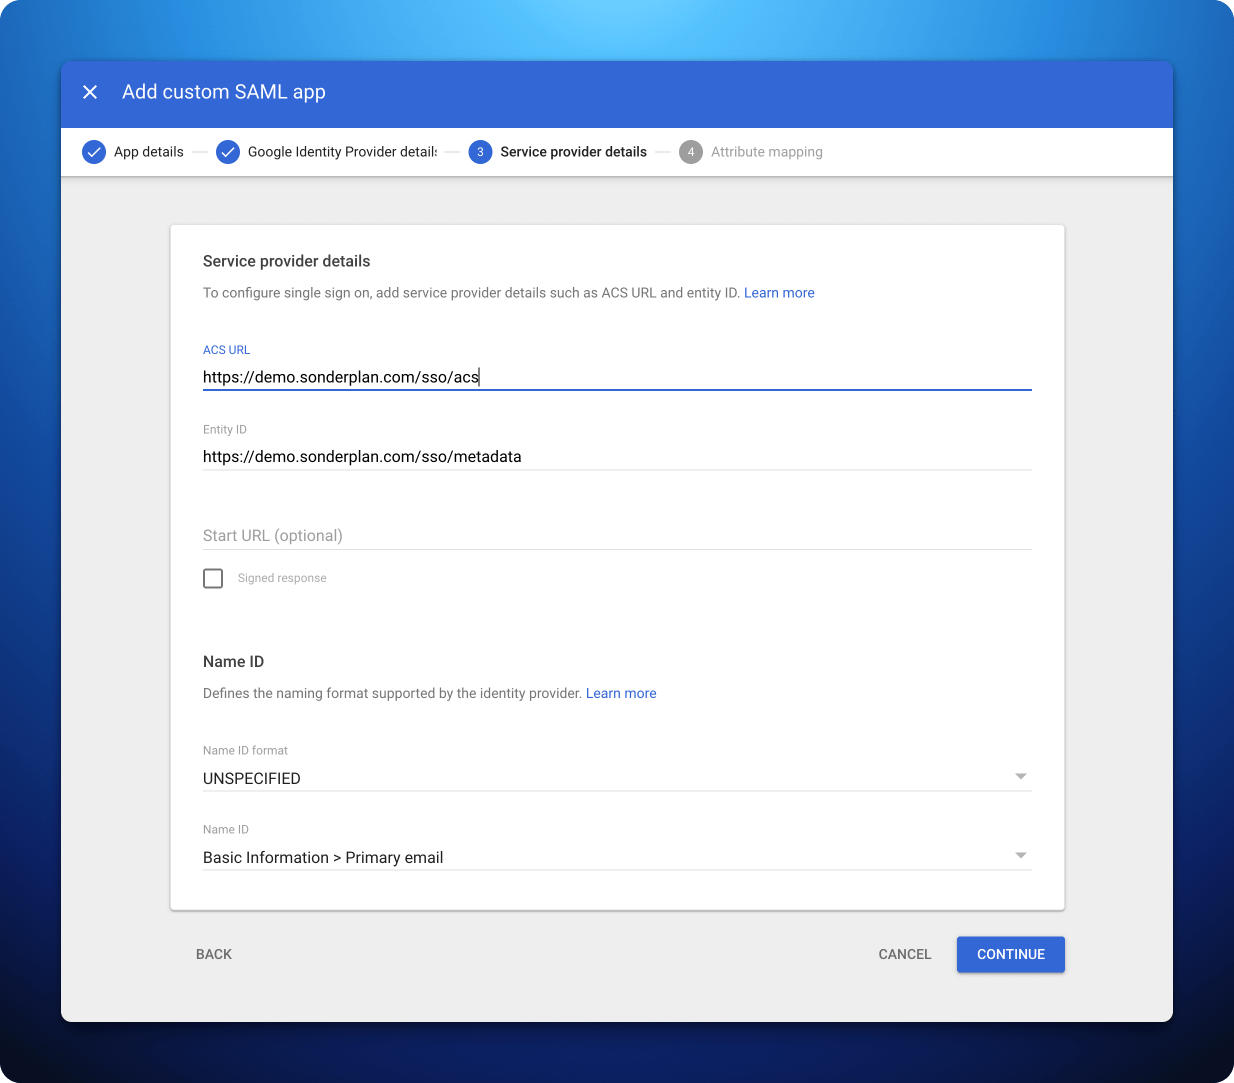 1. Copy the **Recipient / ACS (Consumer) URL** from Sonderplan to -> **ACS URL** in Google Workspace Admin Console
2. Copy the **Entity ID / Audience / Metadata URL** from Sonderplan to -> **Entity ID** in Google Workspace Admin Console
3. Make sure **Name ID** in Google Workspace Admin Console is set to **Basic information > Primary Email**
4. Click **Continue**
1. Copy the **Recipient / ACS (Consumer) URL** from Sonderplan to -> **ACS URL** in Google Workspace Admin Console
2. Copy the **Entity ID / Audience / Metadata URL** from Sonderplan to -> **Entity ID** in Google Workspace Admin Console
3. Make sure **Name ID** in Google Workspace Admin Console is set to **Basic information > Primary Email**
4. Click **Continue**
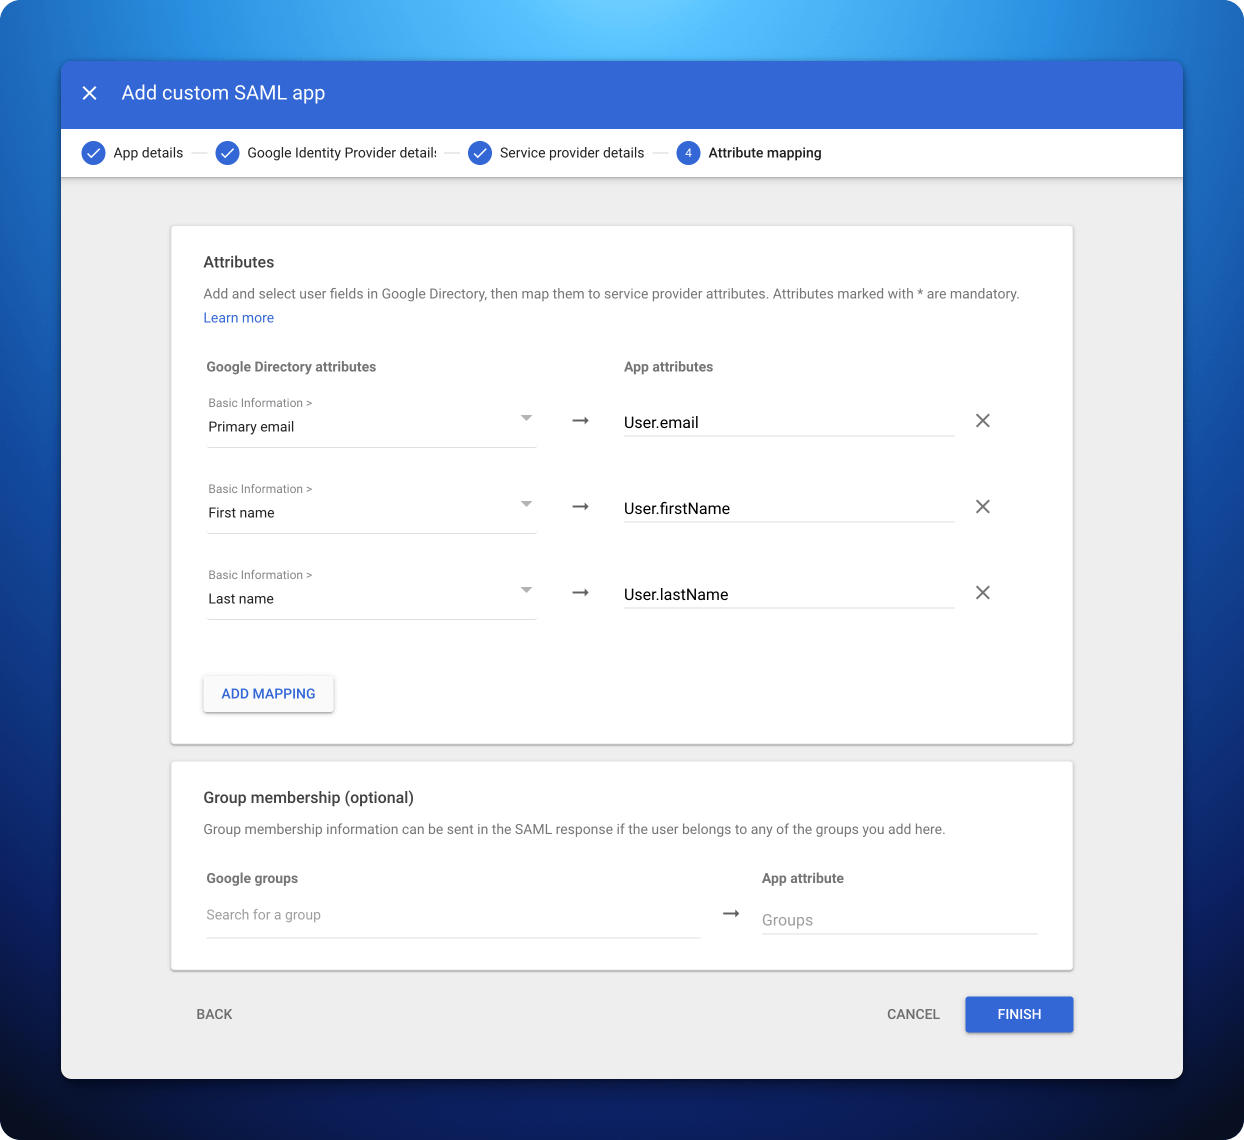 1. Configure the mapping of Google Directory attributes to the attributes of Sonderplan. Please refer to the screenshot above or table below.
\| Google Directory attributes | App attributes |
\|------------------------------------|----------------|
\| Basic Information -> Primary email | User.email |
\| Basic Information -> First name | User.firstName |
\| Basic Information -> Last name | User.lastName |
2. Click **Finish**
Once the app has been created, you'll need to enable the SAML app for your Google Workspace users.
1. Configure the mapping of Google Directory attributes to the attributes of Sonderplan. Please refer to the screenshot above or table below.
\| Google Directory attributes | App attributes |
\|------------------------------------|----------------|
\| Basic Information -> Primary email | User.email |
\| Basic Information -> First name | User.firstName |
\| Basic Information -> Last name | User.lastName |
2. Click **Finish**
Once the app has been created, you'll need to enable the SAML app for your Google Workspace users.
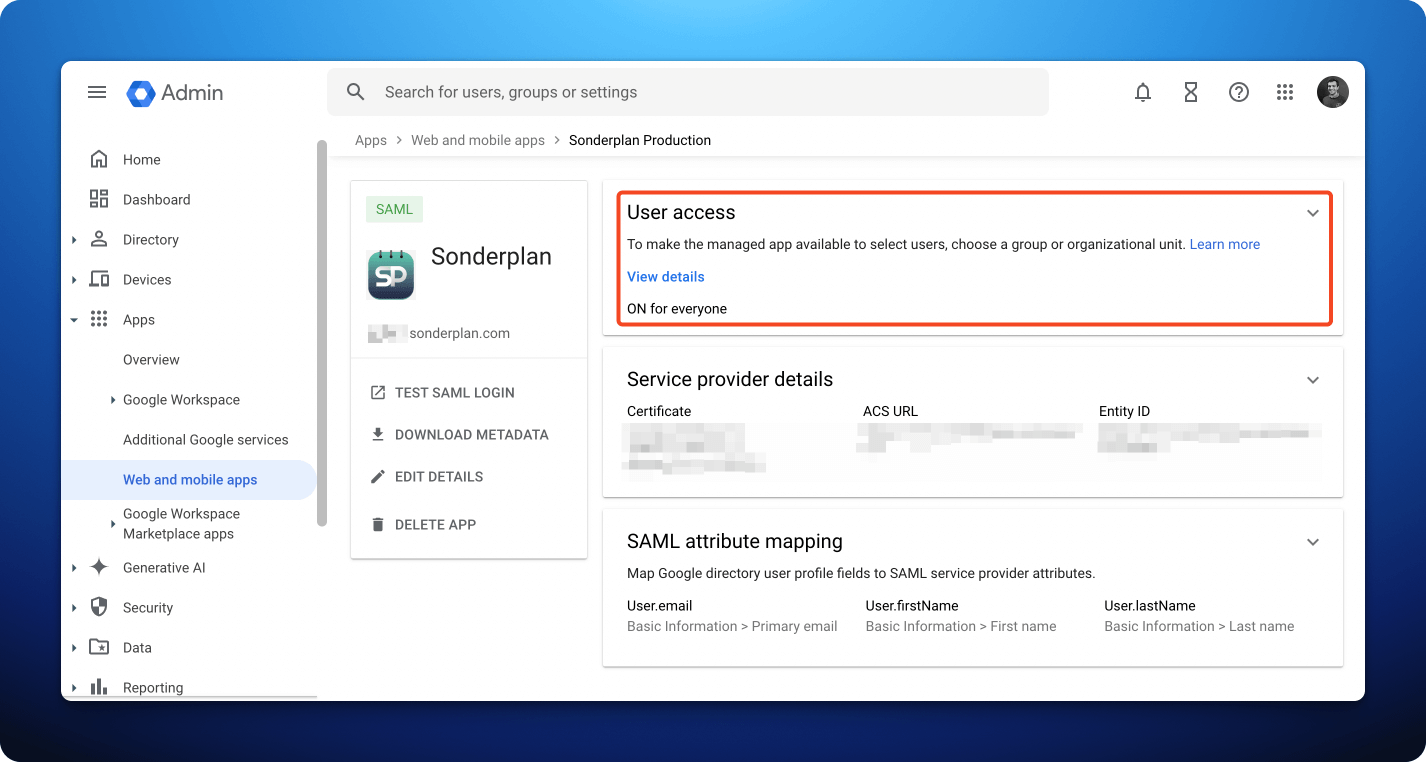 1. In the **Google Workspace Admin Console** navigate to **Apps -> Web and mobile apps -> Sonderplan -> User Access** change the access setting to **ON for everyone**
2. Finally, you'll need to configure [your users in Sonderplan for SSO](/admin/saml-sso-settings#configure-users-for-sso)
### Microsoft Entra
To configure Sonderplan SAML SSO with Microsoft Entra, please expand and follow the instructions in each section:
1. Login to the Microsoft Azure Portal and navigate to **your directory -> Enterprise Applications -> All applications -> New application**
1. In the **Google Workspace Admin Console** navigate to **Apps -> Web and mobile apps -> Sonderplan -> User Access** change the access setting to **ON for everyone**
2. Finally, you'll need to configure [your users in Sonderplan for SSO](/admin/saml-sso-settings#configure-users-for-sso)
### Microsoft Entra
To configure Sonderplan SAML SSO with Microsoft Entra, please expand and follow the instructions in each section:
1. Login to the Microsoft Azure Portal and navigate to **your directory -> Enterprise Applications -> All applications -> New application**
 2. In the Microsoft Entra Gallery, click **Create your own Application**
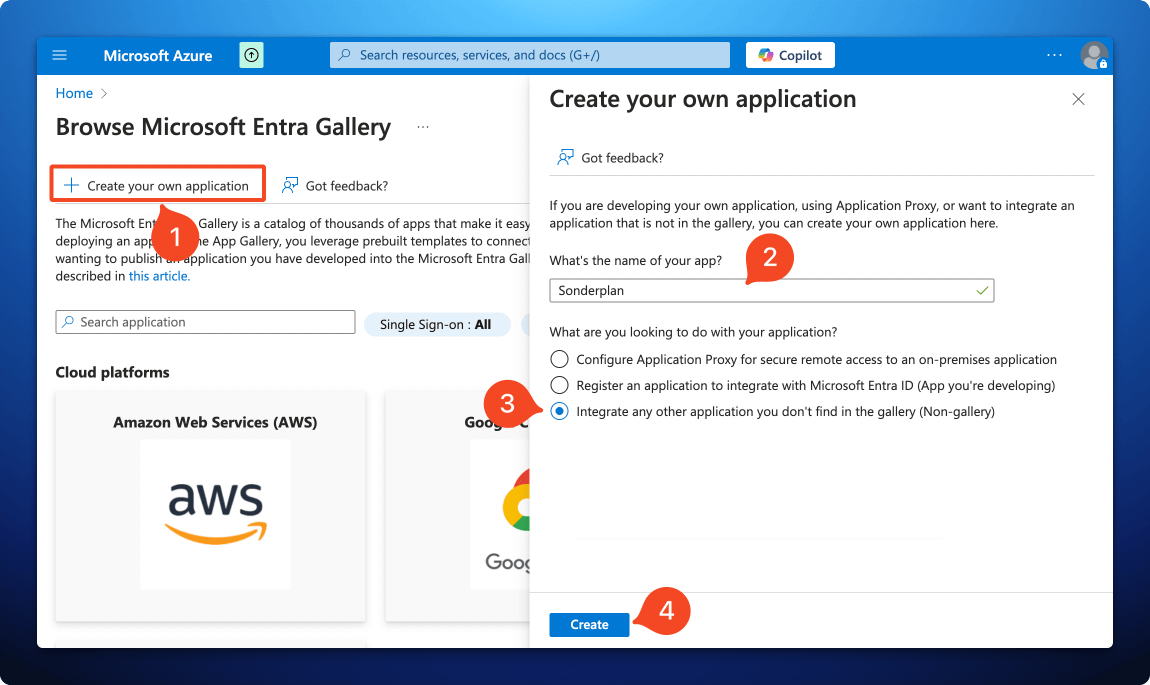 3. Enter ***Sonderplan*** as the name of the app
4. Check that the option *Integrate any other application you don't find in the gallery (Non-gallery)* is selected
5. Click **Create**
3. Enter ***Sonderplan*** as the name of the app
4. Check that the option *Integrate any other application you don't find in the gallery (Non-gallery)* is selected
5. Click **Create**
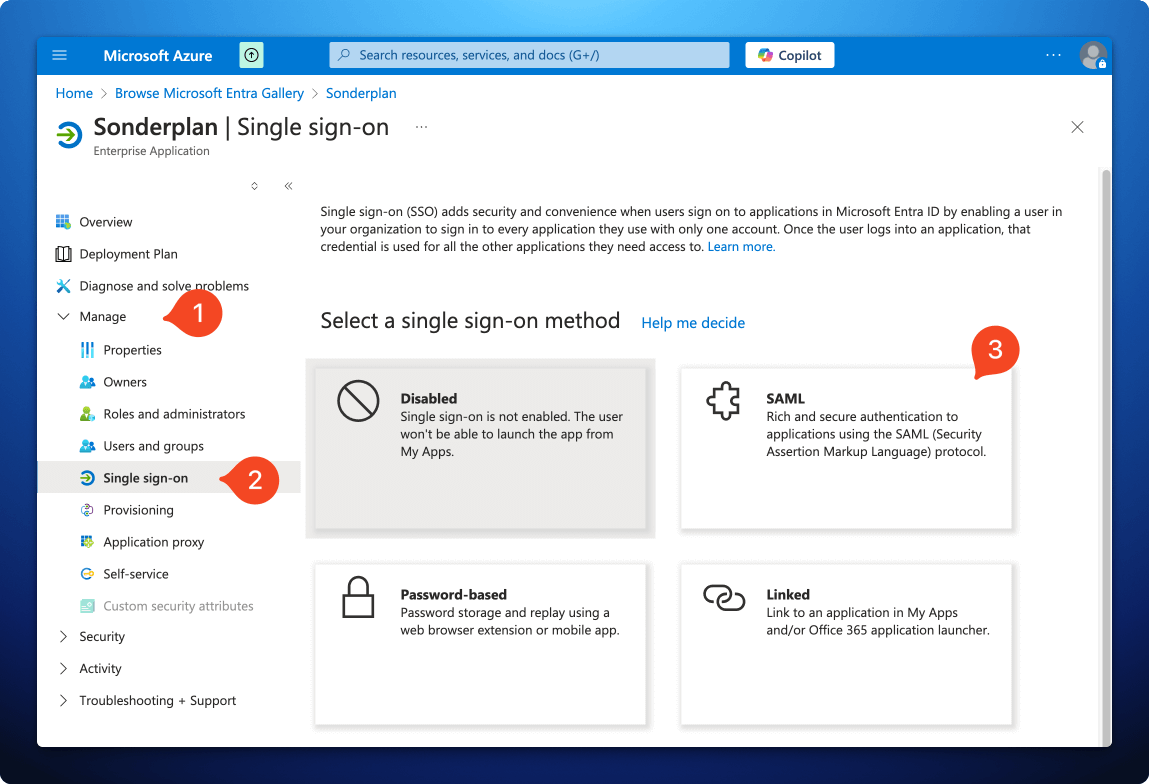 1. In the newly created app *Sonderplan* app, expand the **Manage** section, then click **Single sign-on -> SAML**
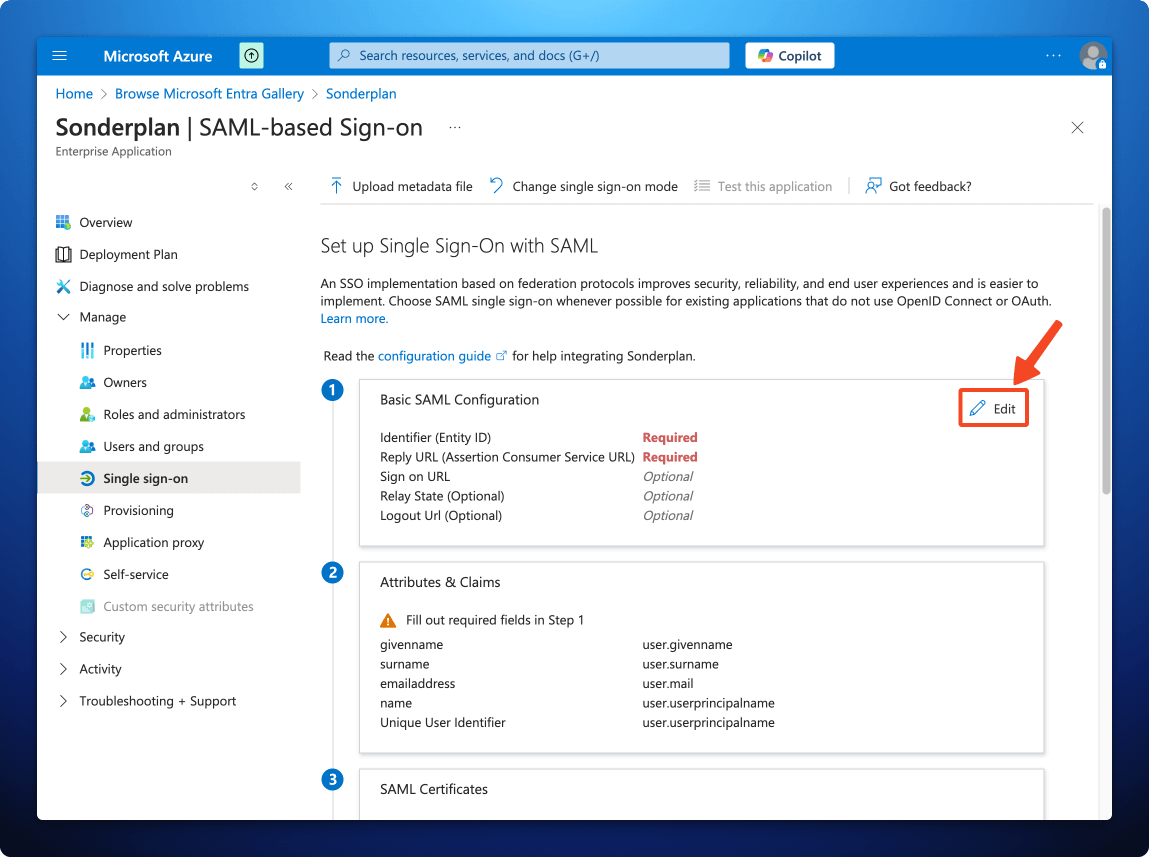
2. On the next screen, in the *Basic SAML Configuration*, click **Edit**
1. In the newly created app *Sonderplan* app, expand the **Manage** section, then click **Single sign-on -> SAML**
2. On the next screen, in the *Basic SAML Configuration*, click **Edit**
 3. In another window, open Sonderplan and head over to **Admin -> System Settings** and expand the **SAML Single Sign On (SSO)** settings panel
4. Enable SAML SSO and enter ***Microsoft Entra*** as the **Identity Provider Name** then scroll down to the "*2. Service Provider Details (Sonderplan)*" section
3. In another window, open Sonderplan and head over to **Admin -> System Settings** and expand the **SAML Single Sign On (SSO)** settings panel
4. Enable SAML SSO and enter ***Microsoft Entra*** as the **Identity Provider Name** then scroll down to the "*2. Service Provider Details (Sonderplan)*" section
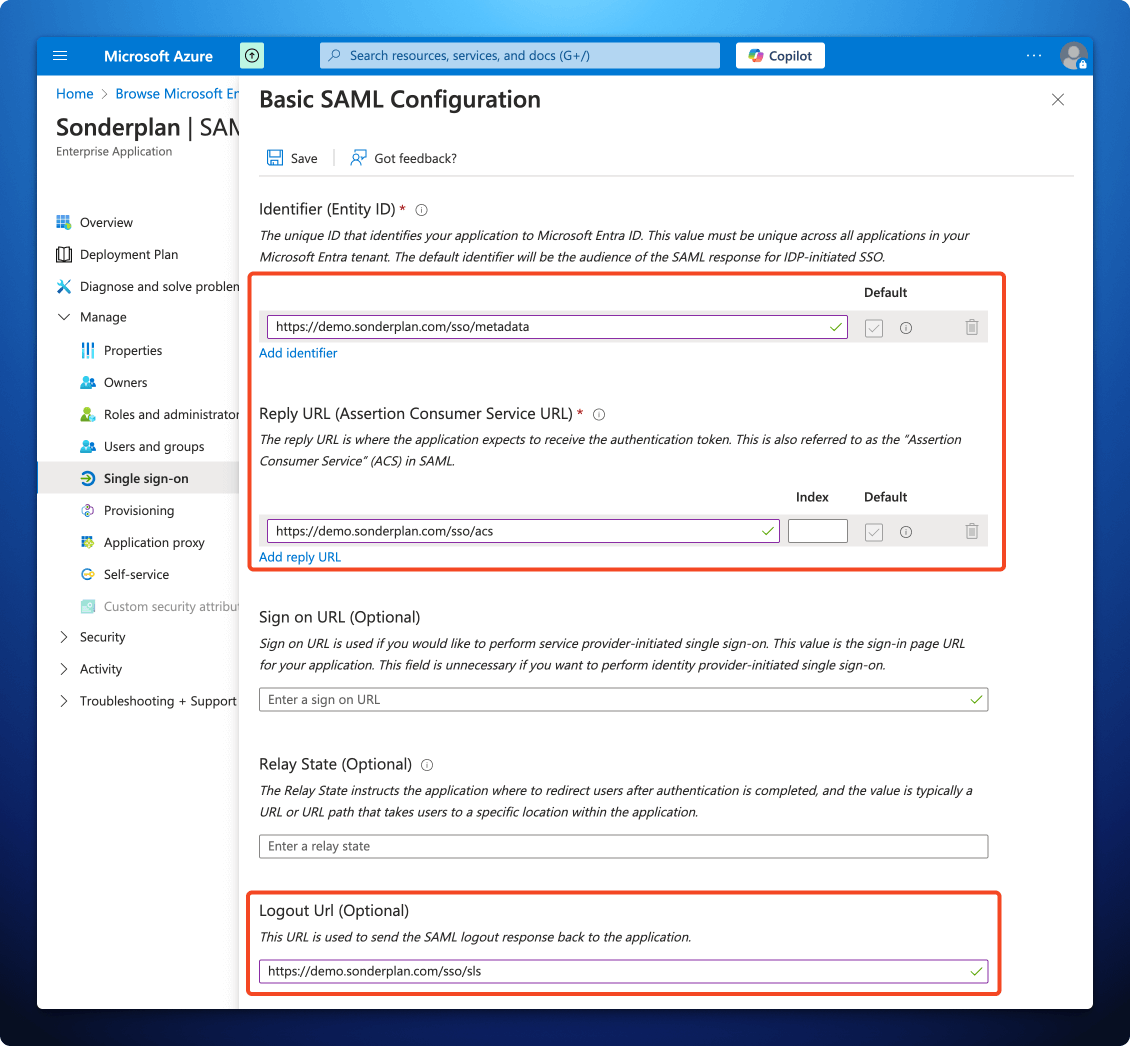
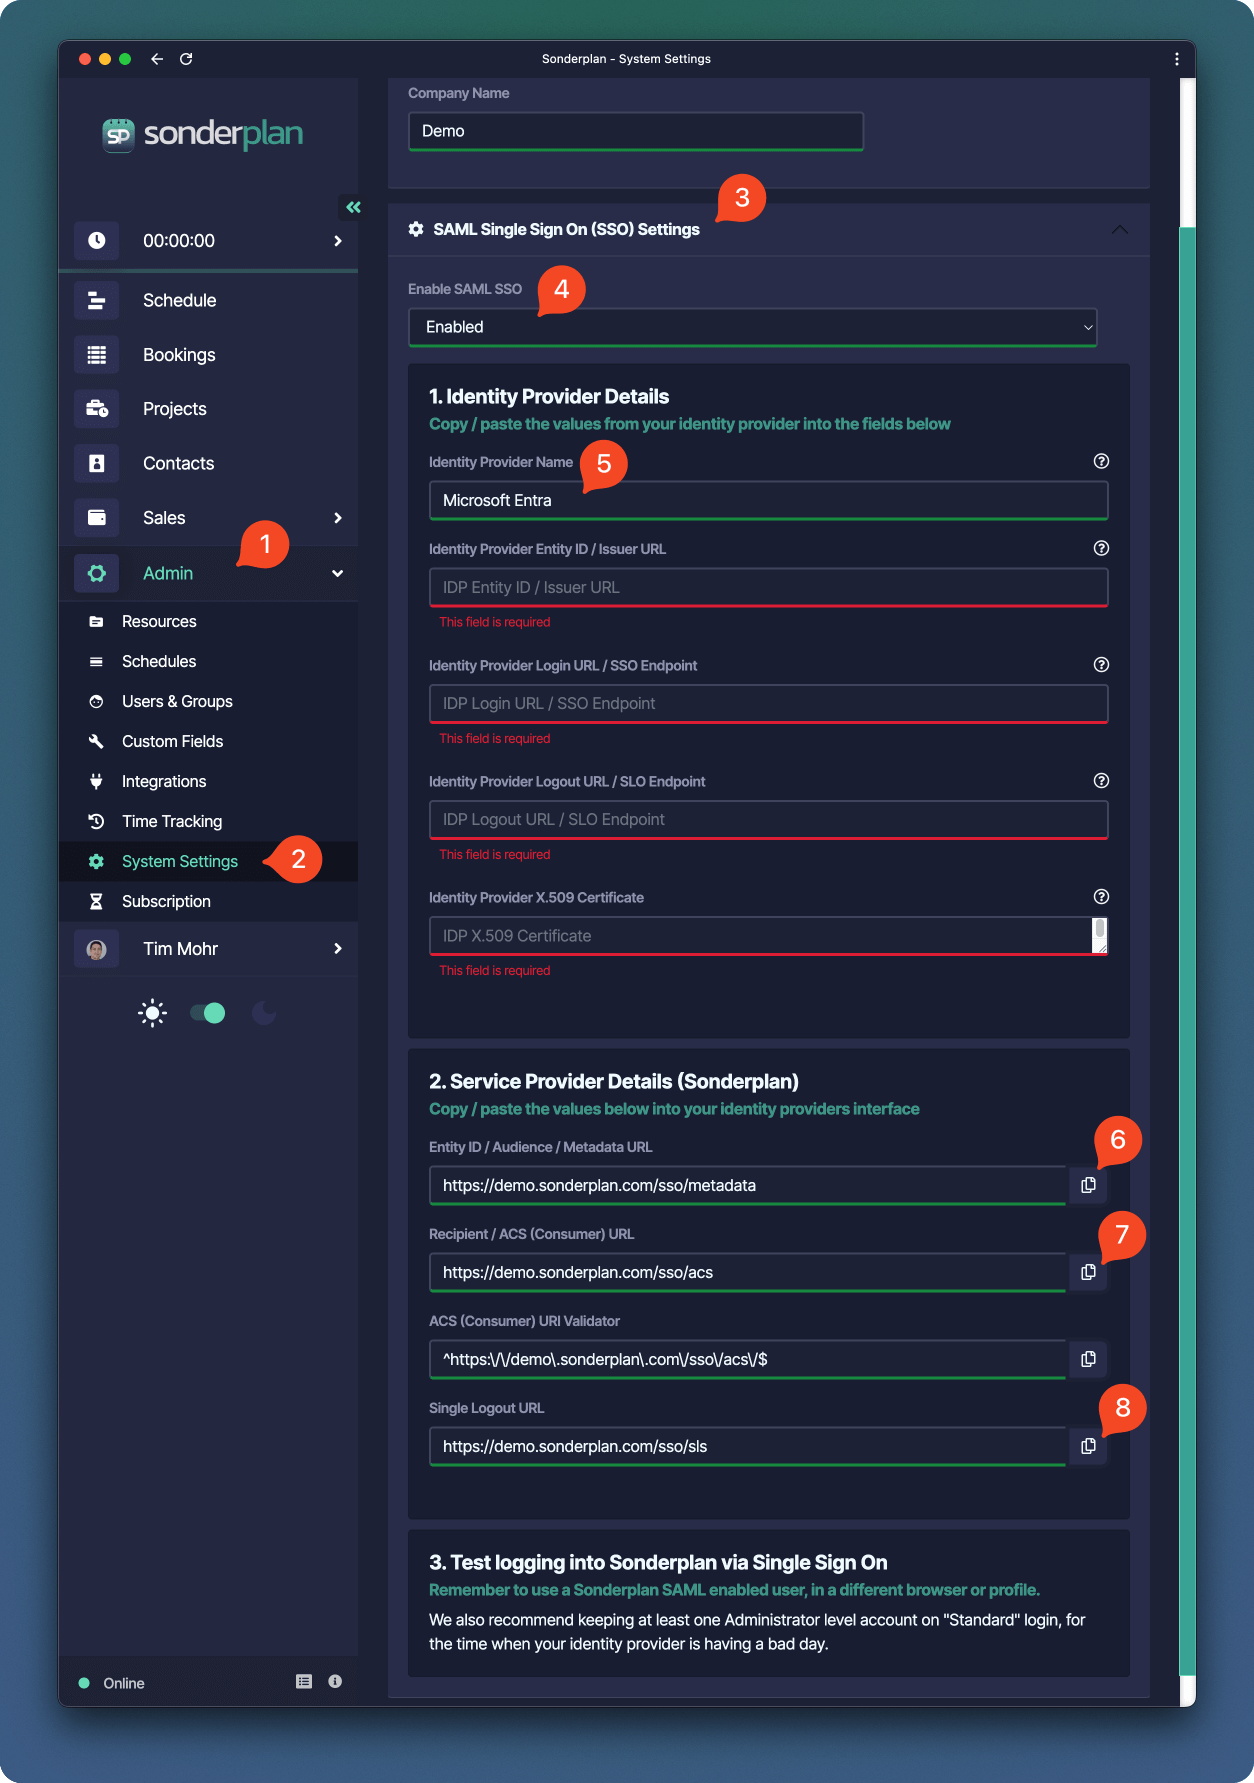 5. Copy the **Entity ID / Audience / Metadata URL** from Sonderplan to -> **Identifier Entity ID** in the Azure SAML configuration
6. Copy the **Recipient / ACS (Consumer) URL** from Sonderplan to -> **Reply URL (Assertion Consumer URL)** in the Azure SAML configuration
7. Copy the **Single Logout URL** from Sonderplan to -> \*\*Logout Url (Optional) in the Azure SAML configuration
8. Finally click **Save** at the top of the *Basic SAML Configuration* screen in the Azure Portal, then click the **x** in the top right corner
5. Copy the **Entity ID / Audience / Metadata URL** from Sonderplan to -> **Identifier Entity ID** in the Azure SAML configuration
6. Copy the **Recipient / ACS (Consumer) URL** from Sonderplan to -> **Reply URL (Assertion Consumer URL)** in the Azure SAML configuration
7. Copy the **Single Logout URL** from Sonderplan to -> \*\*Logout Url (Optional) in the Azure SAML configuration
8. Finally click **Save** at the top of the *Basic SAML Configuration* screen in the Azure Portal, then click the **x** in the top right corner
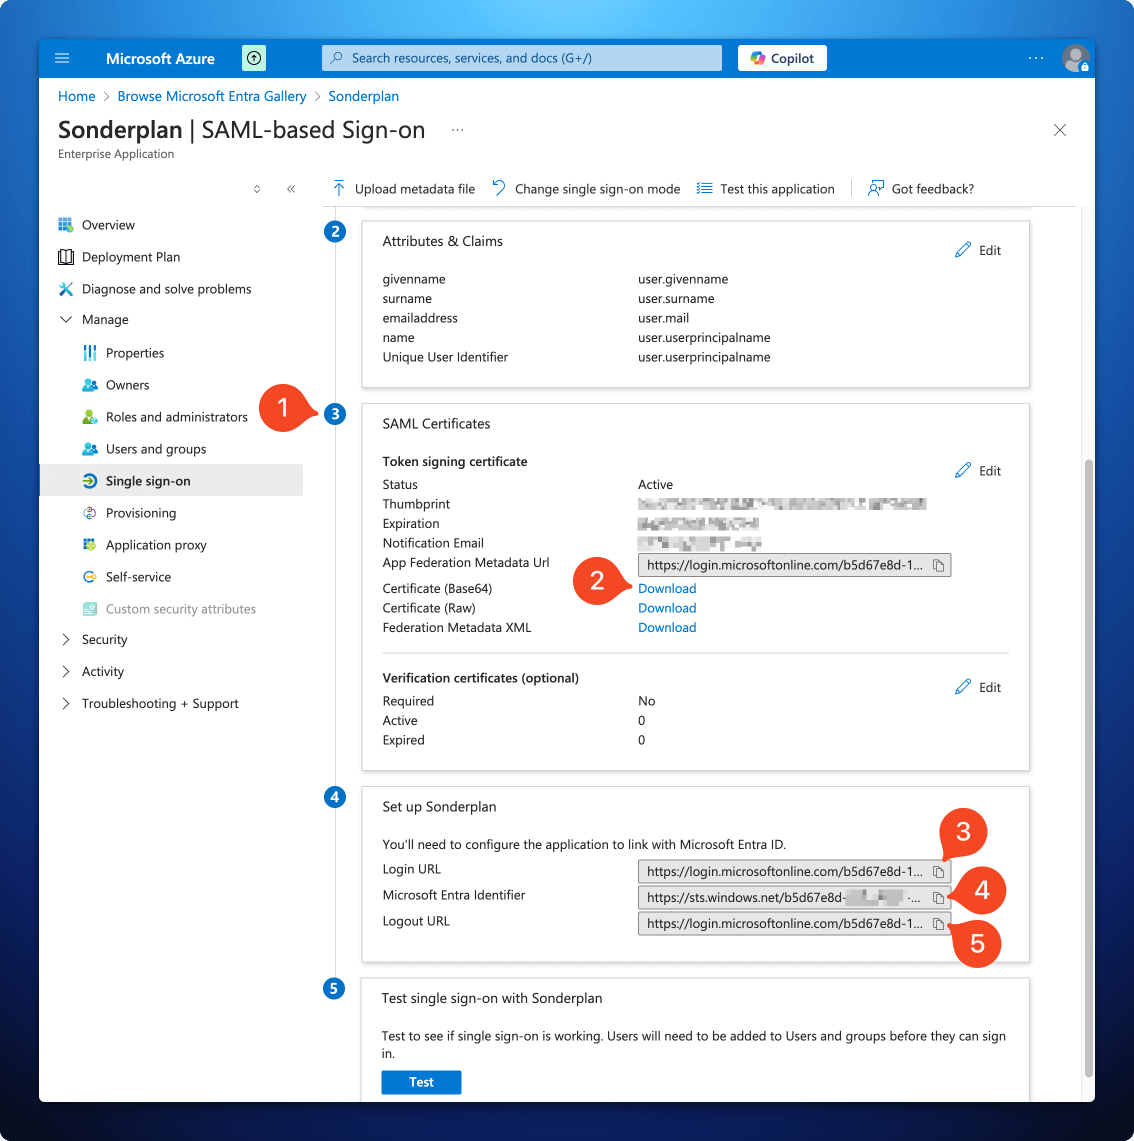 1. Still in the Azure Portal, but back on the *SAML-based Sign-on* page for the Sonderplan Enterprise app, scroll down to section **3 SAML Certificates**
2. Download the **Certificate (Base64)**, open the **Sonderplan.cer** file in a text editor on your computer and copy the entire contents of the file into the **Identity Provider X.509 Certificate** in the Sonderplan SAML SSO settings textarea
3. Copy the **Login URL** from the Azure Portal to -> **Identity Provider Login URL / SSO Endpoint** in Sonderplan
4. Copy the **Microsoft Entra Identifier** from the Azure Portal to -> **Identity Provider Entity ID / Issuer URL** in Sonderplan
5. Copy the **Logout URL** from the Azure Portal to -> **Identity Provider Logout URL / SLO Endpoint** in Sonderplan
6. Click **Save Changes** in the top right corner of Sonderplan
1. Still in the Azure Portal, but back on the *SAML-based Sign-on* page for the Sonderplan Enterprise app, scroll down to section **3 SAML Certificates**
2. Download the **Certificate (Base64)**, open the **Sonderplan.cer** file in a text editor on your computer and copy the entire contents of the file into the **Identity Provider X.509 Certificate** in the Sonderplan SAML SSO settings textarea
3. Copy the **Login URL** from the Azure Portal to -> **Identity Provider Login URL / SSO Endpoint** in Sonderplan
4. Copy the **Microsoft Entra Identifier** from the Azure Portal to -> **Identity Provider Entity ID / Issuer URL** in Sonderplan
5. Copy the **Logout URL** from the Azure Portal to -> **Identity Provider Logout URL / SLO Endpoint** in Sonderplan
6. Click **Save Changes** in the top right corner of Sonderplan

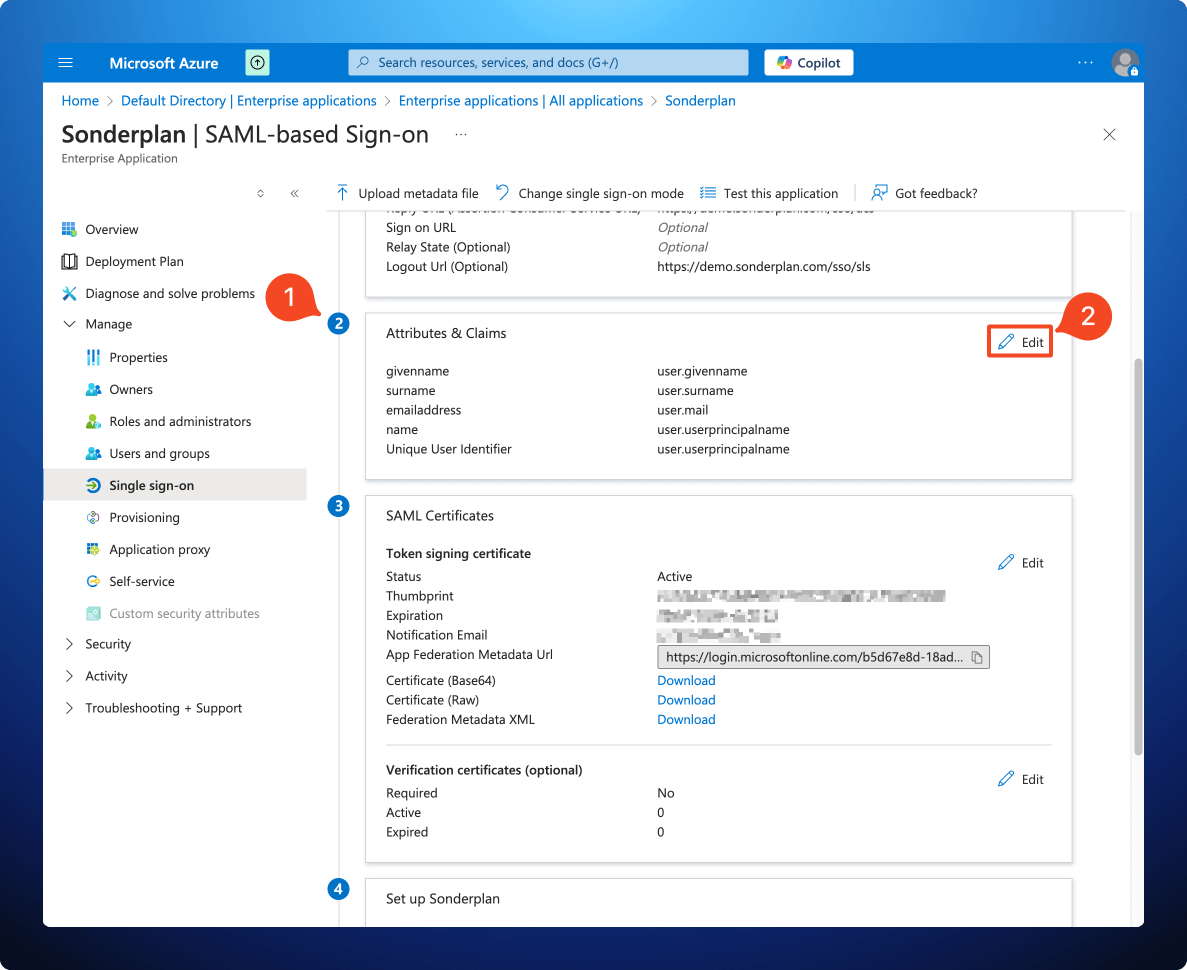 1. Still in the Azure Portal, but back on the *SAML-based Sign-on* page for the Sonderplan Enterprise app, scroll down to section **2 Attributes & Claims** and click **Edit**
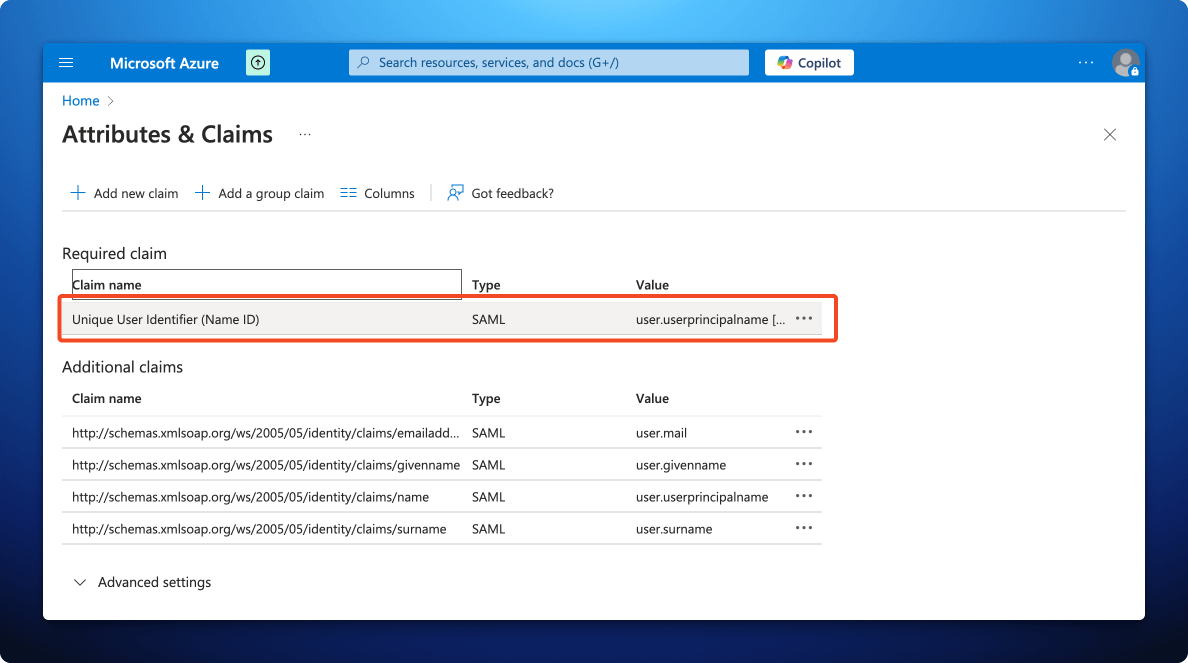 2. In the *Attributes & Claims* screen, click the **Unique User Identifier (Name ID)** claim
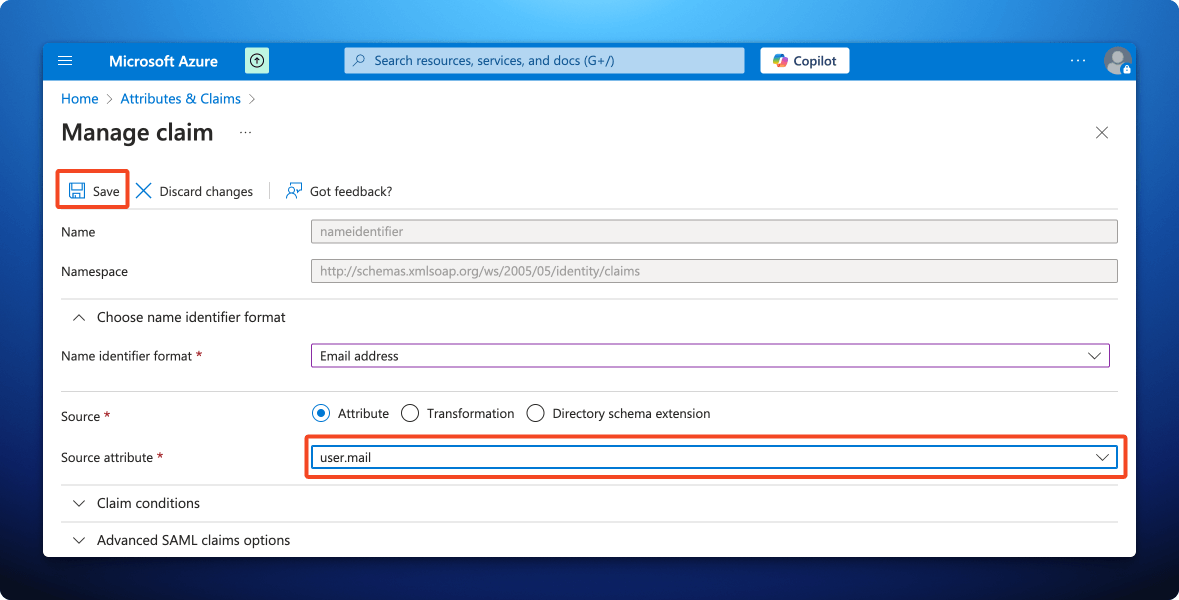 3. Change the **Source Attribute** to ***user.mail*** and click **Save**
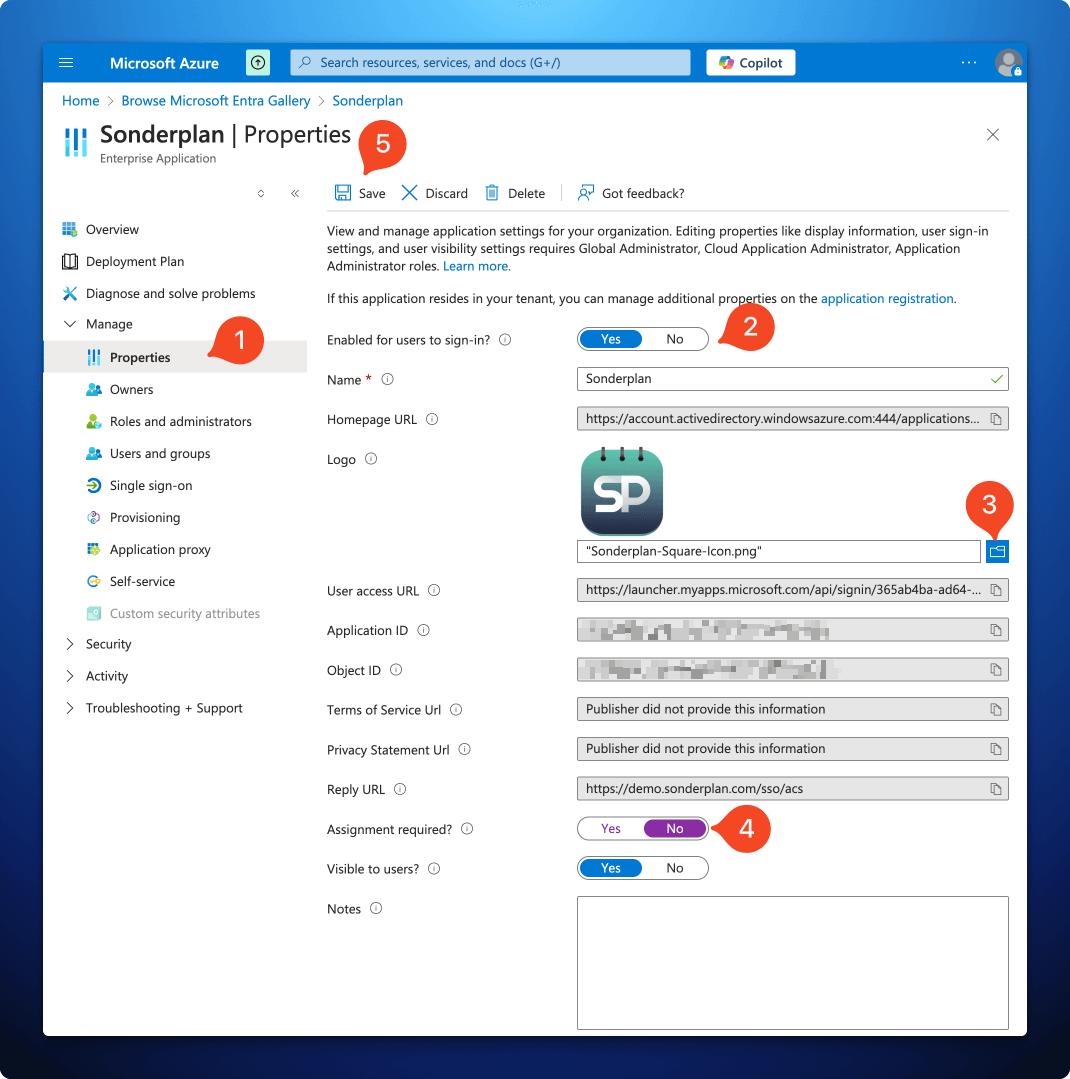 1. Still in the Sonderplan Enterprise application, expand the **Manage** section, then click on **Properties**
2. Ensure the **Enabled for users to sign-in?** slider is set to **Yes**
3. Upload the App Icon to the **Logo** field, which you can save from here:
4. Change **Assignment required?** slider to **No**
5. Click **Save** in the top left corner
6. Finally, you'll need to configure [your users in Sonderplan for SSO](/admin/saml-sso-settings#configure-users-for-sso)
### Okta
To configure Sonderplan SAML SSO with Okta, please expand and follow the instructions in each section:
1. Still in the Sonderplan Enterprise application, expand the **Manage** section, then click on **Properties**
2. Ensure the **Enabled for users to sign-in?** slider is set to **Yes**
3. Upload the App Icon to the **Logo** field, which you can save from here:
4. Change **Assignment required?** slider to **No**
5. Click **Save** in the top left corner
6. Finally, you'll need to configure [your users in Sonderplan for SSO](/admin/saml-sso-settings#configure-users-for-sso)
### Okta
To configure Sonderplan SAML SSO with Okta, please expand and follow the instructions in each section:
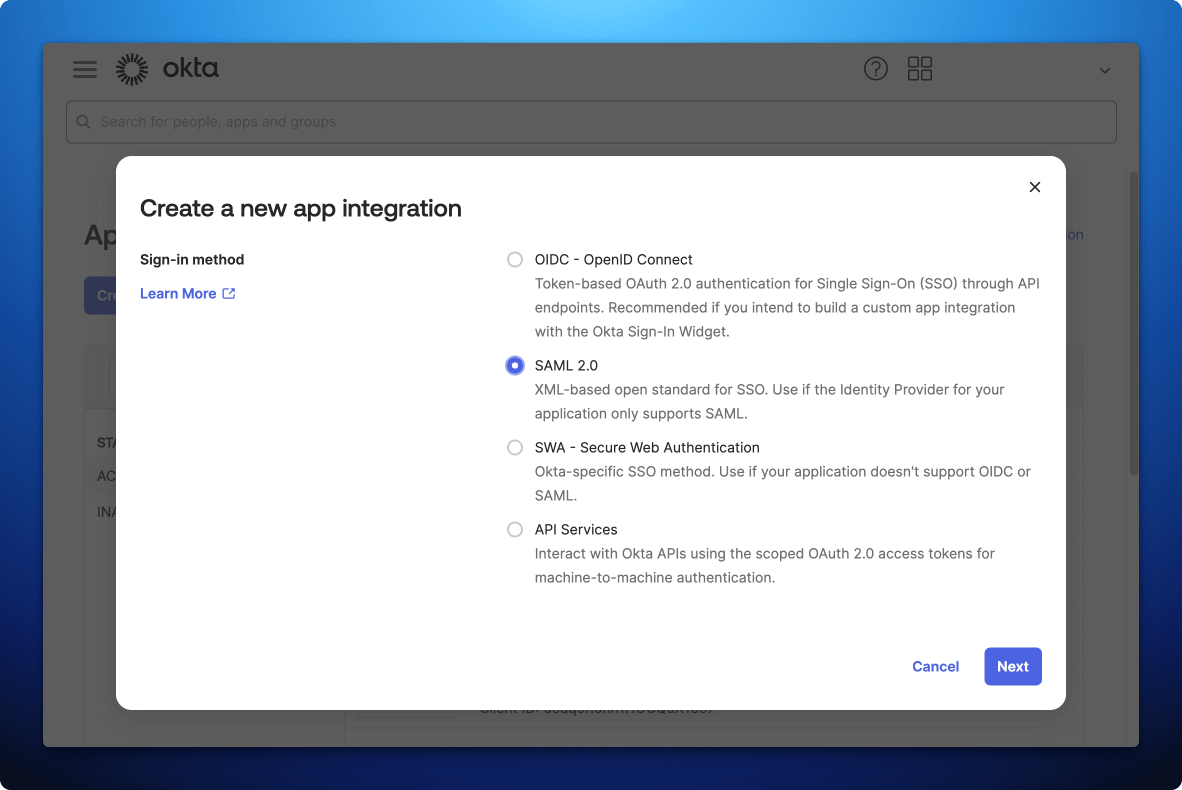 1. In the Okta Admin Console, go to **Applications -> Applications**
2. Click **Create App Integration**
3. Select **SAML 2.0** as the Sign-in method, then click **Next**
1. In the Okta Admin Console, go to **Applications -> Applications**
2. Click **Create App Integration**
3. Select **SAML 2.0** as the Sign-in method, then click **Next**
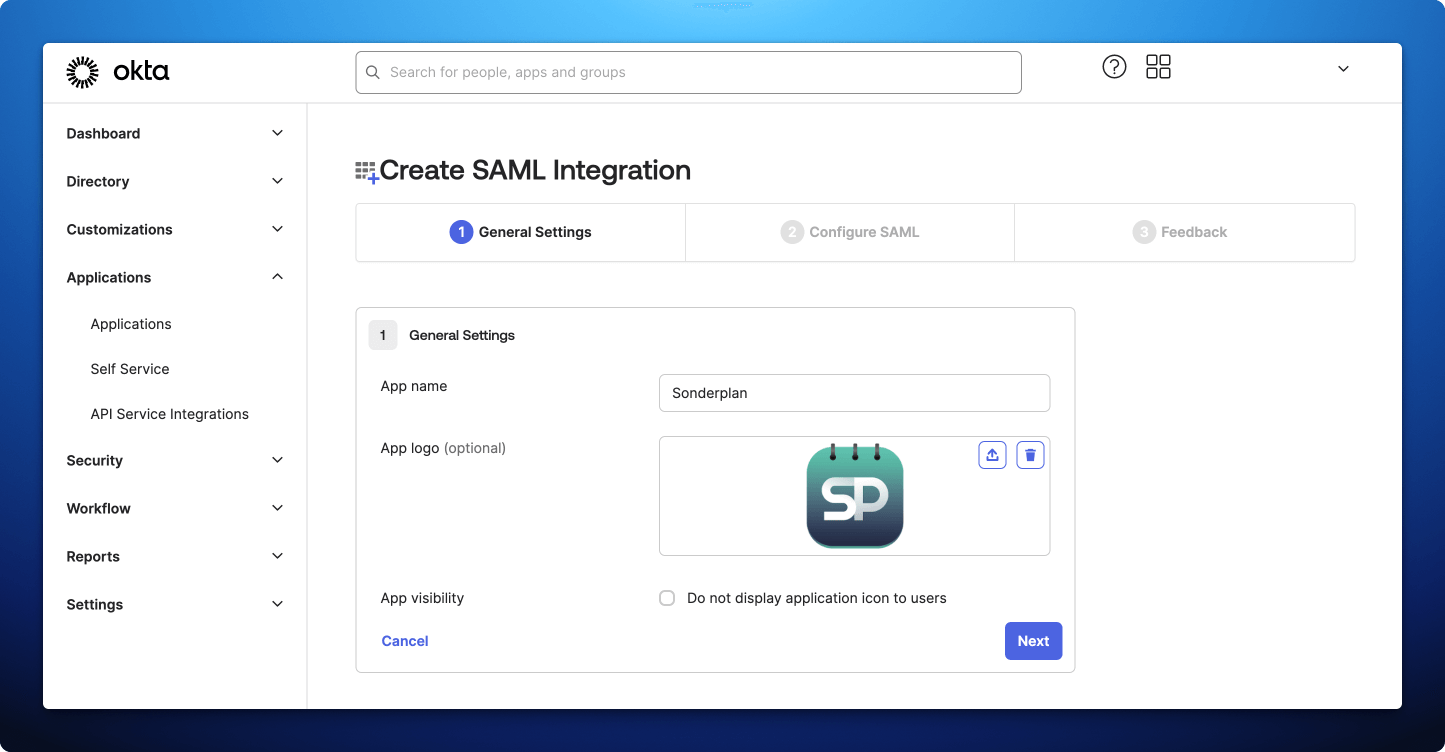 4. Enter **Sonderplan** as the **App Name**
5. Upload the App Icon to the **Logo** field, which you can save from here:
6. Then click **Next**
1. In Sonderplan, head over to **Admin -> System Settings** and expand the *SAML Single Sign On (SSO)* settings panel
2. Enable **SAML SSO** and enter **Okta** as the Identity Provider Name
3. Leave the remaining fields blank for now, and scroll to the section titled *2. Service Provider Details (Sonderplan)*
4. Enter **Sonderplan** as the **App Name**
5. Upload the App Icon to the **Logo** field, which you can save from here:
6. Then click **Next**
1. In Sonderplan, head over to **Admin -> System Settings** and expand the *SAML Single Sign On (SSO)* settings panel
2. Enable **SAML SSO** and enter **Okta** as the Identity Provider Name
3. Leave the remaining fields blank for now, and scroll to the section titled *2. Service Provider Details (Sonderplan)*
 4. Copy the **Recipient / ACS (Consumer) URL** from Sonderplan to -> **Single sign-on URL** in Okta Admin
5. Copy the **Entity ID / Audience / Metadata URL** from Sonderplan to -> **Audience URI (SP Entity ID)** in Okta Admin
4. Copy the **Recipient / ACS (Consumer) URL** from Sonderplan to -> **Single sign-on URL** in Okta Admin
5. Copy the **Entity ID / Audience / Metadata URL** from Sonderplan to -> **Audience URI (SP Entity ID)** in Okta Admin
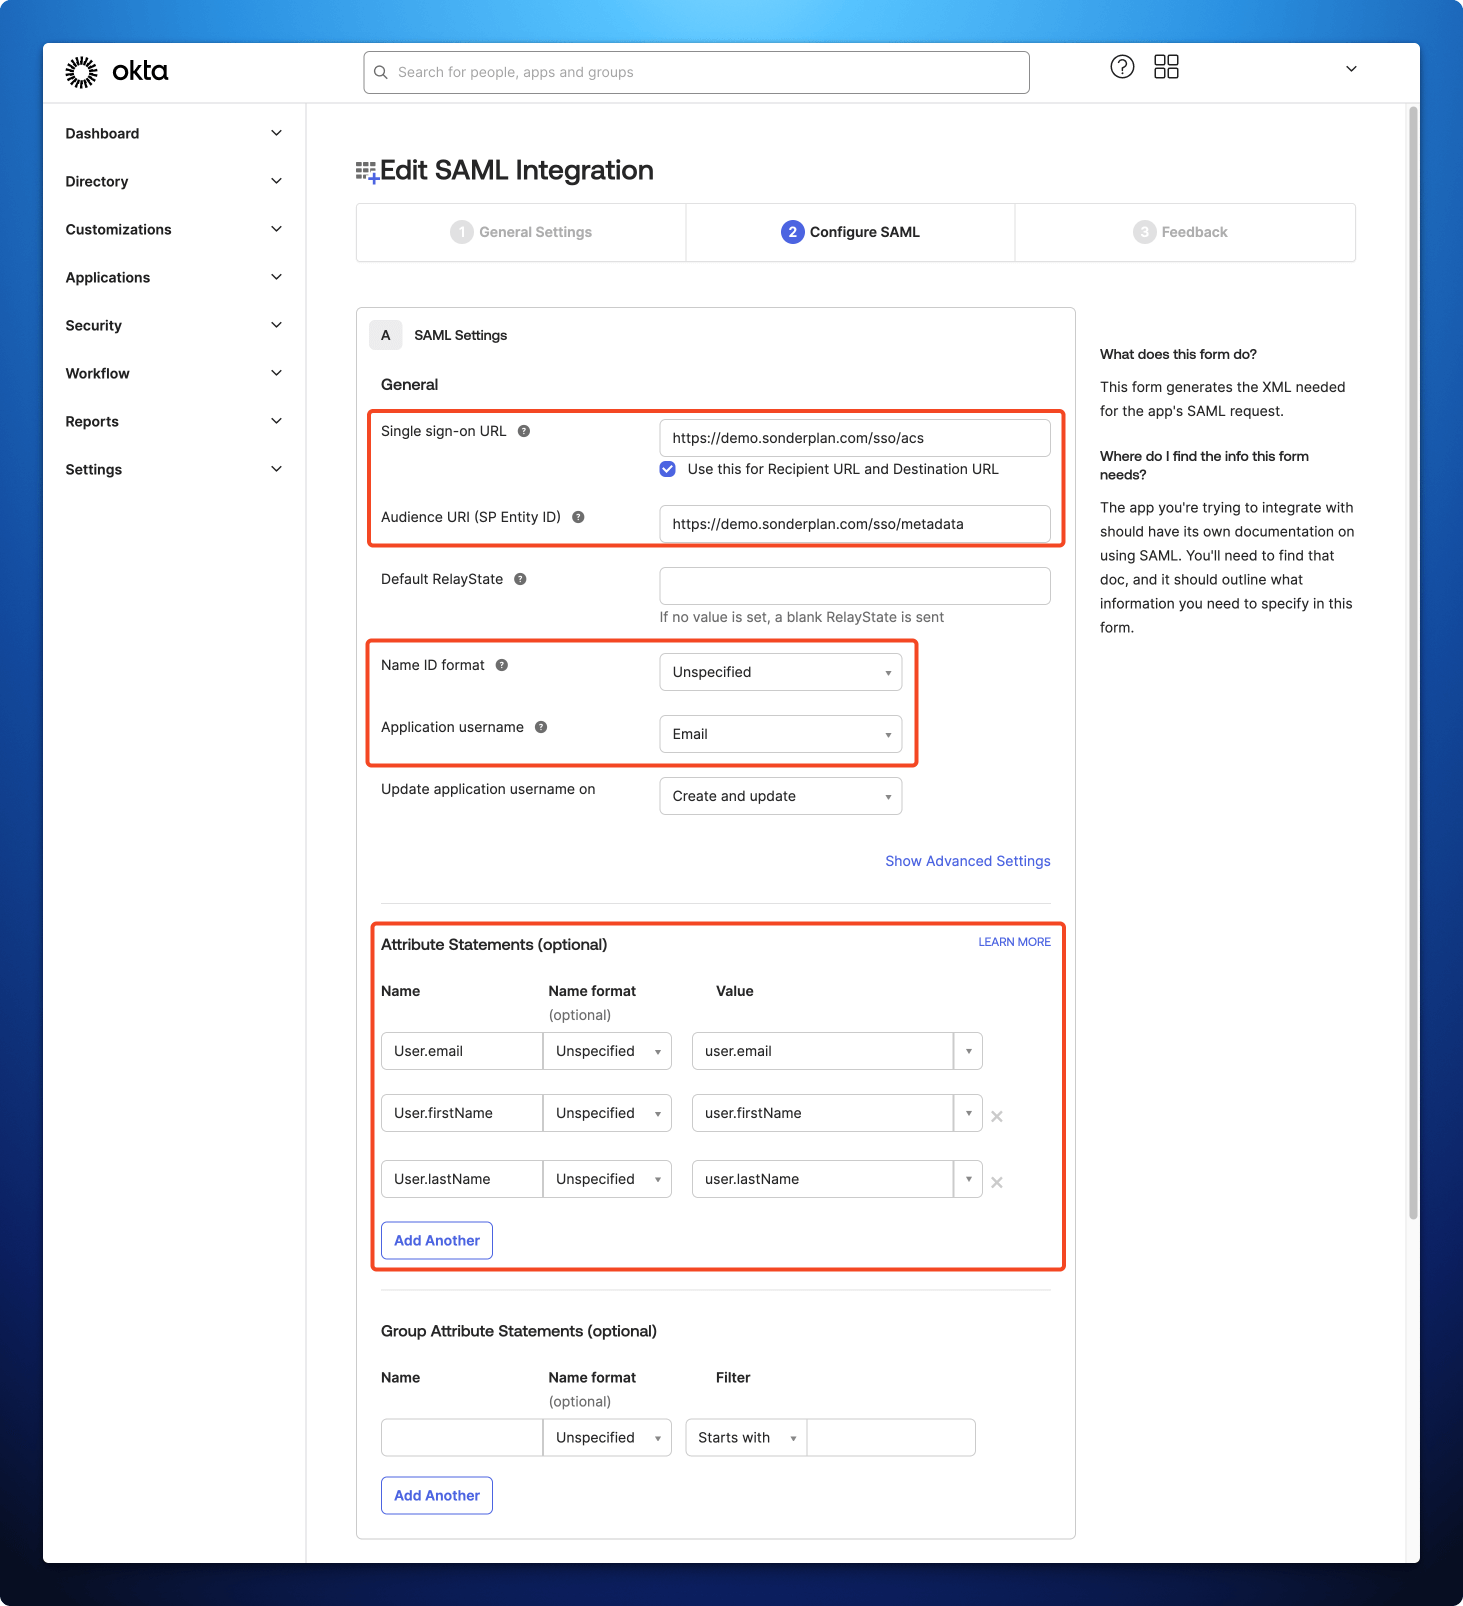 6. Make sure **Name ID format** in Okta Admin is set to **Unspecified**
7. Set **Application username** in Okta admin to **Email**
8. In the **Attribute Statements (Optional)** section, define the following mapping:
| Name | Name format | Value |
| -------------- | ----------- | -------------- |
| User.email | Unspecified | user.email |
| User.firstName | Unspecified | user.firstName |
| User.lastName | Unspecified | user.lastName |
9. Click **Next**
10. Select **I'm an Okta customer adding an internal app**
11. Check **This is an internal app that we have created**
12. Click **Finish**
6. Make sure **Name ID format** in Okta Admin is set to **Unspecified**
7. Set **Application username** in Okta admin to **Email**
8. In the **Attribute Statements (Optional)** section, define the following mapping:
| Name | Name format | Value |
| -------------- | ----------- | -------------- |
| User.email | Unspecified | user.email |
| User.firstName | Unspecified | user.firstName |
| User.lastName | Unspecified | user.lastName |
9. Click **Next**
10. Select **I'm an Okta customer adding an internal app**
11. Check **This is an internal app that we have created**
12. Click **Finish**
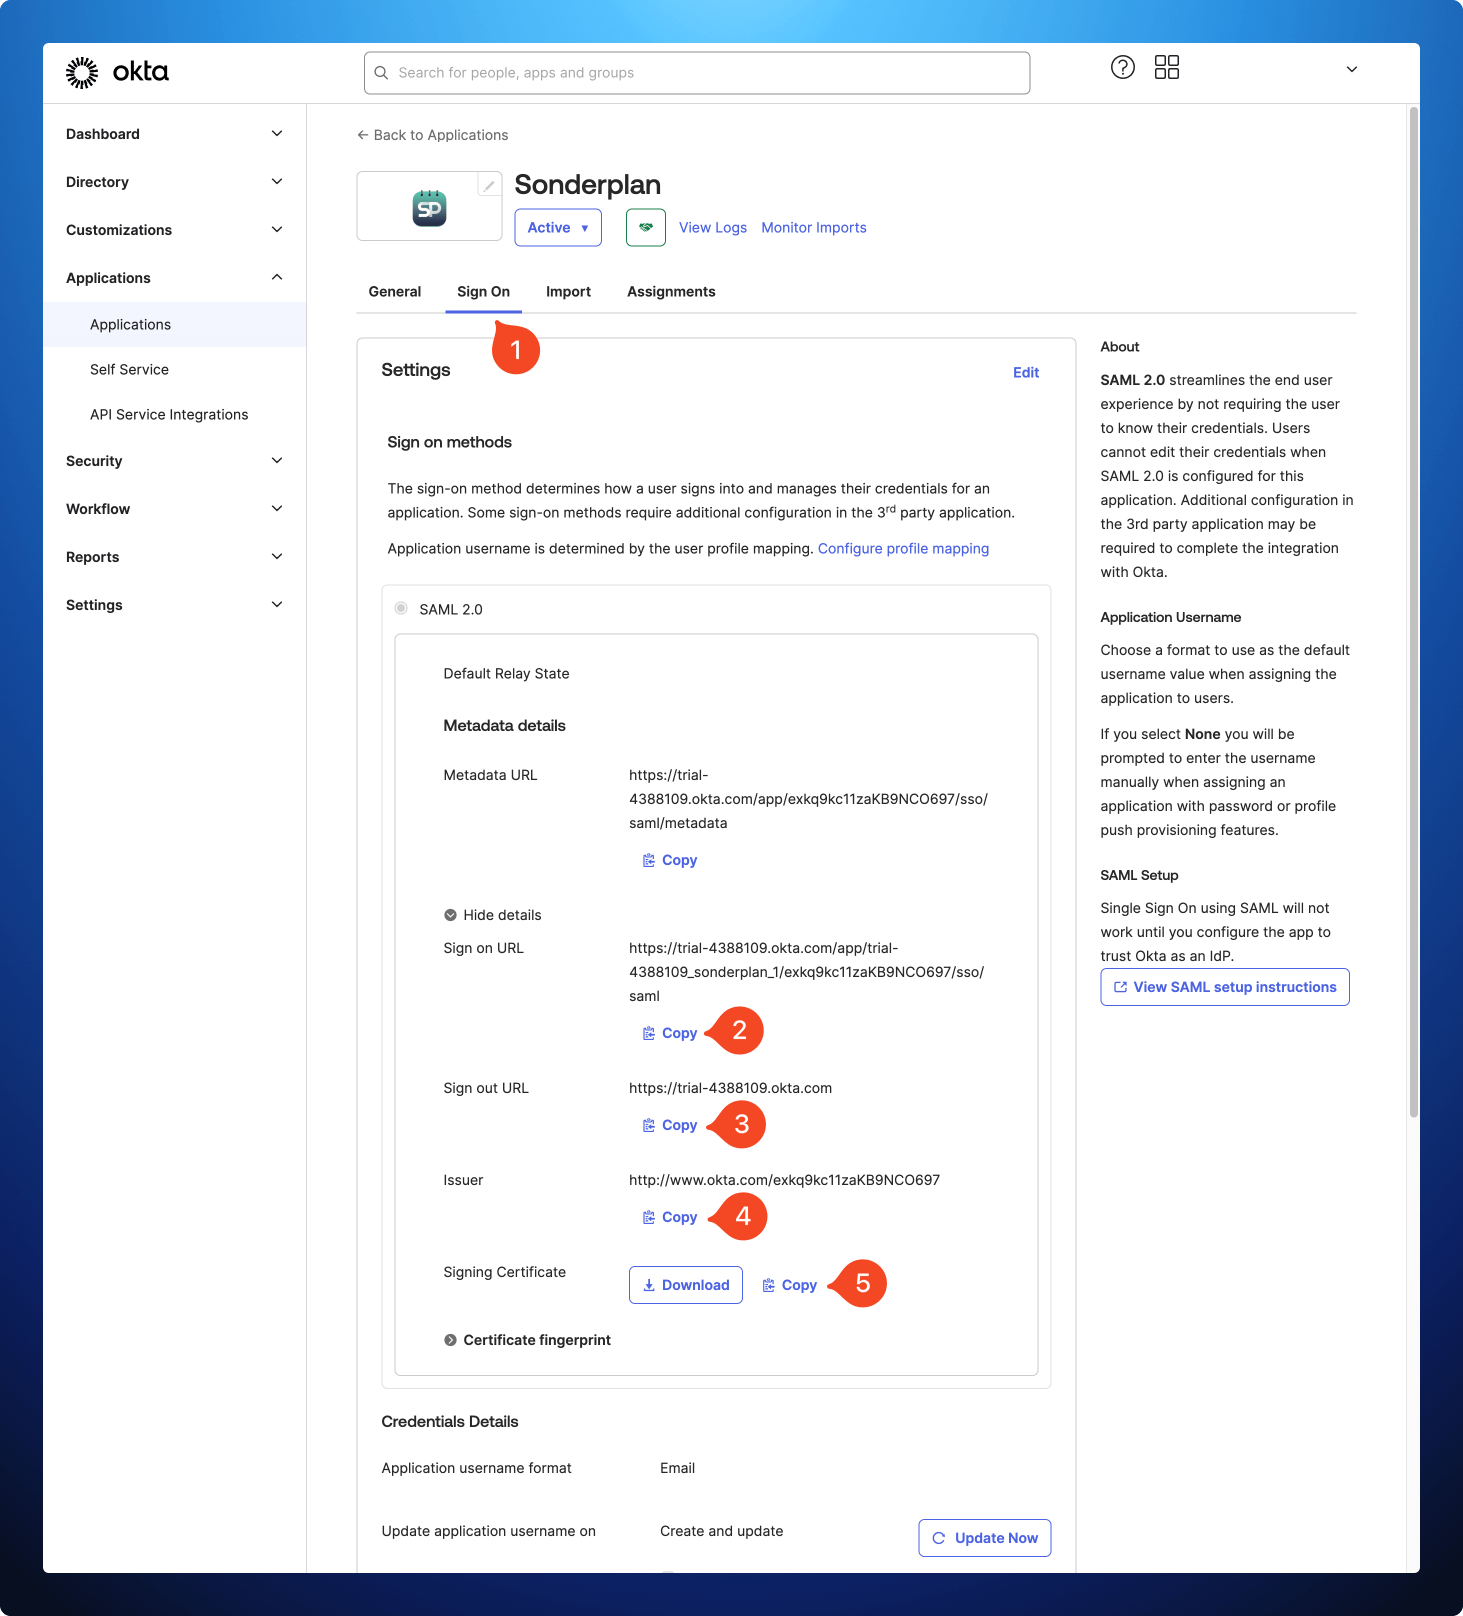 1. In the Okta Admin panel, click **Sign On** within the *Sonderplan*\* application and scroll down to the **SAML 2.0** section
2. Copy the **Sign on URL** from Okta to -> **Identity Provider Login URL / SSO Endpoint** in Sonderplan
3. Copy the **Sign out URL** from Okta to -> **Identity Provider Logout URL / SLO Endpoint** in Sonderplan
4. Copy the **Issuer** from Okta to -> **Identity Provider Entity ID / Issuer URL** in Sonderplan
5. Copy the **Signing Certificate** from Okta to -> **Identity Provider X.509 Certificate** in Sonderplan
6. Click **Save Changes** in the top right corner of Sonderplan
7. Finally, you'll need to configure [your users in Sonderplan for SSO](/admin/saml-sso-settings#configure-users-for-sso)
## Configure Users for SSO
Once you've correctly configured SAML, you'll need to enable SAML SSO Login for each of your users in **Admin -> Users & Groups -> User Editor -> SAML SSO Login**.
To prevent accidental account lockouts due to potential misconfiguration or Identity Provider outages, we recommend maintaining at least one Super Administrator account configured with the Standard Login method.
1. In the Okta Admin panel, click **Sign On** within the *Sonderplan*\* application and scroll down to the **SAML 2.0** section
2. Copy the **Sign on URL** from Okta to -> **Identity Provider Login URL / SSO Endpoint** in Sonderplan
3. Copy the **Sign out URL** from Okta to -> **Identity Provider Logout URL / SLO Endpoint** in Sonderplan
4. Copy the **Issuer** from Okta to -> **Identity Provider Entity ID / Issuer URL** in Sonderplan
5. Copy the **Signing Certificate** from Okta to -> **Identity Provider X.509 Certificate** in Sonderplan
6. Click **Save Changes** in the top right corner of Sonderplan
7. Finally, you'll need to configure [your users in Sonderplan for SSO](/admin/saml-sso-settings#configure-users-for-sso)
## Configure Users for SSO
Once you've correctly configured SAML, you'll need to enable SAML SSO Login for each of your users in **Admin -> Users & Groups -> User Editor -> SAML SSO Login**.
To prevent accidental account lockouts due to potential misconfiguration or Identity Provider outages, we recommend maintaining at least one Super Administrator account configured with the Standard Login method.