View Types
There are three schedule view types to suit different user preferences—whether you prefer a detailed timeline, a traditional calendar layout, or a grid format, each view displays the same bookings.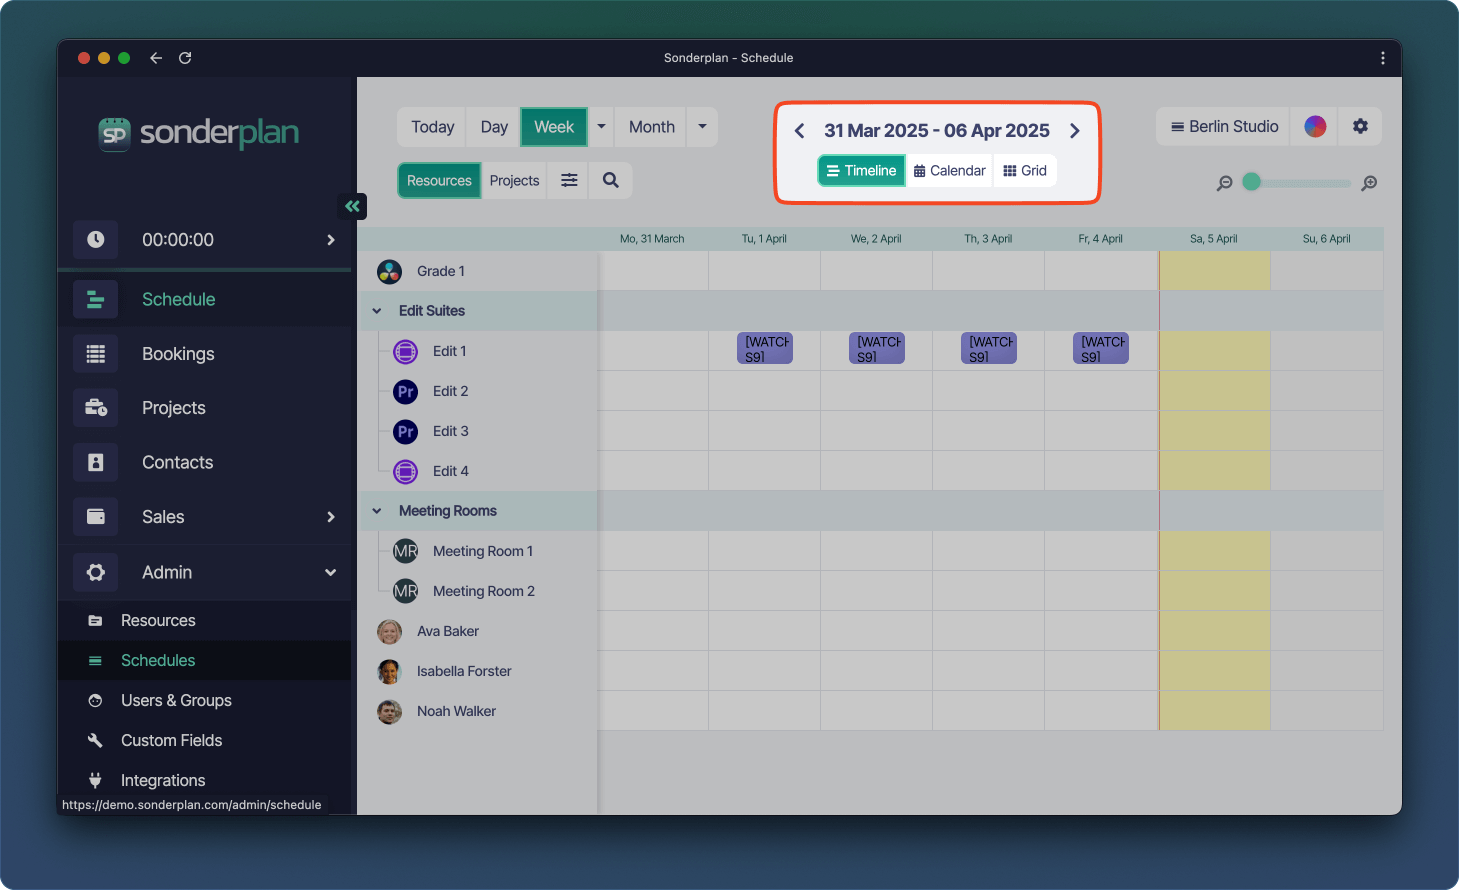
Timelines
The Timeline Schedule offers two distinct views to help you manage and organise your work more effectively: the Resources Timeline and the Project Timeline.Resource Timeline
This view displays all resources assigned to the currently loaded Workspace. Resources appear along the Y axis, while the selected time range is shown across the X axis.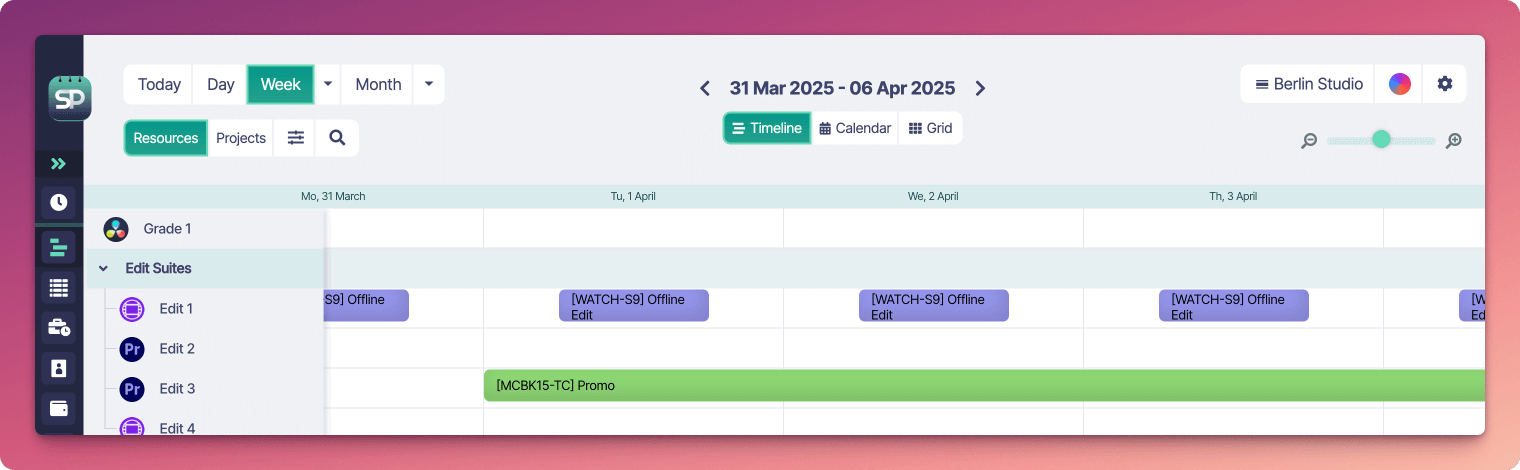
Project Timeline
This view displays all In Progress projects that you have access to. Projects appear along the Y Axis, while the selected time range is shown across the X axis.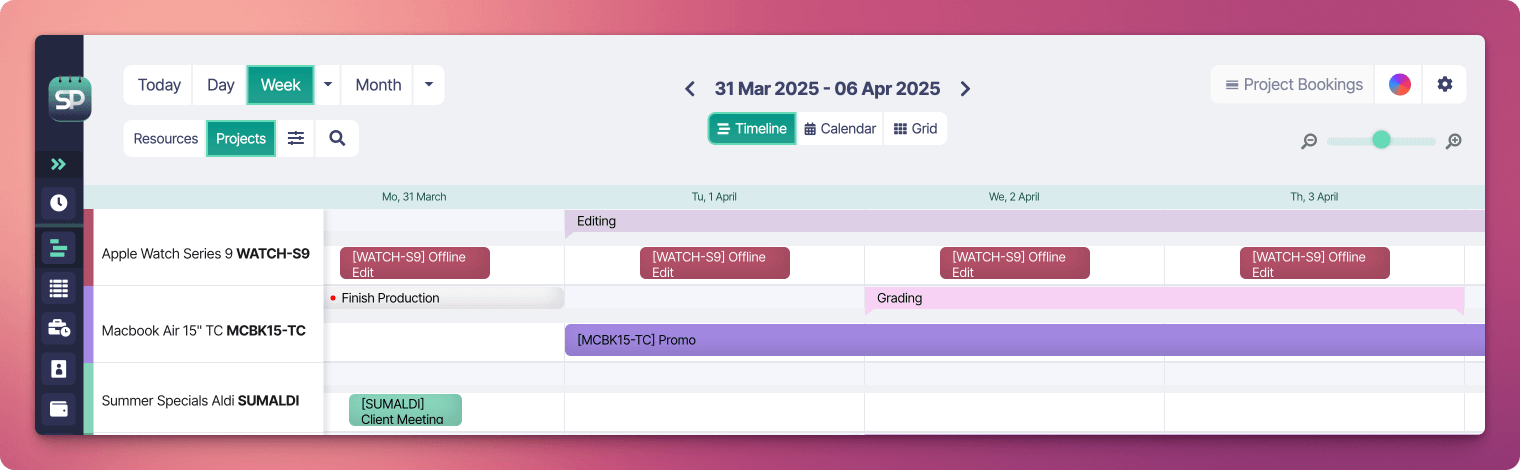
Calendar
While timeline views are typically favoured by experienced schedulers for their depth and clarity in resource and project allocation, calendar views offer a more familiar experience for users transitioning from tools like Google Calendar or Outlook. This makes them a great starting point for new users or those more comfortable with traditional calendar interfaces. The Calendar view offers multiple ways to visualise your schedule—Day, Week, and Month—each suited to different planning needs.Day / Week
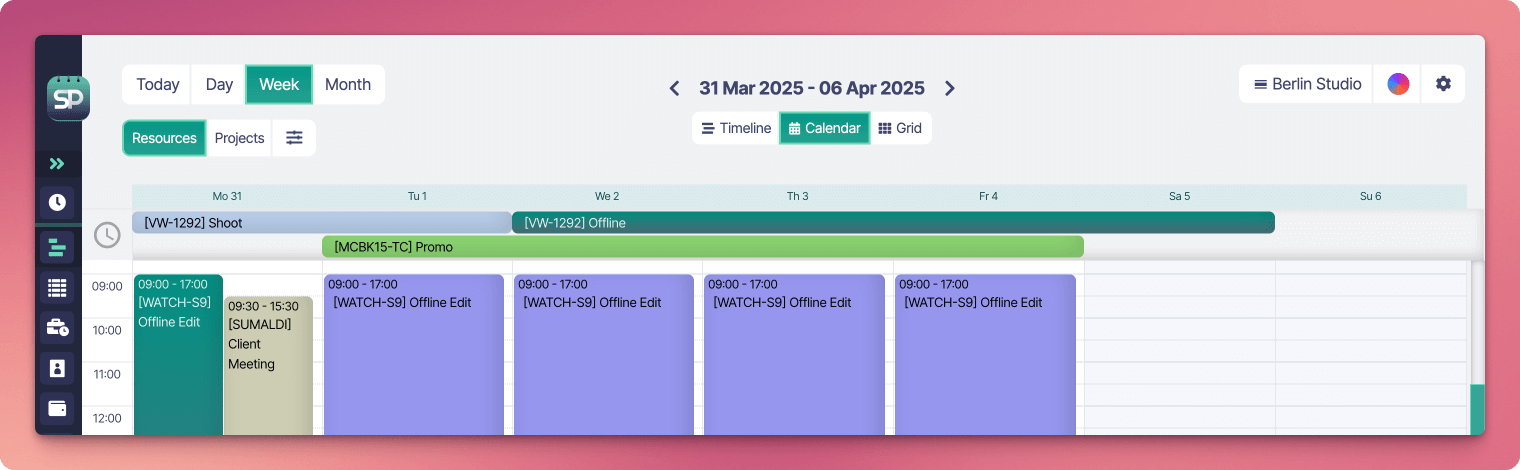
- Ideal for short-term planning and managing daily workloads.
- Bookings are displayed in a vertical format, showing precise start and end times.
- You can easily identify overlapping bookings, gaps in availability, and resource allocation throughout each day.
- The Week view helps visualise how your team or resources are distributed across a full working week.
Month
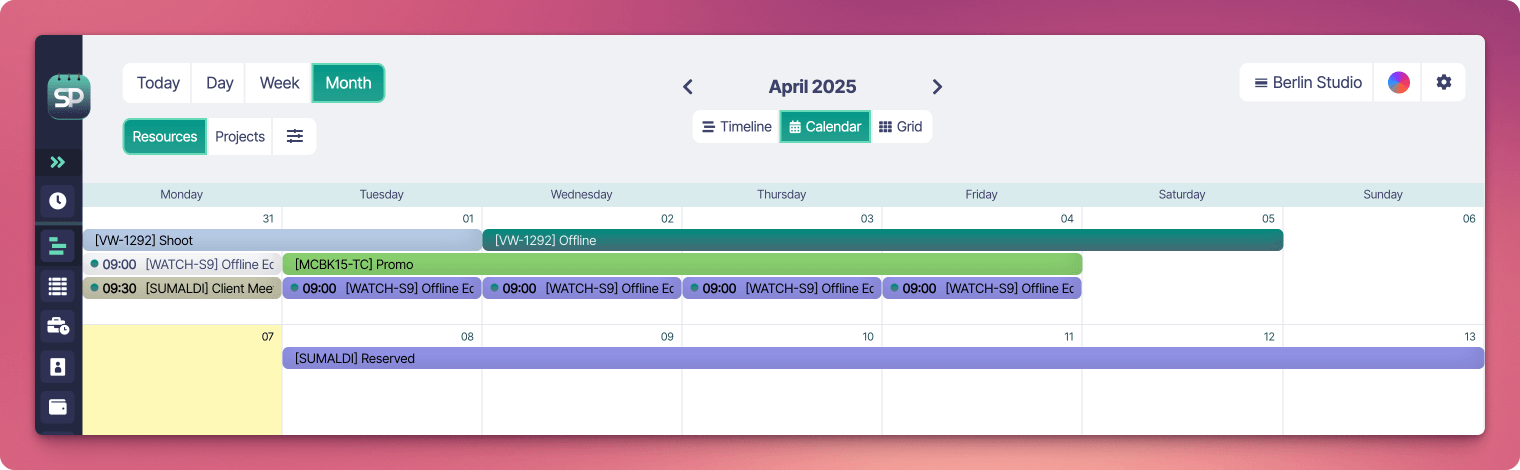
- Best for high-level planning and spotting long-term trends.
- Bookings are displayed as coloured blocks spanning each day, without showing exact hours.
- Helpful for identifying peak periods, long-term projects, and upcoming deadlines.
- Great for checking overall availability at a glance.
Grid
The Grid view presents your schedule in a table format, offering a clear, sortable list of all scheduled bookings within the selected time range.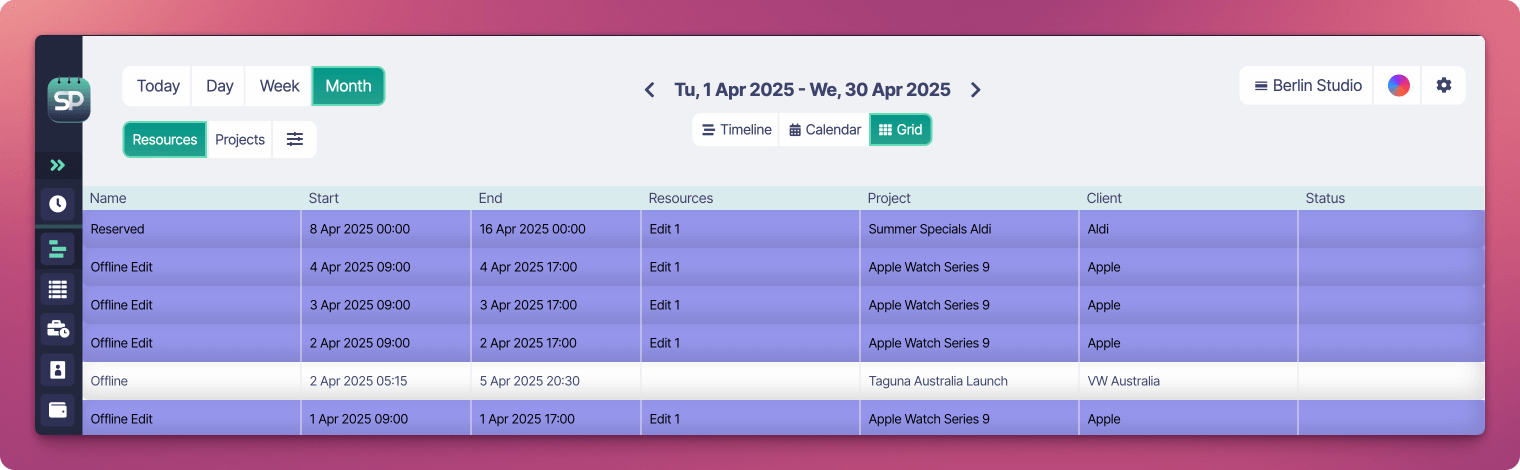
- Tabular Layout: Displays each booking as a row with columns for key details such as Name, Start and End times, Assigned Resources, Project, Client, and Status.
- Quick Overview: Ideal for users who prefer structured data or need to scan bookings quickly without a visual timeline.
- Sortable and Filterable: Easily sort or filter columns (e.g., by date, project, resource, or client) to find what you’re looking for faster.
- Consistent Across Views: The Grid reflects the same data shown in the Timeline and Calendar views, but in a compact, no-frills format.
Bookings Data Table
An alternative to the Grid view is the Bookings Table, which provides a more comprehensive and flexible way to manage your bookings. Unlike the Grid, which only displays bookings within a selected date range, the Bookings Table can show all bookings ever created, regardless of timeframe. It also features enhanced search and filtering tools, making it ideal for in-depth queries, audits, or historical reviews.Time Frames
The time frames available depend on the selected view type, and the additional time frames can be selected by clicking the arrow icons next to the Week and Month menus.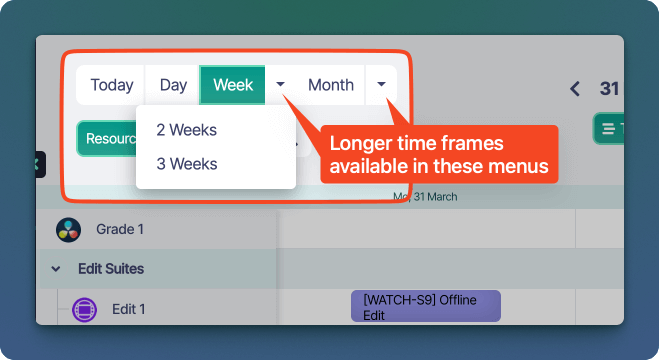
View / Time Frame Matrix
The table belows show the time frames available to each view type.Moving within the Date Range
To move forward or backwards within the current time frame, click on the left and right arrows on either side of the main Date Range Heading. You can also use the left ←← and right →→ arrows on your keyboard to move forward and backwards.Quick Date Select Calendar
Clicking on the current Date Range header displays a mini calendar that lets you quickly select the date you’d like to navigate to on the main Schedule.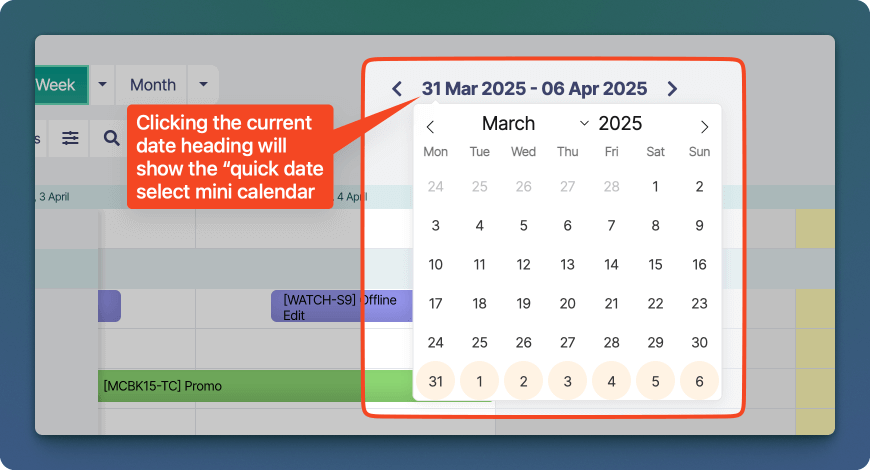
Schedule Workspaces
Workspaces are distinct environments within the Schedule where Administrators can organize and manage groups of Resources. Each Workspace represents a specific context—whether defined by either a physical location (like “Sydney Studio” or “New York”) or by a particular category of assets (such as “Cameras” or “Equipment”). Within each Workspace, Administrators can set view only or edit access permissions and Users with edit access to the Workspace can create, edit and delete bookings.Switching between Workspaces
To switch between workspaces, go to the top-right corner of the Schedule and click the icon. A menu will appear showing all the workspaces you have access to. Simply click on the name of a workspace to load it into the Schedule—this will replace the currently displayed resources with those from the selected workspace.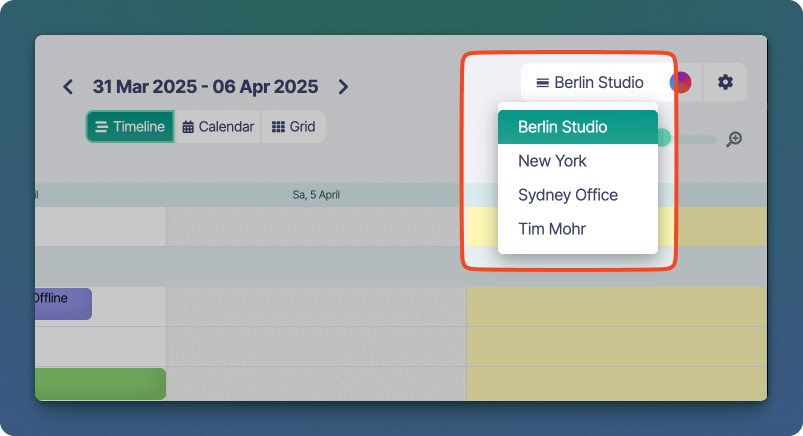
Additional Controls
Booking Colors
The colors of bookings on the Schedule can be switched between three modes, Resource, Project and Booking Status. To switch the color mode, click the “Color Wheel” icon in the top right of the Schedule, then select the preferred color mode.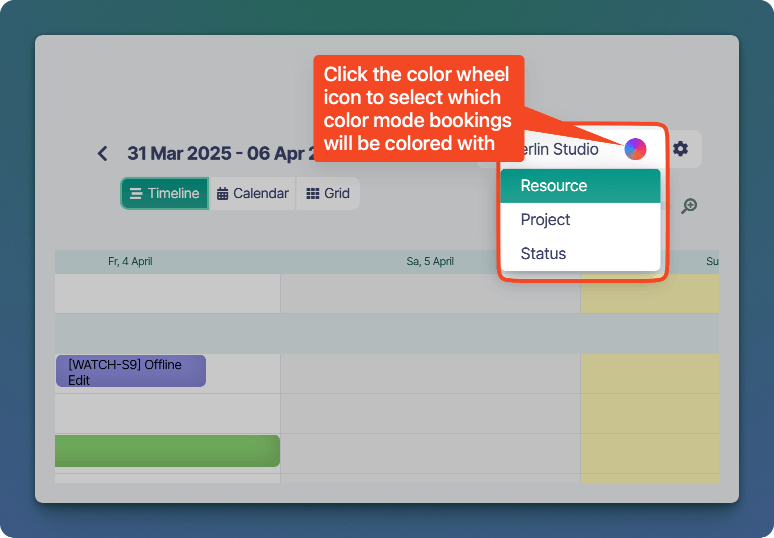
Zoom
You can use the zoom control on timeline views to expand the time range, making bookings appear larger and easier to view.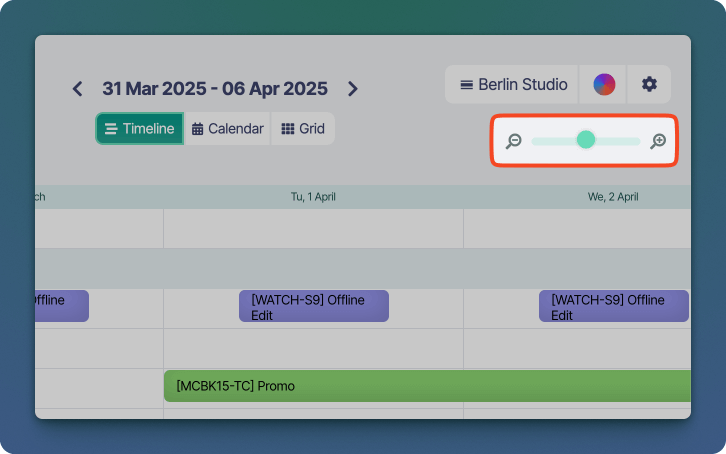
Booking Filter Sidebar
The Booking Filter Sidebar allows you to quickly narrow down the bookings shown on the Schedule by applying custom filters. You can access it by clicking the filter icon in the top-right corner of the Schedule interface.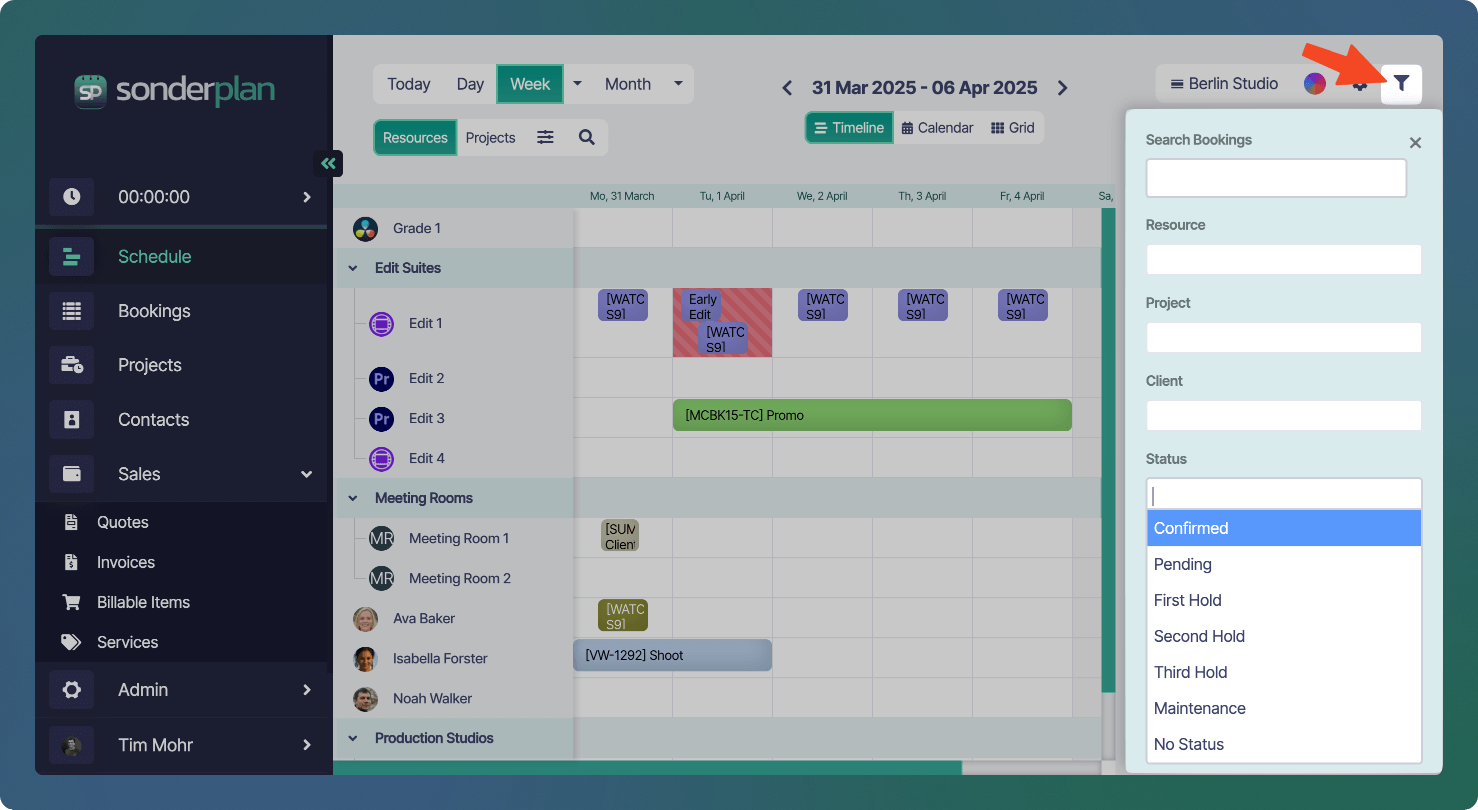
Filter Options:
- Search Bookings - Type in any keyword to search across all booking names.
- Resource - Filter bookings assigned to a specific resource.
- Project - Display only bookings linked to a particular project.
- Client - Show bookings associated with a specific client.
- Status - Show bookings assigned with one or more of your custom created Booking Statuses
Quick Row Filter
The Quick Row Filter is a quick search tool that lets you instantly filter the resources or projects displayed on the timeline. Located near the top of the Schedule view, the Quick Filter is a simple text input field. As you type, it dynamically filters the currently loaded resources or projects—hiding anything that doesn’t match your search term. The filtering happens in real time, allowing you to quickly narrow down the timeline view to just the items you’re interested in. This is especially useful in larger schedules where scrolling through long lists of resources or projects can be time-consuming. Use the Quick Filter to instantly zero in on what you need.User Preferences
The following settings only affect how the Schedule appears to you. They are saved locally on your device and automatically applied each time you open the Schedule.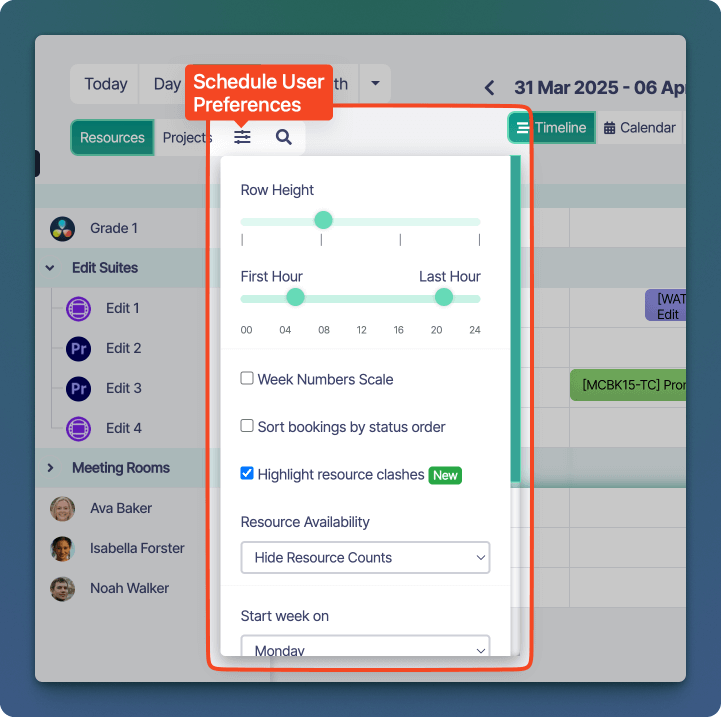
Row Height
The height of Resource and Project rows on timeline views can be set to one of four different sizes, (small, medium, large, extra large)First / Last Hour
Defines the earliest and latest hours displayed across all timeline and calendar views for each day in the Schedule. This setting is especially useful if your bookings typically fall within a consistent set of core hours. By hiding unused hours outside this range, it reduces white space and allows more space for booking labels, making the schedule easier to read and navigate.Week Numbers Scale
The Show Week Numbers Scale option, available in the timeline views, adds a week number row to the top of the schedule. This is particularly helpful for teams that plan or report using ISO week numbers, providing a clear reference point for long-term projects and scheduling alignment.Sort Bookings by Status Order
This setting applies to the timeline views and dictates the sorting order of bookings that have the same start date / times. By default, Sonderplan will display them in the order they were added, however you can override this behaviour and sort the bookings by the order of the associated booking status order. For example, if you use the custom booking statuses to show ‘holds’ (eg First Hold, Second Hold etc.) you can enable this option, to show the bookings in the order reflecting their hold priority.Highlight Resource Clashes
This setting applies to the resource timeline view and if enabled will show a red background around clashing resources. This is separate to the Global Schedule setting which enables / disables the clash warning displayed when saving a booking and clashes were detected.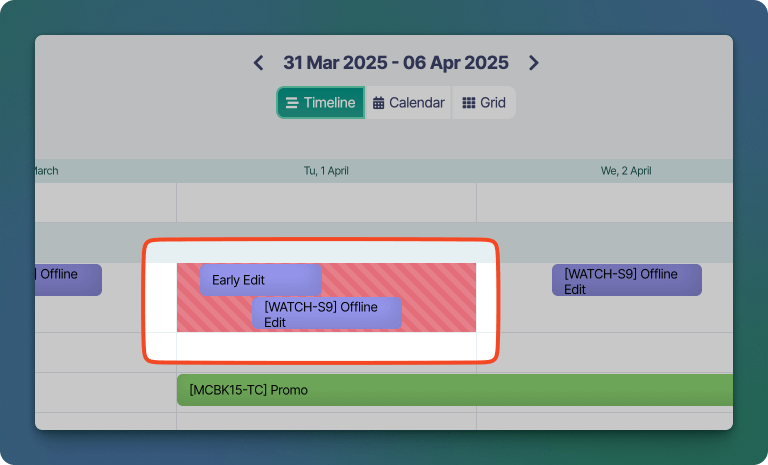
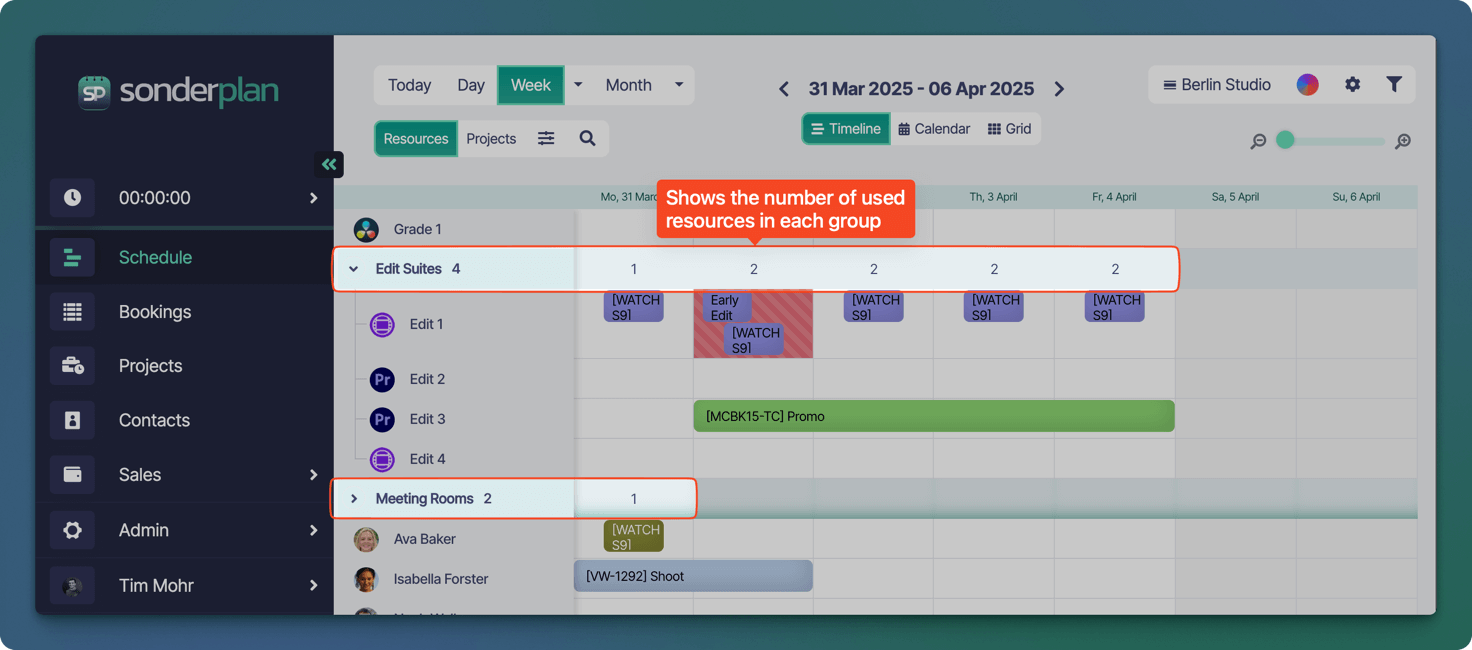
Resource Availability
This setting applies to the resource timeline view and includes three options: Hide Resource Counts, Show Available Resources, and Show Used Resources. When set to Show Available Resources, each resource group displays the number of available (unbooked) resources for each time period. This is useful for spotting availability at a glance and planning new bookings efficiently.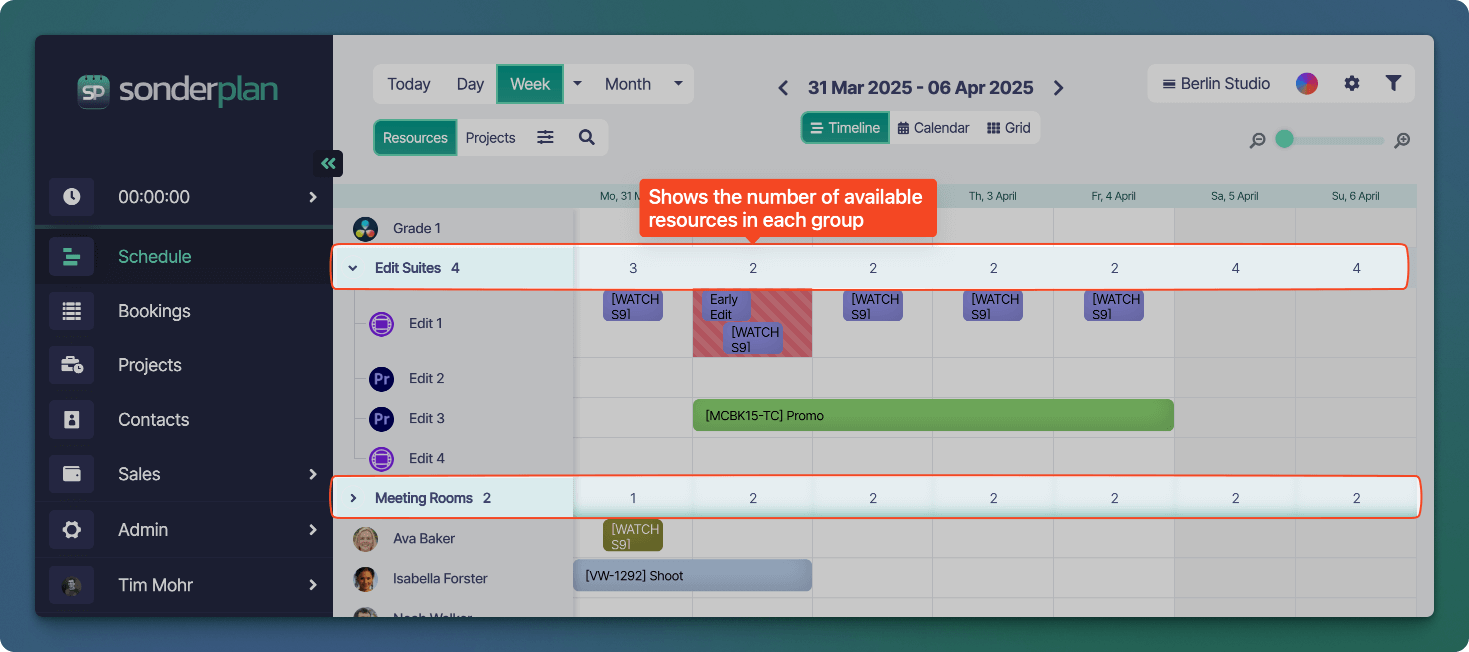
Start Week On
The Start Week On setting allows you to choose which day your schedule week begins on—either Sunday or Monday. This preference affects all week-based views (Timeline and Calendar) and helps align the schedule with your regions norms or personal planning habits.Time Snapping
The Time Snapping setting controls the granularity of the time intervals when creating, resizing, or moving bookings across all views in the Schedule. You can choose from the following snapping options: 5 min, 10 min, 15 min, 30 min, and 60 min. This setting determines how bookings “snap” to the nearest time increment on the timeline or calendar views. For example, if set to 15 min, a booking will align to 09:00, 09:15, 09:30, etc., when adjusted. Use smaller increments (e.g. 5 or 10 minutes) for more precise scheduling, or larger increments (e.g. 30 or 60 minutes) to simplify booking creation and reduce clutter in your schedule.Booking Drag Confirmation
When the Booking Drag Confirmation setting is enabled, a confirmation dialog appears before a booking is moved, extended, or shortened on the Schedule. This added step helps prevent accidental changes and ensures edits are intentional.Booking Label Format
The Booking Label Format setting lets you customise how booking labels appear by including details such as the booking name, linked resources, project, client, and status. This allows you to tailor labels to highlight the most relevant information at a glance.Quick Info Popover
The Quick Info window appears when you single-click a booking on the Schedule. It provides a compact summary of the booking and offers quick access to common actions. It contains the following information:- Booking Name - The title of the booking, shown at the top.
- Time & Date - Start and end time, along with the day of the booking.
- Resource - The name of the assigned resource (e.g. Edit Suite 1).
- Project & Client Info - Displays the linked project and client, including any tags or labels.
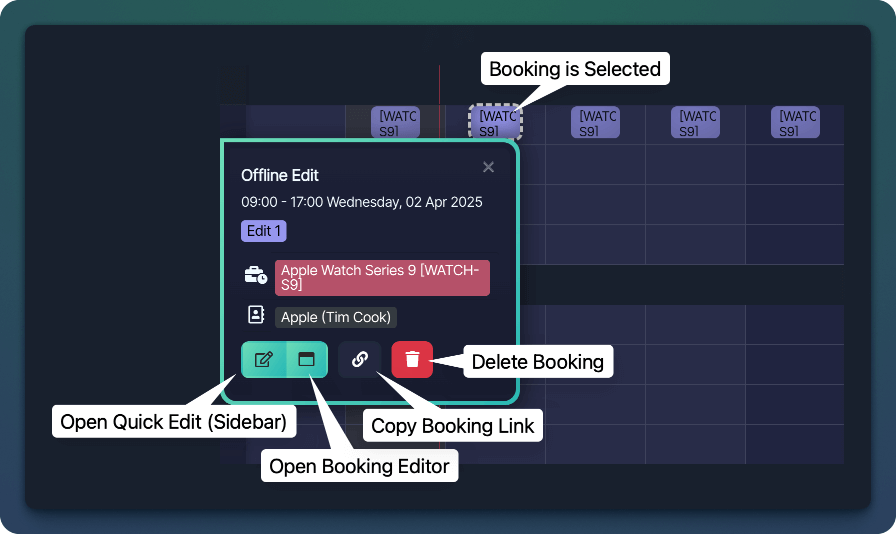
- Open Quick Edit (Sidebar) - Opens the booking in a quick-edit sidebar on the right-hand side, allowing for fast adjustments.
- Open Booking Editor - Launches the full booking editor for more detailed changes.
- Copy Booking Link - Copies a direct link to the booking—ideal for sharing with teammates.
- Delete Booking - Permanently removes the booking from the Schedule (confirmation required).
Learn More
We’ve covered the following topics in detailed guides.Create, Edit & Delete Bookings
Getting back to basics when working with bookings in Sonderplan.
Exporting Bookings
Export bookings to Excel, CSV, or clipboard for easy sharing and reporting.